

Introduction
To develop and host a Next.js application on Square Cloud, it’s essential to follow a structured sequence of configurations and prerequisites. This technical guide will cover the entire process, from initial setup to production deployment.Prerequisites
- Square Cloud Account: Register through the signup page using your email.
- Active plan: Ensures dedicated resources and optimized performance for your application. Check our available plans and choose the most suitable for your needs.
Create the project
You need Node.js 20.9 or later and npm on your machine. If you don’t have them, download them from the official Node.js website. Create a project with the official initializer:npm run dev and edit app/page.tsx (or app/page.js) to change the home page.
Build for production
next build writes the production build to the .next folder. Run it on your machine: TypeScript, ESLint and Tailwind CSS are devDependencies, which Square Cloud does not install.
Port and host
Nothing to change in Next.js:next start reads the PORT environment variable, which Square Cloud sets to 80, and listens on all network interfaces. Keep the default start script in your package.json:
package.json
Configure Square Cloud
Create asquarecloud.app file at the root of your project:
squarecloud.app
RUNTIME=nodejs selects the Node.js runtime without a MAIN file, and START runs next start. In the dashboard upload, set the same start command.
What goes in the ZIP
.next/, the production build (Square Cloud removes.next/cacheon upload, so you can leave it out).public/,package.jsonand yournext.config.*file.squarecloud.app.- Your source folders (
app/orpages/) are not read bynext start, but uploading them does no harm.
node_modules: Square Cloud installs your dependencies on the first start.
Deploy and verify
Via dashboard
1
Access the Upload Page
Access the upload page and upload your project zip file.
2
Configure Your Environment
After uploading your zip, you will need to configure the name, main file or runtime environment and other settings for your project.
If you are uploading a web project, make sure to select “Web Publication” and set a subdomain to your project.
If you are uploading a web project, make sure to select “Web Publication” and set a subdomain to your project.
3
Deploy Your Project
Finally, click on the “Deploy” button to host your project on Square Cloud.
After deployment, you can monitor your project’s status and logs from the dashboard.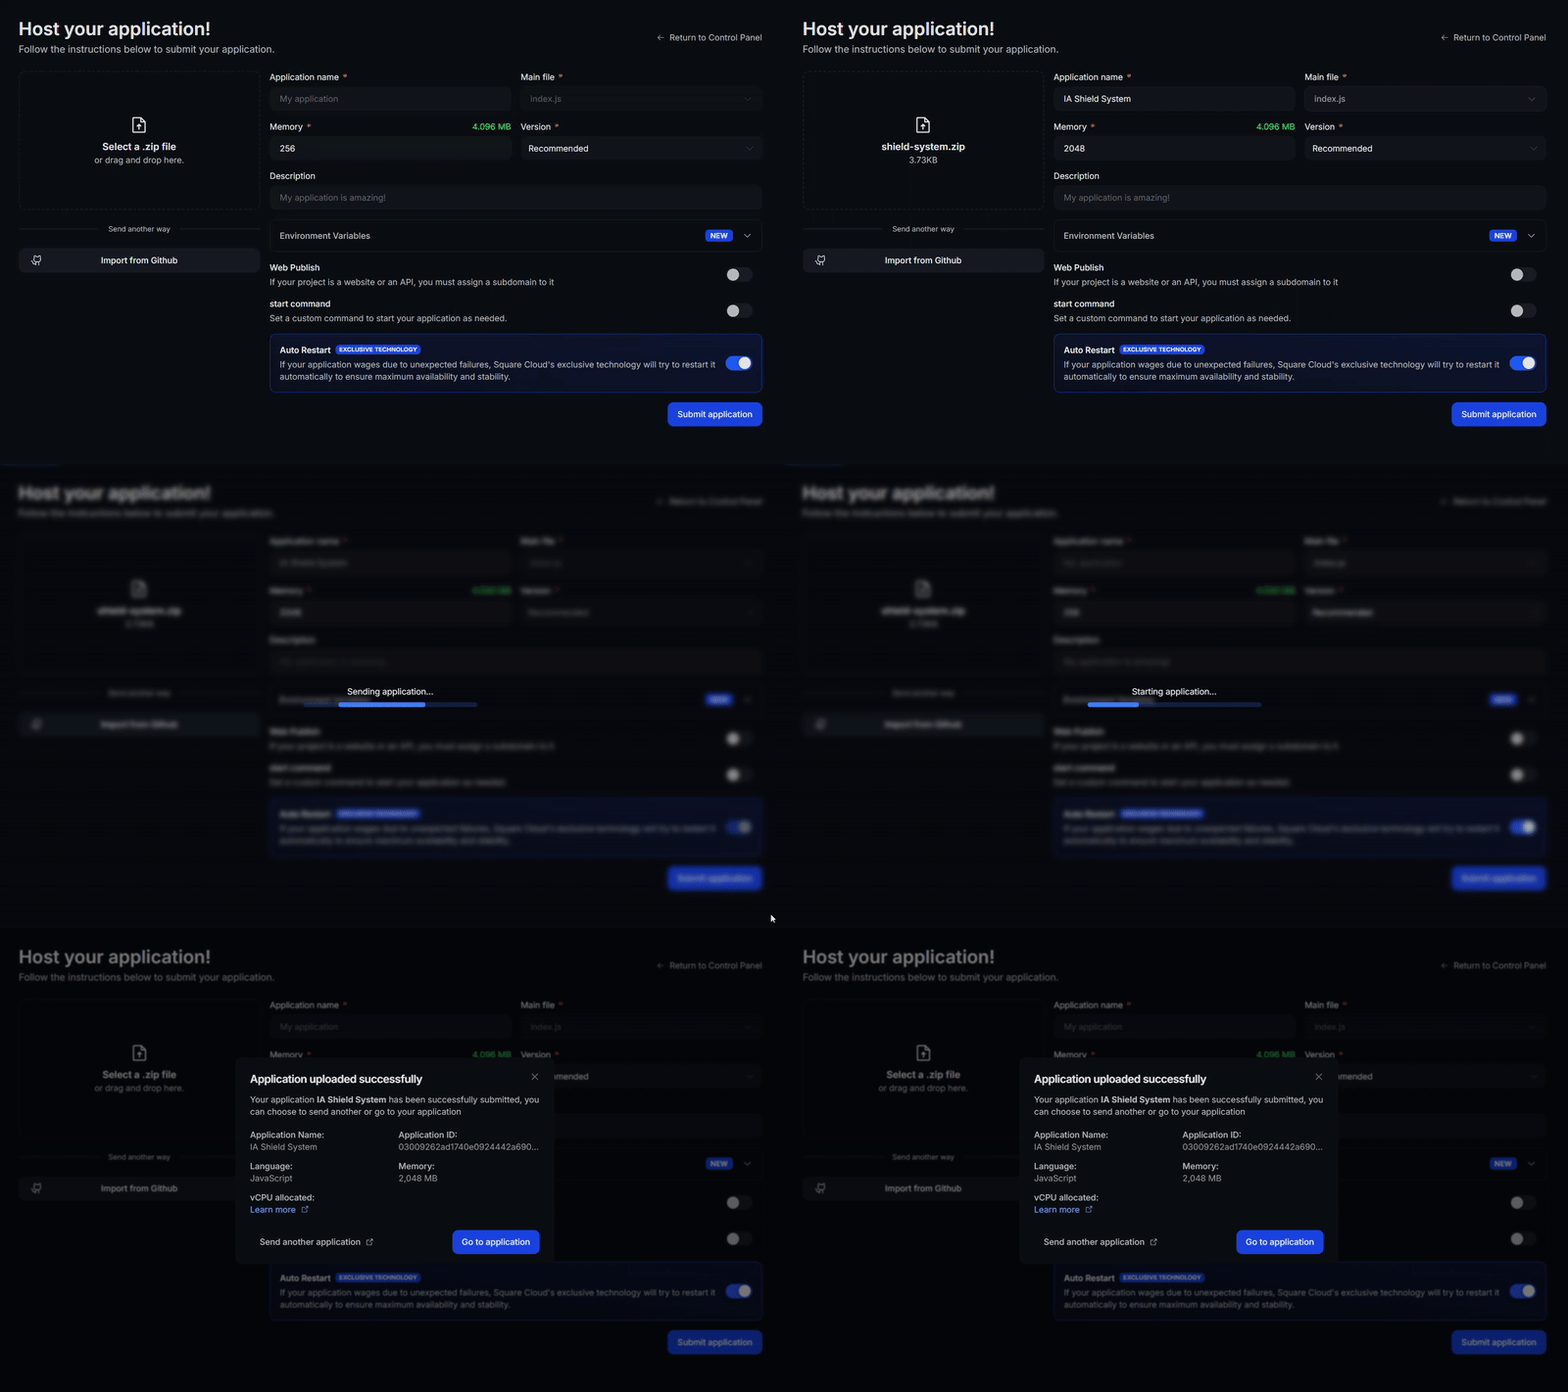
After deployment, you can monitor your project’s status and logs from the dashboard.
4
Confirm Your App Is Live
Your first deploy usually takes less than a minute. In the dashboard, wait for your application status to show as running and check the logs for any startup errors.
If you deployed a website or API, open
If you deployed a website or API, open
https://<your-subdomain>.squareweb.app in your browser: you should see your application responding. If you deployed a bot, send it a command to confirm it is online.
Via CLI
To use this method, your project needs a configuration file namedsquarecloud.app at its root. It tells Square Cloud how to run your application.
Configuration file guide
Learn how to create the
squarecloud.app configuration file that defines your application’s environment.1
Install the CLI
Install the Square Cloud CLI. If you already have it, run the same command to update it:
2
Log In
Run the command below. It opens your browser: approve the login there and the CLI is ready. There is no API key to copy. For scripts and CI, see CLI authentication.
3
Upload Your Project
From your project folder, run the command below. The CLI zips the current folder, leaving out what To upload a zip you created yourself, pass it with
squarecloud.ignore lists, and uploads it:--file:4
Confirm Your App Is Live
Your first deploy usually takes less than a minute. Check your application status and logs directly from the terminal:If you deployed a website or API, open
https://<your-subdomain>.squareweb.app in your browser: you should see your application responding. If you deployed a bot, send it a command to confirm it is online.
Common errors
Custom domain
To use a custom domain (e.g.,
mysite.com) instead of the default URL mysite.squareweb.app, you need the Standard plan or higher. The default URL comes from the SUBDOMAIN field in the configuration file. To connect your domain, follow how to set up your own domain.Minimum RAM requirements
Minimum: 512MB RAM for websites and APIs, enough for a static build on the static runtime. For apps that render pages on a server (Next.js, Nuxt, Angular SSR and similar), we recommend at least 1GB RAM. For larger applications, allocate more RAM to prevent the application from running out of memory and crashing.
Could not find this site.
Check if the subdomain/domain matches what’s configured in the SUBDOMAIN field or in the custom domain settings. If you just uploaded the site, wait up to 60 seconds for Square to enable first access.
Site took too long to respond…
Your server must listen on port 80 and host 0.0.0.0. Square Cloud sets the PORT (
80) and HOST (0.0.0.0) environment variables in your application: read them in your code instead of hardcoding other values. A server that listens only on localhost or 127.0.0.1 never receives requests.Could not find a production build
next start did not find the .next folder. Run npm run build before zipping and check that .next is in the ZIP.
Deploy on every push with GitHub Actions
The Square Cloud GitHub Action installs the CLI on the runner, so a workflow can build your app and send it to Square Cloud. Save an API key as the repository secretSQUARECLOUD_API_KEY and your application ID as the repository variable SQUARECLOUD_APP_ID, then add .github/workflows/deploy.yml:
.github/workflows/deploy.yml
squarecloud commit sends the folder, including the fresh .next build, to your application, and --restart restarts it so the new build goes live. Add .next/cache to a squarecloud.ignore file to keep the upload small. For more options, see deploying with GitHub Actions.
Next steps
Environment variables
Keep secrets and settings out of your code and read them at runtime.
Custom domain
Serve your app on your own domain, on the Standard plan and above.
Troubleshooting
Fix an app that does not start or a site that does not respond.