

dotnet run.
Before you begin
- The .NET SDK on your machine. If you don’t have it, download it from the official .NET website.
- A Square Cloud account: sign up with your email or GitHub.
- An active plan. See the plans and pick the one that fits your project.
Configure Square Cloud
If you upload your application through the dashboard, you can skip this section: the dashboard creates the
squarecloud.app configuration file for you.Configuration file reference
The
squarecloud.app file tells Square Cloud how to run your application: its main file, memory, runtime version, name and, for a website, its subdomain.MAIN to your project file. A complete configuration file for each kind of app:
- Bot or worker
- Website or API
squarecloud.app
What Square Cloud runs
- If the
STARTfield is not defined in the configuration file, Square Cloud runsdotnet restoreto restore the project dependencies, thendotnet run --project MAINto compile and run the project specified inMAIN. If theSTARTfield is defined, the value in it will be executed directly. For more information about configuration file parameters, visit configuration parameters.
Port and host for websites and APIs
ASP.NET Core does not listen on port 80 by default, anddotnet run applies the URLs of Properties/launchSettings.json, which point to localhost. Set the address in Program.cs instead: Square Cloud sets the PORT environment variable to 80, and 0.0.0.0 accepts connections from outside the container.
Program.cs
Prepare the project
Required files
squarecloud.app, at the root of the ZIP.- Your project file (
.csproj) and source code.
If the
.csproj file is inside a folder, keep the configuration file at the root of the zip and set MAIN to its path, for example MAIN=folder/file.csproj. The default command first runs dotnet restore at the root, which needs a project or solution file there; if the root has neither, set START=dotnet run --project folder/file.csproj.What to leave out
bin/andobj/: build output thatdotnet runcreates again on the server.
Troubleshooting
The site does not respond
The site does not respond
The app listens on another port or only on
localhost. Set the address with app.Run($"http://0.0.0.0:{port}") as shown in Port and host.MSB1003: Specify a project or solution file
MSB1003: Specify a project or solution file
dotnet restore found no project or solution file at the root of the ZIP. Move the .csproj to the root, or set START=dotnet run --project folder/file.csproj.Deploy
Via dashboard
1
Access the Upload Page
Access the upload page and upload your project zip file.
2
Configure Your Environment
After uploading your zip, you will need to configure the name, main file or runtime environment and other settings for your project.
If you are uploading a web project, make sure to select “Web Publication” and set a subdomain to your project.
If you are uploading a web project, make sure to select “Web Publication” and set a subdomain to your project.
3
Deploy Your Project
Finally, click on the “Deploy” button to host your project on Square Cloud.
After deployment, you can monitor your project’s status and logs from the dashboard.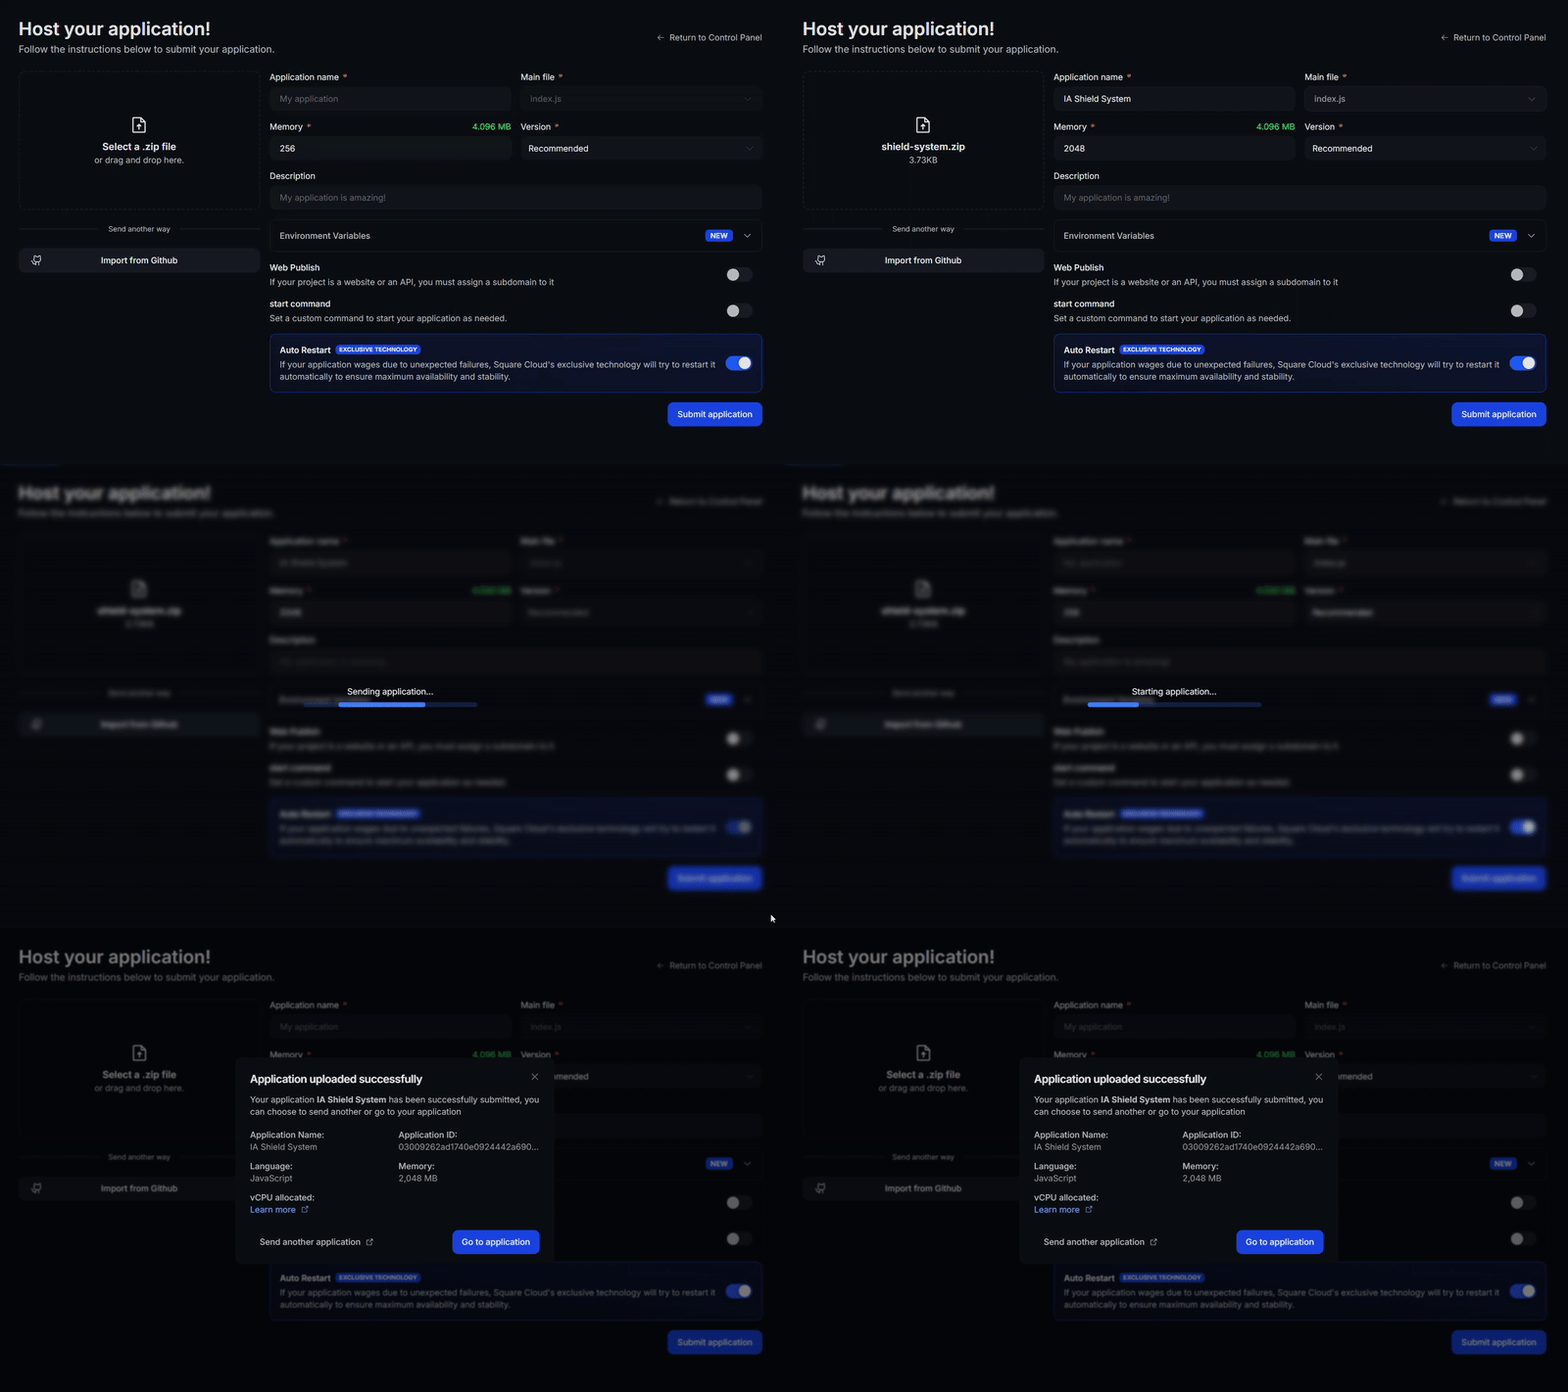
After deployment, you can monitor your project’s status and logs from the dashboard.
4
Confirm Your App Is Live
Your first deploy usually takes less than a minute. In the dashboard, wait for your application status to show as running and check the logs for any startup errors.
If you deployed a website or API, open
If you deployed a website or API, open
https://<your-subdomain>.squareweb.app in your browser: you should see your application responding. If you deployed a bot, send it a command to confirm it is online.
Via CLI
To use this method, your project needs a configuration file namedsquarecloud.app at its root. It tells Square Cloud how to run your application.
Configuration file guide
Learn how to create the
squarecloud.app configuration file that defines your application’s environment.1
Install the CLI
Install the Square Cloud CLI. If you already have it, run the same command to update it:
2
Log In
Run the command below. It opens your browser: approve the login there and the CLI is ready. There is no API key to copy. For scripts and CI, see CLI authentication.
3
Upload Your Project
From your project folder, run the command below. The CLI zips the current folder, leaving out what To upload a zip you created yourself, pass it with
squarecloud.ignore lists, and uploads it:--file:4
Confirm Your App Is Live
Your first deploy usually takes less than a minute. Check your application status and logs directly from the terminal:If you deployed a website or API, open
https://<your-subdomain>.squareweb.app in your browser: you should see your application responding. If you deployed a bot, send it a command to confirm it is online.
Next steps
Environment variables
Keep secrets and settings out of your code and read them at runtime.
Custom domain
Serve your app on your own domain, on the Standard plan and above.
Troubleshooting
Fix an app that does not start or a site that does not respond.