

跳转到主要内容

简介

要在 Square Cloud 上开发和托管 ,遵循一套结构化的配置和前置条件流程至关重要。本技术指南将涵盖整个过程,从初始设置到生产环境部署。

前置条件

  • Square Cloud 账户:通过注册页面使用你的邮箱进行注册。
  • 有效的付费套餐:为你的应用提供专属资源和优化的性能。查看我们可用的套餐,选择最适合你需求的方案。

创建项目

身份验证和机器人操作需要一个有效的 X (Twitter) 账户。如果你还没有账户,请在 X 官方网站 注册。
访问 API 还需要一个 X 开发者账户。请通过 X 开发者门户 申请访问权限。

在 X 上创建机器人应用

1

访问开发者门户

  1. 前往 X 开发者门户
  2. 使用你的 X (Twitter) 账户登录。
  3. 如果这是你第一次使用,请完成开发者访问申请流程。
2

创建项目

  1. 在控制面板中,点击 “Create Project”。
  2. 为你的项目选择一个名称(例如 “Square Cloud Bot”)。
  3. 选择最合适的用例(例如 “Making a bot”)。
  4. 提供机器人的详细描述。
  5. 确认创建项目。
3

设置应用

  1. 在已创建的项目中,点击 “Create App”。
  2. 为你的应用定义一个唯一的名称。
  3. 确认创建应用。
  4. 记下生成的 App ID 以备后续参考。
4

生成 API 密钥

  1. 导航到应用的 “Keys and tokens” 部分。
  2. 在 “Consumer Keys” 部分,点击 “Regenerate” 以生成:
    • API Key (Consumer Key)
    • API Secret Key (Consumer Secret)
  3. 重要:请立即复制并保存这些密钥,因为你将无法再次查看它们。
5

配置权限

  1. 前往 “App permissions” 部分。
  2. 点击 “Edit” 以修改权限。
  3. 选择 “Read and write” 以允许你的机器人发布推文。
  4. 如有必要,选择 “Read and write and Direct message” 以启用私信功能。
  5. 保存更改。
6

生成访问令牌

  1. 返回 “Keys and tokens” 部分。
  2. 在 “Access Token and Secret” 部分,点击 “Generate”。
  3. 确认生成令牌。
  4. 复制并保存:
    • Access Token
    • Access Token Secret
  5. 警告:关闭页面后,这些令牌将无法再次查看。
7

验证凭据

  1. 确认你拥有全部 4 个所需凭据:
    • API Key (Consumer Key)
    • API Secret Key (Consumer Secret)
    • Access Token
    • Access Token Secret
  2. 将这些凭据存储在安全的位置
  3. 重要:切勿公开分享或暴露这些凭据

开发项目

  1. Node.js 检查:确认你的系统已安装 Node.js。如果没有,请从 Node.js 官方网站 下载。
  2. 项目初始化:运行以下命令创建一个新的 Node.js 项目:
Terminal
npm init -y
  1. 安装依赖:安装机器人所需的库:
Terminal
npm install twitter-api-v2
  1. 设置环境变量:创建一个 .env 文件以安全地存储你的凭据:
.env
API_KEY=your_api_key_here
API_SECRET_KEY=your_api_secret_key_here
ACCESS_TOKEN=your_access_token_here
ACCESS_TOKEN_SECRET=your_access_token_secret_here
  1. 创建主文件:编写包含机器人基础结构的 index.js 文件:
index.js
// Import necessary modules
const { TwitterApi } = require('twitter-api-v2');

// Configure Twitter client with authentication
const client = new TwitterApi({
  appKey: process.env.API_KEY,
  appSecret: process.env.API_SECRET_KEY,
  accessToken: process.env.ACCESS_TOKEN,
  accessSecret: process.env.ACCESS_TOKEN_SECRET,
});

// Client with read and write permissions
const rwClient = client.readWrite;

// Stores the authenticated bot user id (set in verifyBot)
let botUserId = null;

// Function to check if the bot is working
async function verifyBot() {
  try {
    // Get authenticated user information (X API v2)
    const me = await rwClient.v2.me();
    botUserId = me.data.id;
    console.log(`Bot successfully initialized! User: @${me.data.username}`);
    return true;
  } catch (error) {
    console.error('Error verifying bot:', error);
    return false;
  }
}

// Function to post a tweet
async function postTweet(text) {
  try {
    const tweet = await rwClient.v2.tweet(text);
    console.log(`Tweet posted successfully! ID: ${tweet.data.id}`);
    return tweet;
  } catch (error) {
    console.error('Error posting tweet:', error);
    throw error;
  }
}

// Function to respond to mentions
async function respondToMentions() {
  if (!botUserId) return;
  try {
    // Fetch recent mentions (X API v2)
    const mentions = await rwClient.v2.userMentionTimeline(botUserId, {
      max_results: 10,
    });

    for (const tweet of mentions.data?.data ?? []) {
      // Check if it's a new mention (implement control logic)
      if (tweet.text.includes('!ping')) {
        // Reply to the mention
        await rwClient.v2.reply(
          'Pong! 🤖 X Bot working correctly!',
          tweet.id
        );
        console.log(`Replied to mention (tweet ID: ${tweet.id})`);
      }
    }
  } catch (error) {
    console.error('Error processing mentions:', error);
  }
}

// Function to search and interact with specific tweets
async function searchAndInteract(query) {
  if (!botUserId) return;
  try {
    // Search recent tweets (X API v2)
    const tweets = await rwClient.v2.search(query, {
      max_results: 10,
    });

    for (const tweet of tweets.data?.data ?? []) {
      // Like the tweet
      await rwClient.v2.like(botUserId, tweet.id);
      console.log(`Liked tweet ID: ${tweet.id}`);

      // Wait a bit between actions to avoid rate limiting
      await new Promise(resolve => setTimeout(resolve, 2000));
    }
  } catch (error) {
    console.error('Error searching and interacting:', error);
  }
}

// Main bot function
async function runBot() {
  console.log('Starting X bot...');
  
  // Check if the bot is configured correctly
  const botOk = await verifyBot();
  if (!botOk) {
    console.error('Bot initialization failed');
    return;
  }
  
  // Example: Post an initialization tweet
  try {
    await postTweet('🤖 X Bot initialized and running on Square Cloud!');
  } catch (error) {
    console.log('Initialization tweet failed, but bot continues running');
  }
  
  // Main bot loop
  setInterval(async () => {
    try {
      // Check and respond to mentions every 5 minutes
      await respondToMentions();
      
      // Example: Search and interact with tweets about a specific topic
      // await searchAndInteract('#SquareCloud');
      
    } catch (error) {
      console.error('Error in main loop:', error);
    }
  }, 5 * 60 * 1000); // 5 minutes
  
  console.log('Bot running. Press Ctrl+C to stop.');
}

// Signal handling for graceful shutdown
process.on('SIGINT', () => {
  console.log('\nShutting down X bot...');
  process.exit(0);
});

process.on('SIGTERM', () => {
  console.log('\nShutting down X bot...');
  process.exit(0);
});

// Initialize the bot
runBot();

部署

准备好项目文件后,你现在可以将它们上传到 Square Cloud 并托管你的项目。 为此,请创建一个包含所有项目文件的 ZIP 文件。
安全提示:切勿将 API 凭据直接写入代码中。始终在 Square Cloud 上使用环境变量。
在 Square Cloud 上,通过控制面板配置以下环境变量:
  • API_KEY:你的 X API 密钥
  • API_SECRET_KEY:你的 X API 密钥密文
  • ACCESS_TOKEN:你的访问令牌
  • ACCESS_TOKEN_SECRET:你的访问令牌密文

通过控制面板

1

访问上传页面

访问上传页面并上传你的项目 zip 文件。
2

配置你的环境

上传 zip 后,你需要为项目配置名称、主文件或运行时环境以及其他设置。
如果你上传的是 Web 项目,请务必选择 “Web Publication” 并为项目设置子域名。
3

部署你的项目

最后,点击 “Deploy” 按钮,即可将项目托管到 Square Cloud。
部署完成后,你可以在控制面板中监控项目的状态和日志。
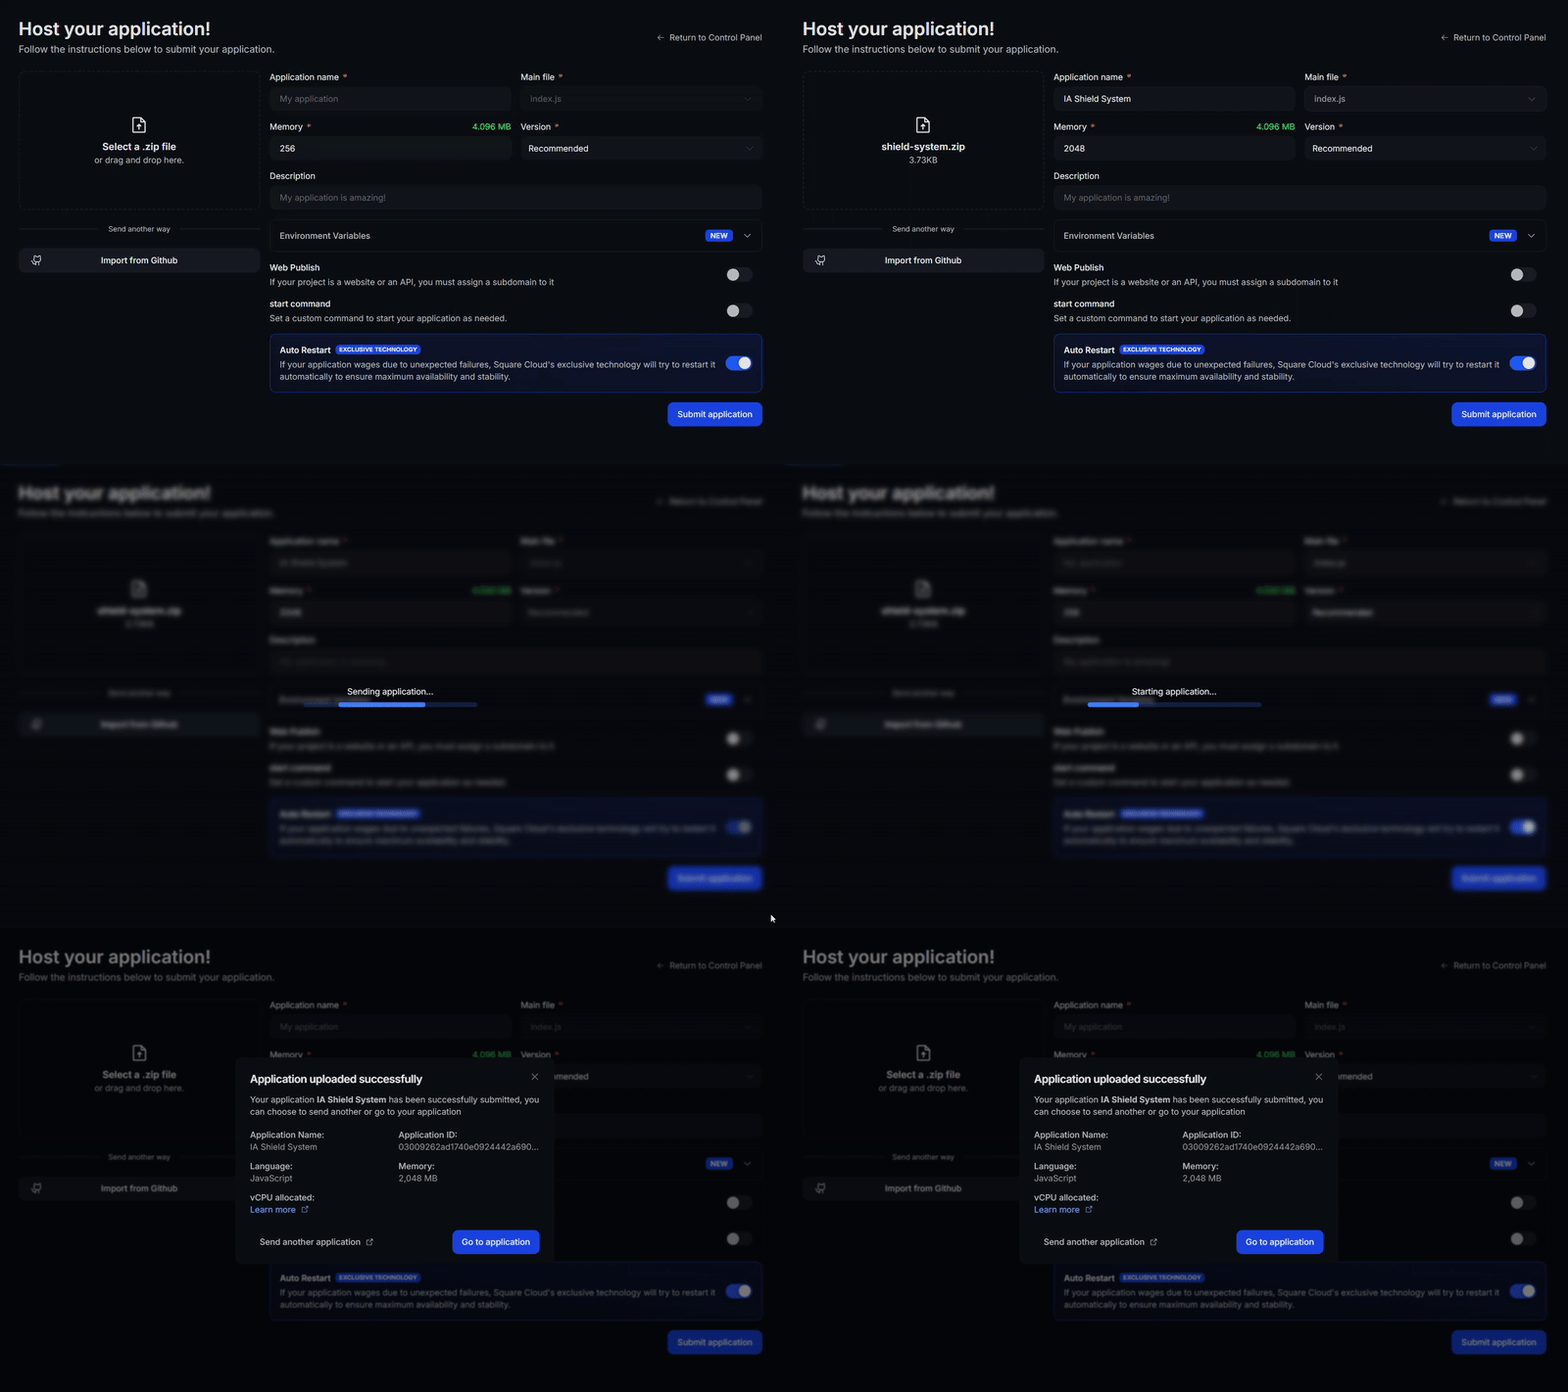
正在上传应用到 Square Cloud

通过 CLI

要使用此方法,你需要在项目根目录中创建一个名为 squarecloud.app 的配置文件。该文件将包含项目所需的配置。

了解更多:如何为 Square Cloud 创建配置文件。

squarecloud.app 文件是一个配置文件,用于配置你的应用;它将用于定义你的环境。
1

安装 CLI

首先,你的环境中需要已安装 CLI。如果尚未安装,请在终端中运行以下命令:
npm install -g @squarecloud/cli
如果你已经安装,我们建议对其进行更新。为此,请在终端中运行以下命令:
squarecloud update
2

进行身份验证

现在,要进行身份验证并使用其他 CLI 命令,你可以在此处点击 “Request API Key” 找到你的授权密钥。获取授权密钥后,运行以下命令:
squarecloud auth login
3

上传你的项目

最后,要使用 CLI 将应用部署到 Square Cloud,你需要运行以下命令:
squarecloud upload 
或者,如果你手动创建了 zip 文件,可以使用:
squarecloud upload --file <path/to/zip> 

更多资源

要深入了解使用 twitter-api-v2 开发 X 机器人,请查阅 twitter-api-v2 官方库文档。该文档提供了详细的指南、进阶教程以及完整的 API 参考,以最大化你的实现潜力。 另请参阅:

话题标签监控

// Function to monitor specific hashtags
async function monitorHashtags(hashtags) {
  for (const hashtag of hashtags) {
    try {
      const tweets = await rwClient.v2.search(`#${hashtag}`, {
        max_results: 10,
      });

      // Process found tweets
      for (const tweet of tweets.data?.data ?? []) {
        console.log(`Tweet found with #${hashtag}: ${tweet.text}`);
        // Implement interaction logic
      }
    } catch (error) {
      console.error(`Error monitoring #${hashtag}:`, error);
    }
  }
}

定时发布

// Function to schedule posts
function schedulePost(text, delay) {
  setTimeout(async () => {
    try {
      await postTweet(text);
      console.log('Scheduled post published successfully!');
    } catch (error) {
      console.error('Error publishing scheduled post:', error);
    }
  }, delay);
}

// Example: Schedule a post for 1 hour
schedulePost('🤖 Scheduled post by the bot!', 60 * 60 * 1000);

速率限制

X (Twitter) 有严格的速率限制。请实现相应的控制以避免超出这些限制:
// Rate limiting control
const rateLimiter = {
  lastRequest: 0,
  minInterval: 1000, // 1 second between requests
  
  async wait() {
    const now = Date.now();
    const timeSinceLastRequest = now - this.lastRequest;
    
    if (timeSinceLastRequest < this.minInterval) {
      const waitTime = this.minInterval - timeSinceLastRequest;
      await new Promise(resolve => setTimeout(resolve, waitTime));
    }
    
    this.lastRequest = Date.now();
  }
};

错误处理

// Helper function to retry an operation on failure
async function retryOperation(operation, maxRetries = 3) {
  for (let i = 0; i < maxRetries; i++) {
    try {
      return await operation();
    } catch (error) {
      console.error(`Attempt ${i + 1} failed:`, error.message);
      
      if (i === maxRetries - 1) {
        throw error;
      }
      
      // Wait before retrying
      await new Promise(resolve => setTimeout(resolve, 2000 * (i + 1)));
    }
  }
}

联系我们

如果你仍然遇到技术问题,我们的专业支持团队可以为你提供帮助。联系我们,我们很乐意协助你解决任何问题。