> ## Documentation Index
> Fetch the complete documentation index at: https://docs.squarecloud.app/llms.txt
> Use this file to discover all available pages before exploring further.
# 在 Square Cloud 上配置 Top.gg Webhook
> 在 Square Cloud 上设置 Top.gg webhook 的详细指南。
## 简介
* 本指南假设你已在 [top.gg](https://top.gg/) 上拥有一个已通过审核的机器人,并且你的项目使用 Node.js 或 Python。
* 接下来,你需要在 Square Cloud 上创建一个账户,这可以通过[注册页面](https://squarecloud.app/signup)完成。你可以使用你的电子邮件来创建账户。
* 最后,你的账户需要有一个有效的付费方案。你可以在[这里](https://squarecloud.app/zh/pricing)查看我们的方案并根据你的需求购买。
## 设置环境
1. 在开始之前,请确保你的系统上已安装 Node.js 和 npm。如果你还没有安装,可以从 [Node.js 官方网站](https://nodejs.org/)下载。
2. 使用以下命令启动一个新的 Node.js 项目:
```bash Terminal theme={null}
npm init -y
```
此命令会在当前目录中创建一个 package.json 文件。
2. 安装所需的库:
```bash Terminal theme={null}
npm install @top-gg/sdk express
```
1. 确保你的系统上已安装 Python 和 Pip(Python 的包管理器)。如果没有,你可以从 [Python 官方网站](https://www.python.org/)和 [Pip 官方网站](https://pypi.org/)下载。
2. 使用 pip 安装 `flask` 和 `waitress` 库:
```bash theme={null}
pip install flask
pip install waitress
```
## 设置项目
**1. 获取你的 webhook 身份验证:**
* 前往你的 Top.gg 个人资料[这里](https://top.gg/user/me)。
* 点击你想要接收投票通知的机器人上的 "edit"。
* 在 "GENERAL" 下,选择 "webhook" 选项。
* 在 "Authorization" 中设置 webhook 身份验证。在本示例中,我们使用了 "myappsquare"。
**2. 实现 webhook 监听器:**
以下部分提供了 Javascript 和 Python 两种代码示例:
我们将使用 top.gg 文档[这里](https://docs.top.gg/docs/Libraries/javascript)提供的示例,并做一些修改。
```javascript index.js theme={null}
// Import libraries
const Topgg = require("@top-gg/sdk");
const express = require("express");
// Create Express app and Top.gg webhook instances
const app = express();
const webhook = new Topgg.Webhook("YOUR_AUTHORIZATION_TOKEN");
// Define route for '/topgg' endpoint (POST requests)
app.post("/topgg", webhook.listener((vote) => {
// Log vote received message with user ID
console.log(`Vote received successfully! User ID: ${vote.user}`);
}));
// Start server on port 80 (default HTTP)
app.listen(80);
```
对于 Python,你可以使用以下代码:
```python app.py theme={null}
# Import the necessary libraries
import logging
import json
from waitress import serve
from flask import Flask, request, abort
# Create an instance of the Flask app
app = Flask(__name__)
# Define your authorization token
AUTH_TOKEN = 'YOUR_AUTHORIZATION'
# Define a route for the '/topgg' endpoint that accepts POST requests
@app.route("/topgg", methods=["POST"])
def hook():
# Check the authorization header
auth = request.headers.get('Authorization')
if auth != AUTH_TOKEN:
logging.error('Access denied')
abort(401) # Unauthorized
# Convert the request data from bytes to a JSON dictionary
data = json.loads(request.data)
# Print the ID of the user who voted
print(f'Vote received successfully! User ID: {data["user"]}')
# Return a response with the string "Data received" and status 200 to indicate that the request was processed successfully
return "Data received"
# Check if this script is being run directly and not imported as a module
if __name__ == "__main__":
# Set the log message format to exclude the log level
logging.basicConfig(format='%(message)s', level=logging.INFO)
# Serve our Flask app on port 80 and listen on all network interfaces
serve(app, host="0.0.0.0", port=80)
```
## 创建 squarecloud 配置文件
squarecloud.app 文件是一个配置文件,用于配置你的应用程序;它将用于定义名称、描述、版本、主文件等内容。
## 将你的应用程序上传到 Square Cloud
完成所有步骤后,将你的应用程序文件放入一个 `.zip` 文件中,包括配置文件。
如果你的应用程序是 Node.js 项目,请查看我们关于 [Node.js](/zh/articles/getting-started-with-nodejs) 的文章。
如果你的应用程序是 Python 项目,请查看我们关于 [Python](/zh/articles/getting-started-with-python) 的文章。
访问 [Square Cloud
控制面板](https://squarecloud.app/zh/dashboard/new) 并上传你的项目
文件。
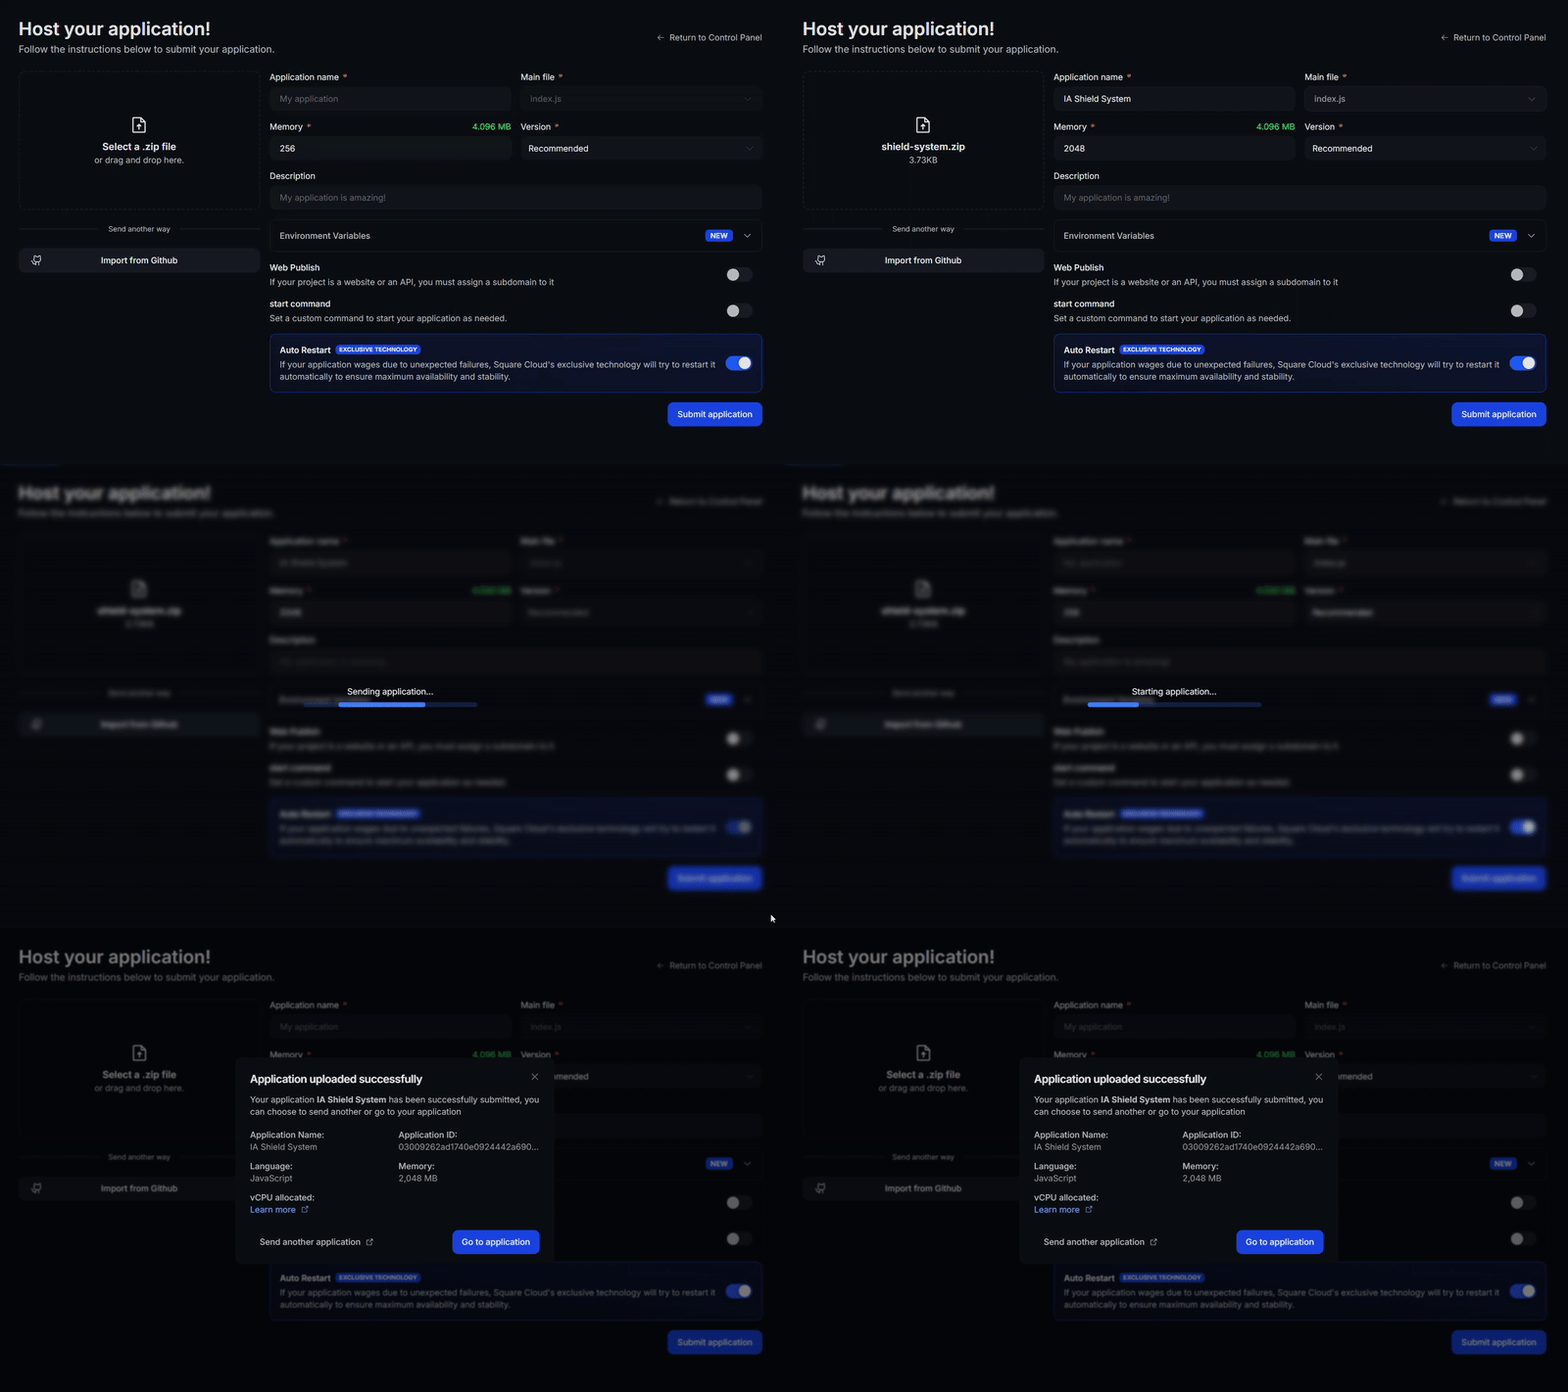 首先,你需要在你的环境中安装 CLI。如果你
还没有安装,请在终端中运行以下命令:
```
npm install -g @squarecloud/cli
```
如果你已经安装了,我们建议更新它。为此,请在终端中运行以下命令:
```bash theme={null}
squarecloud update
```
```bash theme={null}
curl -fsSL https://cli.squarecloud.app/install | bash
```
现在,要进行身份验证并使用其他 CLI 命令,你可以在[这里](https://squarecloud.app/zh/account)
点击 "Request API Key" 找到你的
授权密钥。获取授权密钥后,运行
以下命令:
```bash theme={null}
squarecloud auth login
```
最后,要使用 CLI 将你的应用程序部署到 Square Cloud,你需要执行以下命令,并传入你的 zip 文件路径:
```bash theme={null}
squarecloud upload zip
```
## 开始测试
如果你正确地完成了所有操作,请尝试使用配置文件中定义的子域名访问你的网站。如果你将其定义为 "mysite",那么访问地址将是 `mysite.squareweb.app`。当你访问后仅出现 "Cannot GET /" 或 "Method Not Allowed" 时,说明一切正常。
现在,你需要返回到之前定义授权的上一个页面。在 Webhook URL 字段中,你应该填入你网站的 URL 以及将接收投票的路由。
* 对于我们使用 `app.post("/topgg", webhook.listener((vote) => {...})` 创建的 JavaScript 代码,接收投票的路由是 "/topgg"。因此,如果你的网站是 "mysite.squareweb.app",你应该将 "mysite.squareweb.app/topgg" 填入 Webhook URL。
* 对于我们使用 `@app.route("/topgg", methods=["POST"])` 创建的 Python 代码,接收投票的路由同样是 "/topgg"。因此,Webhook URL 也将是相同的 "mysite.squareweb.app/topgg"。
首先,你需要在你的环境中安装 CLI。如果你
还没有安装,请在终端中运行以下命令:
```
npm install -g @squarecloud/cli
```
如果你已经安装了,我们建议更新它。为此,请在终端中运行以下命令:
```bash theme={null}
squarecloud update
```
```bash theme={null}
curl -fsSL https://cli.squarecloud.app/install | bash
```
现在,要进行身份验证并使用其他 CLI 命令,你可以在[这里](https://squarecloud.app/zh/account)
点击 "Request API Key" 找到你的
授权密钥。获取授权密钥后,运行
以下命令:
```bash theme={null}
squarecloud auth login
```
最后,要使用 CLI 将你的应用程序部署到 Square Cloud,你需要执行以下命令,并传入你的 zip 文件路径:
```bash theme={null}
squarecloud upload zip
```
## 开始测试
如果你正确地完成了所有操作,请尝试使用配置文件中定义的子域名访问你的网站。如果你将其定义为 "mysite",那么访问地址将是 `mysite.squareweb.app`。当你访问后仅出现 "Cannot GET /" 或 "Method Not Allowed" 时,说明一切正常。
现在,你需要返回到之前定义授权的上一个页面。在 Webhook URL 字段中,你应该填入你网站的 URL 以及将接收投票的路由。
* 对于我们使用 `app.post("/topgg", webhook.listener((vote) => {...})` 创建的 JavaScript 代码,接收投票的路由是 "/topgg"。因此,如果你的网站是 "mysite.squareweb.app",你应该将 "mysite.squareweb.app/topgg" 填入 Webhook URL。
* 对于我们使用 `@app.route("/topgg", methods=["POST"])` 创建的 Python 代码,接收投票的路由同样是 "/topgg"。因此,Webhook URL 也将是相同的 "mysite.squareweb.app/topgg"。
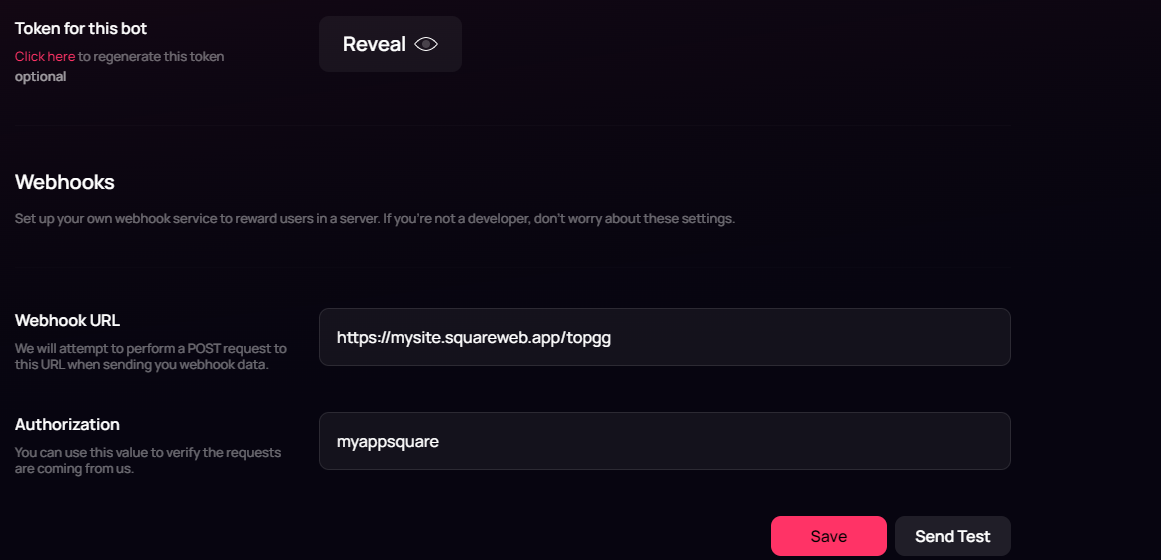 最后,点击 "Send Test" 按钮。之后,检查终端。如果一切顺利,你在 `console.log` 或 `print` 中定义的消息应该会出现在终端中。
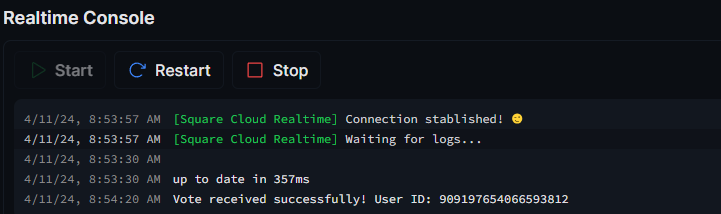 这样,如果一切都配置正确,你的 webhook 就准备好在你的机器人在 top.gg 上收到投票时发送通知了。
## 故障排除
### 自定义域名
若要使用自定义域名(例如 `mysite.com`)来代替默认 URL `mysite.squareweb.app`,你需要 **Standard 计划或更高等级**。子域名由配置文件中的 **SUBDOMAIN** 字段定义。
### 最低内存要求
简单网站/API 的**最低要求为 512MB RAM**。对于使用框架的站点(Next.JS、React、Vue、Angular 等),我们始终建议**至少 1GB RAM**。对于更大型的应用,请分配更多 RAM,以防止应用内存耗尽而崩溃。
### 找不到此站点。
请检查**子域名/域名**是否与 **SUBDOMAIN** 字段或**自定义域名设置**中配置的内容一致。如果你刚上传站点,请等待最多 **60 秒**,让 Square 启用**首次访问**。
### 站点响应超时……
请检查你是否在应用中正确配置了**端口 80** 和**主机 0.0.0.0**。我们建议使用 Square 强制注入的环境变量:来自 `.env` 文件的 **PORT** 和 **HOST**。
## 联系我们
如果你仍然遇到**技术问题**,我们的**专业支持团队**可以为你提供帮助。[**联系我们**](https://squarecloud.app/zh/support),我们很乐意协助你解决任何问题。
这样,如果一切都配置正确,你的 webhook 就准备好在你的机器人在 top.gg 上收到投票时发送通知了。
## 故障排除
### 自定义域名
若要使用自定义域名(例如 `mysite.com`)来代替默认 URL `mysite.squareweb.app`,你需要 **Standard 计划或更高等级**。子域名由配置文件中的 **SUBDOMAIN** 字段定义。
### 最低内存要求
简单网站/API 的**最低要求为 512MB RAM**。对于使用框架的站点(Next.JS、React、Vue、Angular 等),我们始终建议**至少 1GB RAM**。对于更大型的应用,请分配更多 RAM,以防止应用内存耗尽而崩溃。
### 找不到此站点。
请检查**子域名/域名**是否与 **SUBDOMAIN** 字段或**自定义域名设置**中配置的内容一致。如果你刚上传站点,请等待最多 **60 秒**,让 Square 启用**首次访问**。
### 站点响应超时……
请检查你是否在应用中正确配置了**端口 80** 和**主机 0.0.0.0**。我们建议使用 Square 强制注入的环境变量:来自 `.env` 文件的 **PORT** 和 **HOST**。
## 联系我们
如果你仍然遇到**技术问题**,我们的**专业支持团队**可以为你提供帮助。[**联系我们**](https://squarecloud.app/zh/support),我们很乐意协助你解决任何问题。