> ## Documentation Index
> Fetch the complete documentation index at: https://docs.squarecloud.app/llms.txt
> Use this file to discover all available pages before exploring further.
# 如何部署你的 PG Admin
> 了解如何托管你的 pgadmin,随时随地访问你的 PostGreSQL 数据库
## 简介
* 本文将引导你在 Square Cloud 上创建并托管一个 PG Admin 应用。
* 在开始之前,请确保你已拥有 Square Cloud 账户,可通过注册页面完成注册。你可以使用邮箱来创建账户。
* 最后,你的账户需要有一个有效的付费计划。你可以在[此处](https://squarecloud.app/zh/pricing)查看我们的计划,并根据需要购买。
## 创建项目
* 首先,我们需要一个 Python 环境。为此,我们需要一个 `requirements.txt` 或 `pyproject.toml`。
你可以在[此处](https://docs.squarecloud.app/zh/articles/how-to-create-your-requirements)了解如何创建 requirements.txt。
* 你的 `requirements.txt` 必须包含 `pgadmin4` 以及一个用于提供服务的 web 服务器。在本教程中,我们将使用 `gunicorn`。
```txt requirements.txt theme={null}
pgadmin4
gunicorn
```
* 接下来,你需要一个配置文件 `config_local.py` 来设置一些路径。这些路径将定义在何处保存关于 pgadmin 的一些信息。
```py config_local.py theme={null}
SERVER_MODE = True
MAX_LOGIN_ATTEMPTS = 3
"""
CRITICAL 50
ERROR 40
WARNING 30
SQL 25
INFO 20
DEBUG 10
NOTSET 0
"""
CONSOLE_LOG_LEVEL = 10
DATA_DIR = "/application/.pgadmin/"
LOG_FILE = "/application/.pgadmin/logfile"
SQLITE_PATH = '/application/.pgadmin/pgadmin4.db'
```
我们已经在仓库[此处](https://github.com/squarecloud-education/pgadmin4-web/releases)准备好了部署所需的一切。你只需下载 `project.zip` 并上传即可。
## 📁 必要文件
你的 zip 压缩包中需要包含以下文件:
* requirements.txt 或 pyproject.toml
* .env(可选)
## ⚙️ 配置文件
* 你需要将运行时环境配置为 `手动检测`,并将其设置为 `Python`。在 squarecloud.config 或 squarecloud.app 中,它看起来会是这样:
```systemd squarecloud theme={null}
DISPLAY_NAME=App name
RUNTIME=python
MEMORY=1024
START=python -m gunicorn --bind 0.0.0.0:80 --workers=1 --threads=4 pgadmin4.pgAdmin4:app
VERSION=recommended
SUBDOMAIN=my-pgadmin-subdomain
```
* 接下来,我们需要在 `.env` 文件中或在上传菜单的 Square Cloud 环境变量中设置 2 个环境变量:`PGADMIN_SETUP_EMAIL` 和 `PGADMIN_SETUP_PASSWORD`。
```systemd .env theme={null}
PGADMIN_SETUP_EMAIL=accessemail@example.com
PGADMIN_SETUP_PASSWORD=yourSecurePassword
```
## 将项目上传到 Square Cloud
准备好项目文件后,你现在可以将它们上传到 Square Cloud 并托管你的项目。
访问 [Square Cloud 控制台](https://squarecloud.app/zh/dashboard/new)并上传你的项目文件。
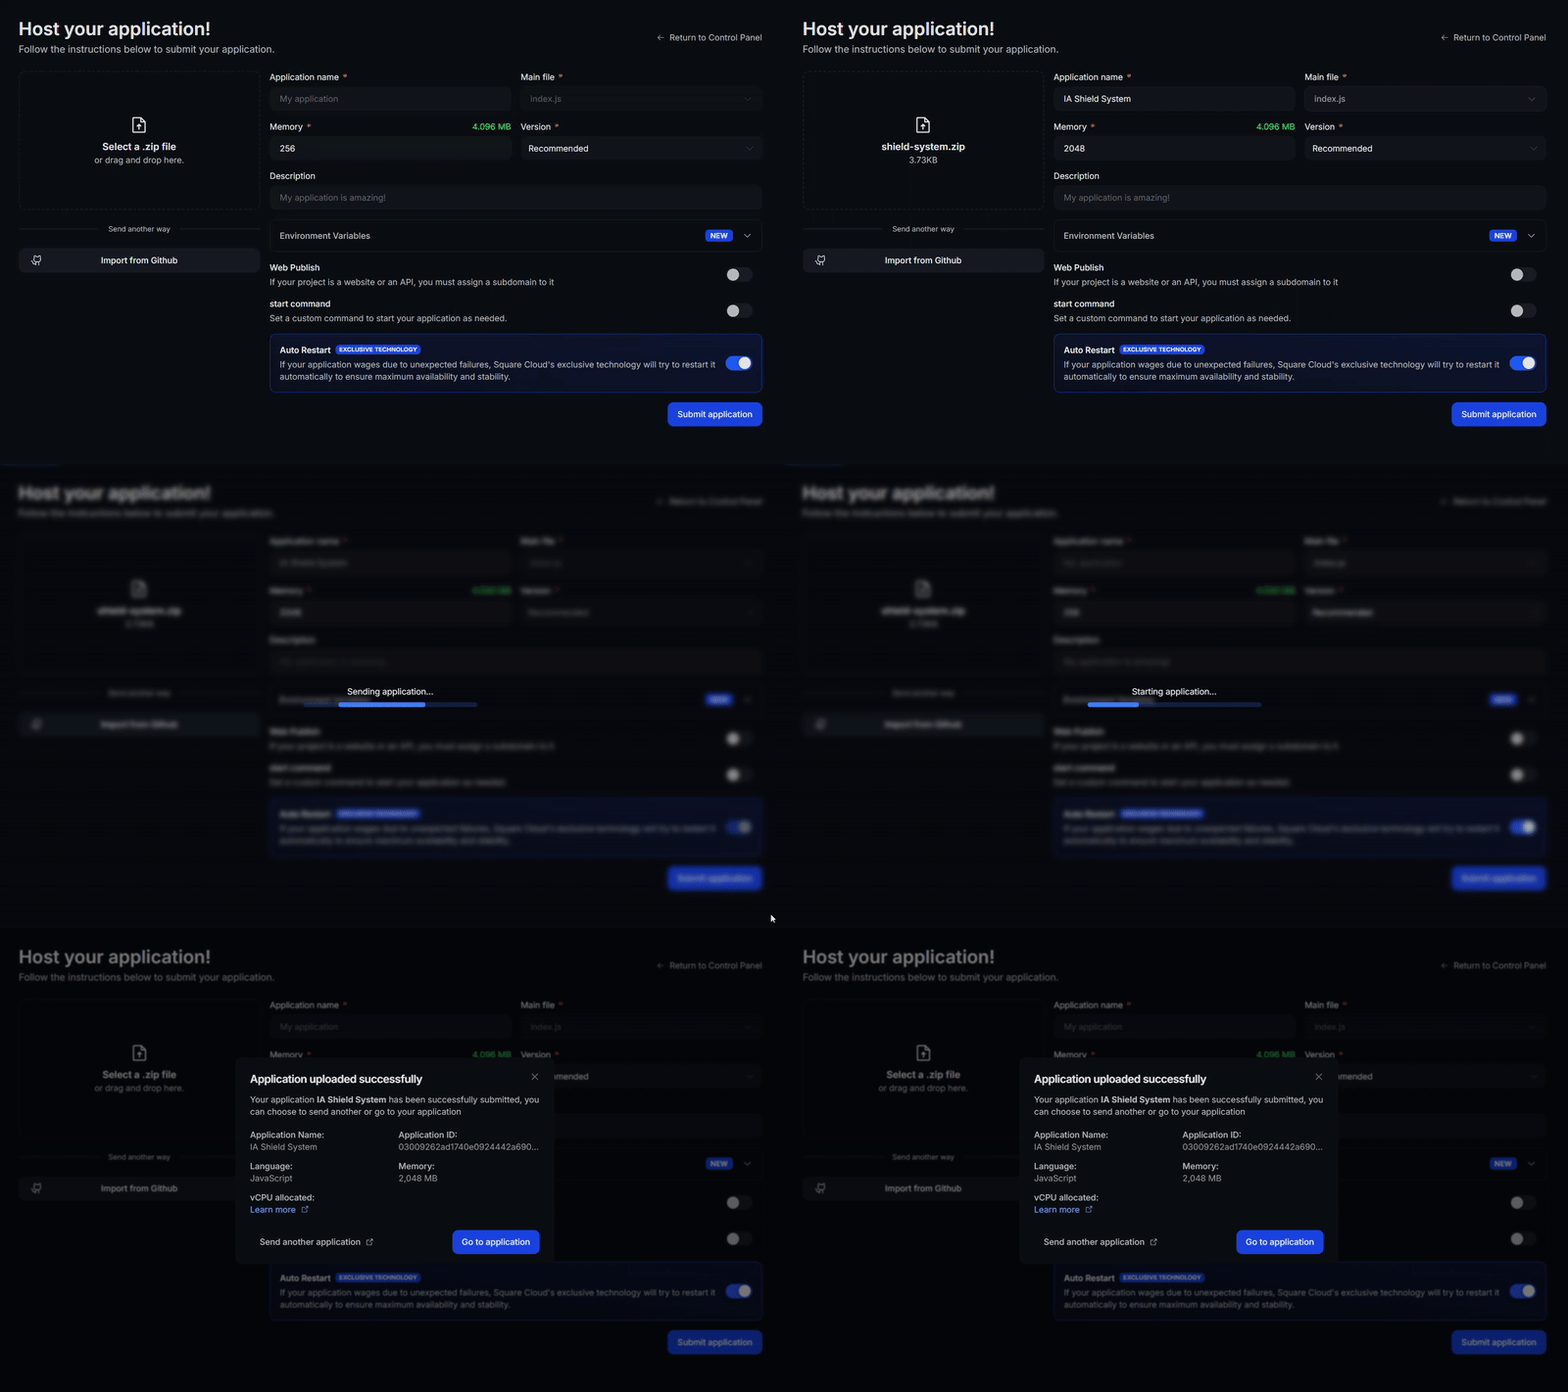 首先,你需要在环境中安装 CLI。如果你还没有安装,请在终端中运行以下命令:
```
npm install -g @squarecloud/cli
```
如果你已经安装了,我们建议你更新它。为此,请在终端中运行以下命令:
```bash theme={null}
squarecloud update
```
```bash theme={null}
curl -fsSL https://cli.squarecloud.app/install | bash
```
现在,为了进行身份验证并使用其他 CLI 命令,你可以在[此处](https://squarecloud.app/zh/account/security)点击 "Request API Key" 找到你的授权密钥。获取授权密钥后,运行以下命令:
```bash theme={null}
squarecloud auth login
```
最后,要使用 CLI 将你的应用部署到 Square Cloud,你需要运行以下命令,并传入你的 zip 文件路径:
```bash theme={null}
squarecloud upload zip
```
首先,你需要在环境中安装 CLI。如果你还没有安装,请在终端中运行以下命令:
```
npm install -g @squarecloud/cli
```
如果你已经安装了,我们建议你更新它。为此,请在终端中运行以下命令:
```bash theme={null}
squarecloud update
```
```bash theme={null}
curl -fsSL https://cli.squarecloud.app/install | bash
```
现在,为了进行身份验证并使用其他 CLI 命令,你可以在[此处](https://squarecloud.app/zh/account/security)点击 "Request API Key" 找到你的授权密钥。获取授权密钥后,运行以下命令:
```bash theme={null}
squarecloud auth login
```
最后,要使用 CLI 将你的应用部署到 Square Cloud,你需要运行以下命令,并传入你的 zip 文件路径:
```bash theme={null}
squarecloud upload zip
```