> ## Documentation Index
> Fetch the complete documentation index at: https://docs.squarecloud.app/llms.txt
> Use this file to discover all available pages before exploring further.
# 如何托管 X (Twitter) 机器人
> 学习在 Square Cloud 上创建和托管 X (Twitter) 机器人。完整教程涵盖配置、部署以及 Node.js 和 Python 的实战示例。
export const RecommendedPlan = ({lang, plan, tier, cpu, appType}) => {
const url = `https://squarecloud.app/${lang}/pay?plan=${plan.toLowerCase()}&tier=${tier}`;
if (lang == 'en') {
return
Wondering how much RAM and CPU your plan needs to host {appType}?
Don't worry, we're here to help.
Our {plan} plan offers {tier}GB of RAM and {cpu}vCPU, which should be sufficient for most {appType}.
However, if you are working on a larger project and seeking extra stability, we recommend considering our Pro plan. With additional resources, you can maintain stability even during demand spikes.
To purchase, simply click here.
;
} else {
return
Está se perguntando quanta RAM e CPU seu plano precisa para hospedar {appType}?
Não se preocupe, estamos aqui para ajudar.
Nosso plano {plan} oferece {tier}GB de RAM e {cpu}vCPU, o que deve ser suficiente para a maioria dos {appType}.
No entanto, se você estiver trabalhando em um projeto maior e precisar de mais estabilidade, recomendamos considerar nosso plano Pro.
Com recursos adicionais, você pode manter a estabilidade mesmo durante picos de demanda.
Para comprar, basta clicar aqui.
;
}
};
export const appType_0 = "a X (Twitter) bot"
## 简介
要在 Square Cloud 上开发和托管 {appType_0},遵循一套结构化的配置和前置条件流程至关重要。本技术指南将涵盖整个过程,从初始设置到生产环境部署。
### 前置条件
* **Square Cloud 账户**:通过[注册页面](https://squarecloud.app/zh/signup)使用你的邮箱进行注册。
* **有效的付费套餐**:为你的应用提供专属资源和优化的性能。查看我们[可用的套餐](https://squarecloud.app/zh/pricing),选择最适合你需求的方案。
### 创建项目
身份验证和机器人操作需要一个有效的 X (Twitter) 账户。如果你还没有账户,请在 [X 官方网站](https://x.com/) 注册。\
访问 API 还需要一个 X 开发者账户。请通过 [X 开发者门户](https://developer.x.com/en) 申请访问权限。
### 在 X 上创建机器人应用
1. 前往 [X 开发者门户](https://developer.x.com/en/portal/dashboard)。
2. 使用你的 X (Twitter) 账户登录。
3. 如果这是你第一次使用,请完成开发者访问申请流程。
1. 在控制面板中,点击 "Create Project"。
2. 为你的项目选择一个名称(例如 "Square Cloud Bot")。
3. 选择最合适的用例(例如 "Making a bot")。
4. 提供机器人的详细描述。
5. 确认创建项目。
1. 在已创建的项目中,点击 "Create App"。
2. 为你的应用定义一个唯一的名称。
3. 确认创建应用。
4. 记下生成的 **App ID** 以备后续参考。
1. 导航到应用的 "Keys and tokens" 部分。
2. 在 "Consumer Keys" 部分,点击 "Regenerate" 以生成:
* **API Key** (Consumer Key)
* **API Secret Key** (Consumer Secret)
3. **重要**:请立即复制并保存这些密钥,因为你将无法再次查看它们。
1. 前往 "App permissions" 部分。
2. 点击 "Edit" 以修改权限。
3. 选择 "Read and write" 以允许你的机器人发布推文。
4. 如有必要,选择 "Read and write and Direct message" 以启用私信功能。
5. 保存更改。
1. 返回 "Keys and tokens" 部分。
2. 在 "Access Token and Secret" 部分,点击 "Generate"。
3. 确认生成令牌。
4. 复制并保存:
* **Access Token**
* **Access Token Secret**
5. **警告**:关闭页面后,这些令牌将无法再次查看。
1. 确认你拥有全部 4 个所需凭据:
* API Key (Consumer Key)
* API Secret Key (Consumer Secret)
* Access Token
* Access Token Secret
2. 将这些凭据存储在安全的位置
3. **重要**:切勿公开分享或暴露这些凭据
## 开发项目
1. **Node.js 检查**:确认你的系统已安装 Node.js。如果没有,请从 [Node.js 官方网站](https://nodejs.org/) 下载。
2. **项目初始化**:运行以下命令创建一个新的 Node.js 项目:
```bash Terminal theme={null}
npm init -y
```
3. **安装依赖**:安装机器人所需的库:
```bash Terminal theme={null}
npm install twitter-api-v2
```
4. **设置环境变量**:创建一个 `.env` 文件以安全地存储你的凭据:
```env .env theme={null}
API_KEY=your_api_key_here
API_SECRET_KEY=your_api_secret_key_here
ACCESS_TOKEN=your_access_token_here
ACCESS_TOKEN_SECRET=your_access_token_secret_here
```
5. **创建主文件**:编写包含机器人基础结构的 `index.js` 文件:
```javascript index.js theme={null}
// Import necessary modules
const { TwitterApi } = require('twitter-api-v2');
// Configure Twitter client with authentication
const client = new TwitterApi({
appKey: process.env.API_KEY,
appSecret: process.env.API_SECRET_KEY,
accessToken: process.env.ACCESS_TOKEN,
accessSecret: process.env.ACCESS_TOKEN_SECRET,
});
// Client with read and write permissions
const rwClient = client.readWrite;
// Stores the authenticated bot user id (set in verifyBot)
let botUserId = null;
// Function to check if the bot is working
async function verifyBot() {
try {
// Get authenticated user information (X API v2)
const me = await rwClient.v2.me();
botUserId = me.data.id;
console.log(`Bot successfully initialized! User: @${me.data.username}`);
return true;
} catch (error) {
console.error('Error verifying bot:', error);
return false;
}
}
// Function to post a tweet
async function postTweet(text) {
try {
const tweet = await rwClient.v2.tweet(text);
console.log(`Tweet posted successfully! ID: ${tweet.data.id}`);
return tweet;
} catch (error) {
console.error('Error posting tweet:', error);
throw error;
}
}
// Function to respond to mentions
async function respondToMentions() {
if (!botUserId) return;
try {
// Fetch recent mentions (X API v2)
const mentions = await rwClient.v2.userMentionTimeline(botUserId, {
max_results: 10,
});
for (const tweet of mentions.data?.data ?? []) {
// Check if it's a new mention (implement control logic)
if (tweet.text.includes('!ping')) {
// Reply to the mention
await rwClient.v2.reply(
'Pong! 🤖 X Bot working correctly!',
tweet.id
);
console.log(`Replied to mention (tweet ID: ${tweet.id})`);
}
}
} catch (error) {
console.error('Error processing mentions:', error);
}
}
// Function to search and interact with specific tweets
async function searchAndInteract(query) {
if (!botUserId) return;
try {
// Search recent tweets (X API v2)
const tweets = await rwClient.v2.search(query, {
max_results: 10,
});
for (const tweet of tweets.data?.data ?? []) {
// Like the tweet
await rwClient.v2.like(botUserId, tweet.id);
console.log(`Liked tweet ID: ${tweet.id}`);
// Wait a bit between actions to avoid rate limiting
await new Promise(resolve => setTimeout(resolve, 2000));
}
} catch (error) {
console.error('Error searching and interacting:', error);
}
}
// Main bot function
async function runBot() {
console.log('Starting X bot...');
// Check if the bot is configured correctly
const botOk = await verifyBot();
if (!botOk) {
console.error('Bot initialization failed');
return;
}
// Example: Post an initialization tweet
try {
await postTweet('🤖 X Bot initialized and running on Square Cloud!');
} catch (error) {
console.log('Initialization tweet failed, but bot continues running');
}
// Main bot loop
setInterval(async () => {
try {
// Check and respond to mentions every 5 minutes
await respondToMentions();
// Example: Search and interact with tweets about a specific topic
// await searchAndInteract('#SquareCloud');
} catch (error) {
console.error('Error in main loop:', error);
}
}, 5 * 60 * 1000); // 5 minutes
console.log('Bot running. Press Ctrl+C to stop.');
}
// Signal handling for graceful shutdown
process.on('SIGINT', () => {
console.log('\nShutting down X bot...');
process.exit(0);
});
process.on('SIGTERM', () => {
console.log('\nShutting down X bot...');
process.exit(0);
});
// Initialize the bot
runBot();
```
## 部署
准备好项目文件后,你现在可以将它们上传到 Square Cloud 并托管你的项目。
为此,请创建一个包含所有项目文件的 ZIP 文件。
**安全提示**:切勿将 API 凭据直接写入代码中。始终在 Square Cloud 上使用环境变量。
在 Square Cloud 上,通过控制面板配置以下环境变量:
* `API_KEY`:你的 X API 密钥
* `API_SECRET_KEY`:你的 X API 密钥密文
* `ACCESS_TOKEN`:你的访问令牌
* `ACCESS_TOKEN_SECRET`:你的访问令牌密文
### 通过控制面板
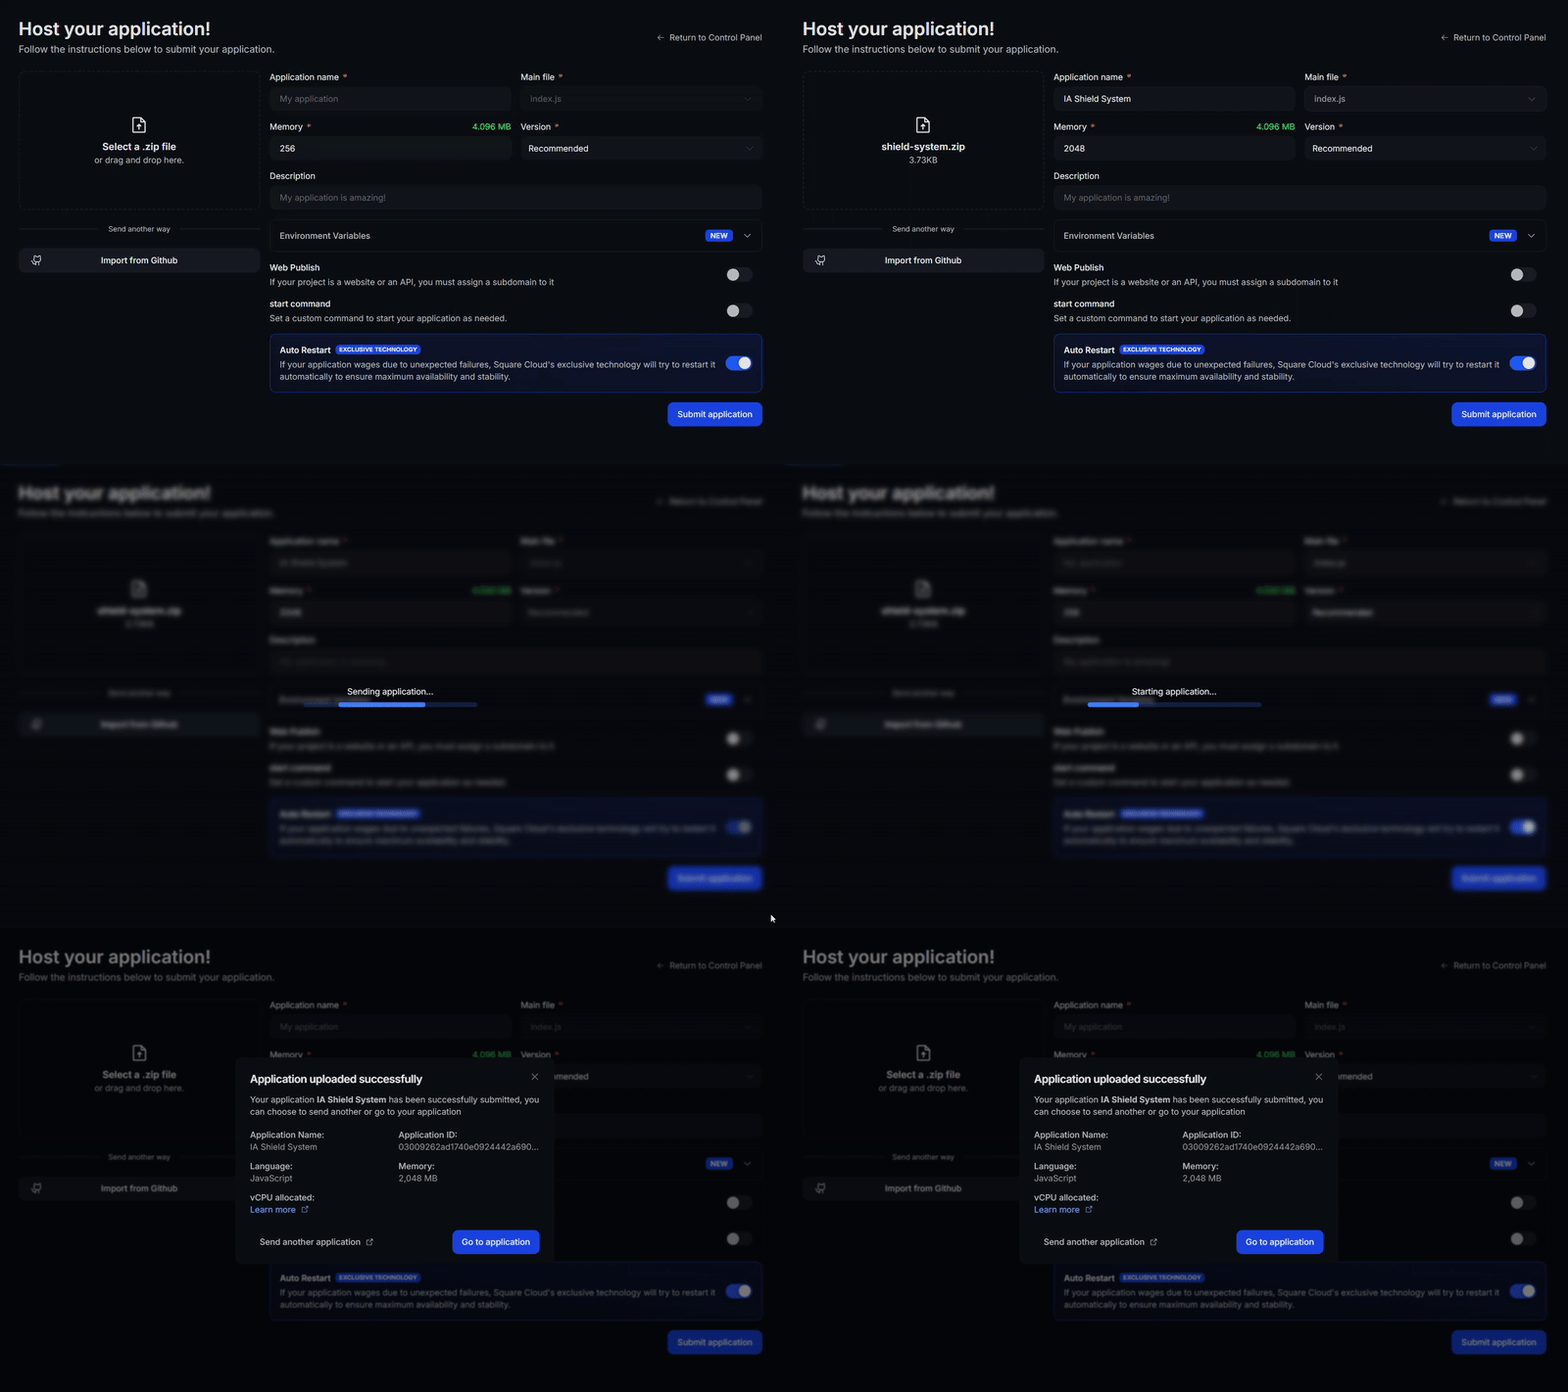
访问[上传页面](https://squarecloud.app/zh/dashboard/new)并上传你的项目 zip 文件。
上传 zip 后,你需要为项目配置名称、主文件或运行时环境以及其他设置。\
如果你上传的是 Web 项目,请务必选择 "Web Publication" 并为项目设置子域名。
最后,点击 "Deploy" 按钮,即可将项目托管到 Square Cloud。\
部署完成后,你可以在控制面板中监控项目的状态和日志。
 ### 通过 CLI
要使用此方法,你需要在项目根目录中创建一个名为 `squarecloud.app` 的配置文件。该文件将包含项目所需的配置。
squarecloud.app 文件是一个配置文件,用于配置你的应用;它将用于定义你的环境。
首先,你的环境中需要已安装 CLI。如果尚未安装,请在终端中运行以下命令:
```
npm install -g @squarecloud/cli
```
如果你已经安装,我们建议对其进行更新。为此,请在终端中运行以下命令:
```bash theme={null}
squarecloud update
```
```bash theme={null}
curl -fsSL https://cli.squarecloud.app/install | bash
```
现在,要进行身份验证并使用其他 CLI 命令,你可以在[此处](https://squarecloud.app/zh/account/security)点击 "Request API Key" 找到你的授权密钥。获取授权密钥后,运行以下命令:
```bash theme={null}
squarecloud auth login
```
最后,要使用 CLI 将应用部署到 Square Cloud,你需要运行以下命令:
```bash theme={null}
squarecloud upload
```
或者,如果你手动创建了 zip 文件,可以使用:
```bash theme={null}
squarecloud upload --file
```
## 更多资源
要深入了解使用 twitter-api-v2 开发 X 机器人,请查阅 [twitter-api-v2 官方库文档](https://github.com/PLhery/node-twitter-api-v2)。该文档提供了详细的指南、进阶教程以及完整的 API 参考,以最大化你的实现潜力。
另请参阅:
* [X API 官方文档](https://docs.x.com/overview)
* [X API 使用政策](https://developer.x.com/en/developer-terms/policy)
* [机器人最佳实践指南](https://docs.x.com/x-api/getting-started/about-x-api)
### 话题标签监控
```javascript theme={null}
// Function to monitor specific hashtags
async function monitorHashtags(hashtags) {
for (const hashtag of hashtags) {
try {
const tweets = await rwClient.v2.search(`#${hashtag}`, {
max_results: 10,
});
// Process found tweets
for (const tweet of tweets.data?.data ?? []) {
console.log(`Tweet found with #${hashtag}: ${tweet.text}`);
// Implement interaction logic
}
} catch (error) {
console.error(`Error monitoring #${hashtag}:`, error);
}
}
}
```
### 定时发布
```javascript theme={null}
// Function to schedule posts
function schedulePost(text, delay) {
setTimeout(async () => {
try {
await postTweet(text);
console.log('Scheduled post published successfully!');
} catch (error) {
console.error('Error publishing scheduled post:', error);
}
}, delay);
}
// Example: Schedule a post for 1 hour
schedulePost('🤖 Scheduled post by the bot!', 60 * 60 * 1000);
```
### 速率限制
X (Twitter) 有严格的速率限制。请实现相应的控制以避免超出这些限制:
```javascript theme={null}
// Rate limiting control
const rateLimiter = {
lastRequest: 0,
minInterval: 1000, // 1 second between requests
async wait() {
const now = Date.now();
const timeSinceLastRequest = now - this.lastRequest;
if (timeSinceLastRequest < this.minInterval) {
const waitTime = this.minInterval - timeSinceLastRequest;
await new Promise(resolve => setTimeout(resolve, waitTime));
}
this.lastRequest = Date.now();
}
};
```
### 错误处理
```javascript theme={null}
// Helper function to retry an operation on failure
async function retryOperation(operation, maxRetries = 3) {
for (let i = 0; i < maxRetries; i++) {
try {
return await operation();
} catch (error) {
console.error(`Attempt ${i + 1} failed:`, error.message);
if (i === maxRetries - 1) {
throw error;
}
// Wait before retrying
await new Promise(resolve => setTimeout(resolve, 2000 * (i + 1)));
}
}
}
```
## 联系我们
如果你仍然遇到**技术问题**,我们的**专业支持团队**可以为你提供帮助。[**联系我们**](https://squarecloud.app/zh/support),我们很乐意协助你解决任何问题。
### 通过 CLI
要使用此方法,你需要在项目根目录中创建一个名为 `squarecloud.app` 的配置文件。该文件将包含项目所需的配置。
squarecloud.app 文件是一个配置文件,用于配置你的应用;它将用于定义你的环境。
首先,你的环境中需要已安装 CLI。如果尚未安装,请在终端中运行以下命令:
```
npm install -g @squarecloud/cli
```
如果你已经安装,我们建议对其进行更新。为此,请在终端中运行以下命令:
```bash theme={null}
squarecloud update
```
```bash theme={null}
curl -fsSL https://cli.squarecloud.app/install | bash
```
现在,要进行身份验证并使用其他 CLI 命令,你可以在[此处](https://squarecloud.app/zh/account/security)点击 "Request API Key" 找到你的授权密钥。获取授权密钥后,运行以下命令:
```bash theme={null}
squarecloud auth login
```
最后,要使用 CLI 将应用部署到 Square Cloud,你需要运行以下命令:
```bash theme={null}
squarecloud upload
```
或者,如果你手动创建了 zip 文件,可以使用:
```bash theme={null}
squarecloud upload --file
```
## 更多资源
要深入了解使用 twitter-api-v2 开发 X 机器人,请查阅 [twitter-api-v2 官方库文档](https://github.com/PLhery/node-twitter-api-v2)。该文档提供了详细的指南、进阶教程以及完整的 API 参考,以最大化你的实现潜力。
另请参阅:
* [X API 官方文档](https://docs.x.com/overview)
* [X API 使用政策](https://developer.x.com/en/developer-terms/policy)
* [机器人最佳实践指南](https://docs.x.com/x-api/getting-started/about-x-api)
### 话题标签监控
```javascript theme={null}
// Function to monitor specific hashtags
async function monitorHashtags(hashtags) {
for (const hashtag of hashtags) {
try {
const tweets = await rwClient.v2.search(`#${hashtag}`, {
max_results: 10,
});
// Process found tweets
for (const tweet of tweets.data?.data ?? []) {
console.log(`Tweet found with #${hashtag}: ${tweet.text}`);
// Implement interaction logic
}
} catch (error) {
console.error(`Error monitoring #${hashtag}:`, error);
}
}
}
```
### 定时发布
```javascript theme={null}
// Function to schedule posts
function schedulePost(text, delay) {
setTimeout(async () => {
try {
await postTweet(text);
console.log('Scheduled post published successfully!');
} catch (error) {
console.error('Error publishing scheduled post:', error);
}
}, delay);
}
// Example: Schedule a post for 1 hour
schedulePost('🤖 Scheduled post by the bot!', 60 * 60 * 1000);
```
### 速率限制
X (Twitter) 有严格的速率限制。请实现相应的控制以避免超出这些限制:
```javascript theme={null}
// Rate limiting control
const rateLimiter = {
lastRequest: 0,
minInterval: 1000, // 1 second between requests
async wait() {
const now = Date.now();
const timeSinceLastRequest = now - this.lastRequest;
if (timeSinceLastRequest < this.minInterval) {
const waitTime = this.minInterval - timeSinceLastRequest;
await new Promise(resolve => setTimeout(resolve, waitTime));
}
this.lastRequest = Date.now();
}
};
```
### 错误处理
```javascript theme={null}
// Helper function to retry an operation on failure
async function retryOperation(operation, maxRetries = 3) {
for (let i = 0; i < maxRetries; i++) {
try {
return await operation();
} catch (error) {
console.error(`Attempt ${i + 1} failed:`, error.message);
if (i === maxRetries - 1) {
throw error;
}
// Wait before retrying
await new Promise(resolve => setTimeout(resolve, 2000 * (i + 1)));
}
}
}
```
## 联系我们
如果你仍然遇到**技术问题**,我们的**专业支持团队**可以为你提供帮助。[**联系我们**](https://squarecloud.app/zh/support),我们很乐意协助你解决任何问题。