> ## Documentation Index
> Fetch the complete documentation index at: https://docs.squarecloud.app/llms.txt
> Use this file to discover all available pages before exploring further.
# 如何托管 Slack 机器人
> 了解如何在 Square Cloud 上创建并托管 Slack 机器人。完整教程涵盖配置、部署以及 Node.js 和 Python 的实践示例。
export const RecommendedPlan = ({lang, plan, tier, cpu, appType}) => {
const url = `https://squarecloud.app/${lang}/pay?plan=${plan.toLowerCase()}&tier=${tier}`;
if (lang == 'en') {
return
Wondering how much RAM and CPU your plan needs to host {appType}?
Don't worry, we're here to help.
Our {plan} plan offers {tier}GB of RAM and {cpu}vCPU, which should be sufficient for most {appType}.
However, if you are working on a larger project and seeking extra stability, we recommend considering our Pro plan. With additional resources, you can maintain stability even during demand spikes.
To purchase, simply click here.
;
} else {
return
Está se perguntando quanta RAM e CPU seu plano precisa para hospedar {appType}?
Não se preocupe, estamos aqui para ajudar.
Nosso plano {plan} oferece {tier}GB de RAM e {cpu}vCPU, o que deve ser suficiente para a maioria dos {appType}.
No entanto, se você estiver trabalhando em um projeto maior e precisar de mais estabilidade, recomendamos considerar nosso plano Pro.
Com recursos adicionais, você pode manter a estabilidade mesmo durante picos de demanda.
Para comprar, basta clicar aqui.
;
}
};
export const appType_0 = "a Slack bot"
## 简介
要在 Square Cloud 上开发和托管 {appType_0},遵循一套结构化的配置和前置条件流程至关重要。本技术指南将涵盖整个过程,从初始设置到生产环境部署。
### 前置条件
* **Square Cloud 账户**:通过[注册页面](https://squarecloud.app/zh/signup)使用你的邮箱进行注册。
* **有效的付费套餐**:为你的应用提供专属资源和优化的性能。查看我们[可用的套餐](https://squarecloud.app/zh/pricing),选择最适合你需求的方案。
## 创建项目
要创建 Slack 机器人,你需要一个账户以及在 Slack 上创建应用的权限。在按照后续步骤操作之前,请在 [https://slack.com/](https://slack.com/) 创建或登录你的账户。
### 在 Slack 上创建机器人应用
1. 前往 [Slack API - Your Apps](https://api.slack.com/apps) 并点击 "Create New App"。
2. 选择 "From scratch",为应用命名,并选择你将要安装它的 workspace。
3. 记下 *Signing Secret*(位于 "Basic Information" 下),并在 "OAuth & Permissions" 部分创建一个 *Bot Token*,为你的机器人添加合适的 scope(例如 `chat:write`、`channels:read`、`commands`、`app_mentions:read`)。
**安全提示:** 切勿公开暴露 Signing Secret 或 Bot Token。请将它们视为敏感凭据。
## 开发项目
请根据你选择的语言使用下面对应的部分。两个示例都演示了一个响应提及或简单命令的机器人。
**Node.js 环境搭建**
1. 确认已安装 Node.js。
2. 初始化项目并安装依赖:
```bash Terminal theme={null}
npm init -y
npm install @slack/bolt
```
3. 创建一个 `index.js` 文件,内容如下:
```javascript index.js theme={null}
const { App } = require('@slack/bolt');
const app = new App({
signingSecret: process.env.SLACK_SIGNING_SECRET,
token: process.env.SLACK_BOT_TOKEN,
});
// Responds when mentioned
app.event('app_mention', async ({ event, say }) => {
await say(`<@${event.user}> Thanks for mentioning me!`);
});
// Example slash command
app.command('/hello', async ({ ack, respond }) => {
await ack();
await respond('Hello from Square Cloud!');
});
(async () => {
await app.start(process.env.PORT || 3000);
console.log('⚡️ Slack Bolt app is running!');
})();
```
注意:在 Square Cloud 上,请在应用面板中设置环境变量 `SLACK_SIGNING_SECRET` 和 `SLACK_BOT_TOKEN`。
**Python 环境搭建**
1. 确认已安装 Python 和 pip。
2. 安装 Bolt for Python 库:
```bash Terminal theme={null}
pip install slack_bolt
```
3. 创建一个 `app.py` 文件,内容如下:
```python app.py theme={null}
from slack_bolt import App
import os
app = App(
signing_secret=os.environ.get('SLACK_SIGNING_SECRET'),
token=os.environ.get('SLACK_BOT_TOKEN')
)
@app.event('app_mention')
def handle_mention(event, say):
user = event.get('user')
say(f'<@{user}> Thanks for mention!')
@app.command('/hello')
def hello_command(ack, respond):
ack()
respond('Hello from Square Cloud!')
if __name__ == '__main__':
app.start(port=int(os.environ.get('PORT', 3000)))
```
4. 对于 Python 项目,请包含一个 `requirements.txt`,内容为:
```txt requirements.txt theme={null}
slack_bolt
```
## 部署
准备好项目文件后,你现在可以将它们上传到 Square Cloud 并托管你的项目。
为此,请创建一个包含所有项目文件的 ZIP 文件。
### 通过控制面板
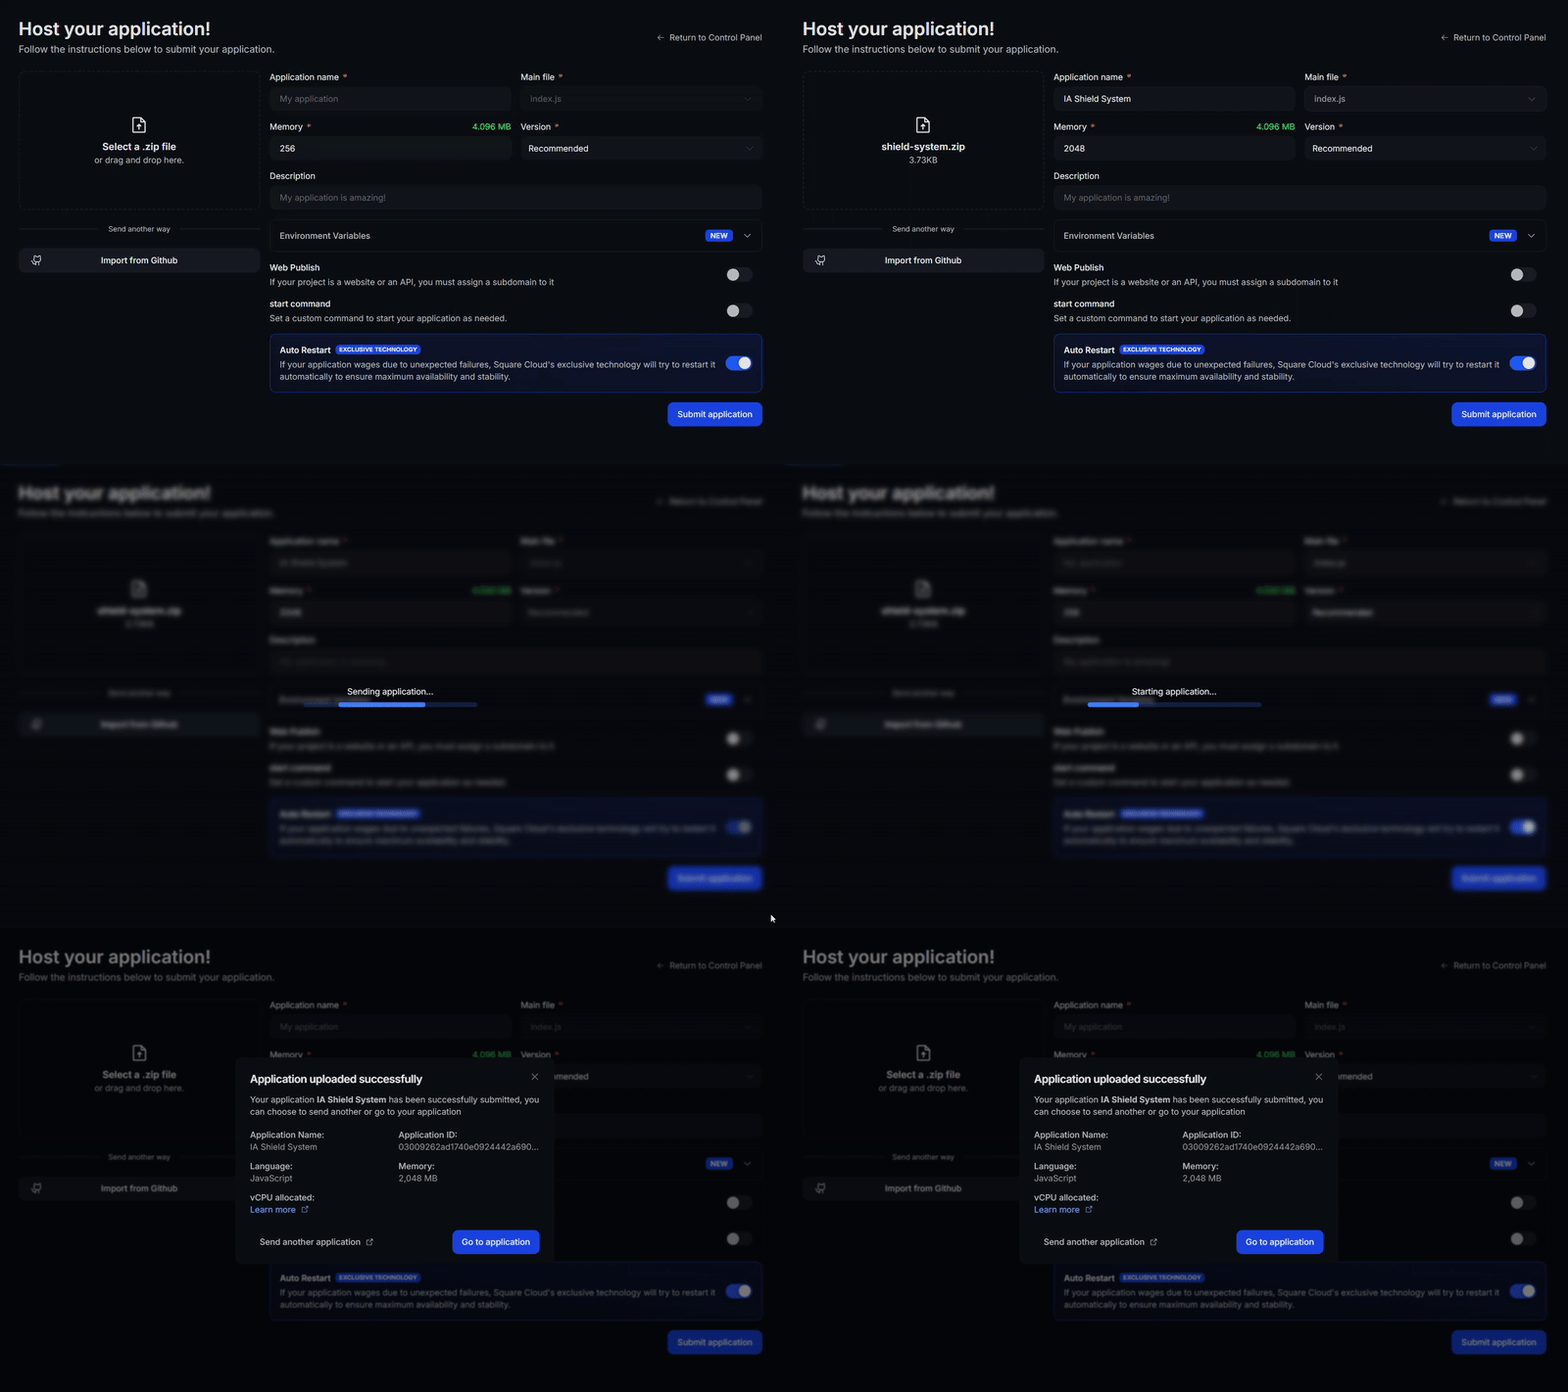
访问[上传页面](https://squarecloud.app/zh/dashboard/new)并上传你的项目 zip 文件。
上传 zip 后,你需要为项目配置名称、主文件或运行时环境以及其他设置。\
如果你上传的是 Web 项目,请务必选择 "Web Publication" 并为项目设置子域名。
最后,点击 "Deploy" 按钮,即可将项目托管到 Square Cloud。\
部署完成后,你可以在控制面板中监控项目的状态和日志。
 ### 通过 CLI
要使用此方法,你需要在项目根目录中创建一个名为 `squarecloud.app` 的配置文件。该文件将包含项目所需的配置。
squarecloud.app 文件是一个配置文件,用于配置你的应用;它将用于定义你的环境。
首先,你的环境中需要已安装 CLI。如果尚未安装,请在终端中运行以下命令:
```
npm install -g @squarecloud/cli
```
如果你已经安装,我们建议对其进行更新。为此,请在终端中运行以下命令:
```bash theme={null}
squarecloud update
```
```bash theme={null}
curl -fsSL https://cli.squarecloud.app/install | bash
```
现在,要进行身份验证并使用其他 CLI 命令,你可以在[此处](https://squarecloud.app/zh/account/security)点击 "Request API Key" 找到你的授权密钥。获取授权密钥后,运行以下命令:
```bash theme={null}
squarecloud auth login
```
最后,要使用 CLI 将应用部署到 Square Cloud,你需要运行以下命令:
```bash theme={null}
squarecloud upload
```
或者,如果你手动创建了 zip 文件,可以使用:
```bash theme={null}
squarecloud upload --file
```
## 测试机器人
1. 在 Slack 应用面板的 "OAuth & Permissions" 下,将应用安装到 workspace。
2. 如果机器人暴露了 endpoint(用于事件或命令),请在 "Event Subscriptions" 和 "Slash Commands" 中配置 Request URL,指向你应用的公共 URL(Square Cloud 会在部署后提供域名)。
3. 在频道中测试提及功能或 `/hello` 命令,以验证响应是否正常。
安装链接示例(请替换 client\_id):
```txt theme={null}
https://slack.com/oauth/v2/authorize?client_id=000000000000.000000000000&scope=commands,chat:write,app_mentions:read
```
## 更多资源
如需进一步阅读,请查阅 Slack 官方文档:
* Bolt for JavaScript: [https://docs.slack.dev/tools/bolt-js/](https://docs.slack.dev/tools/bolt-js/)
* Bolt for Python: [https://docs.slack.dev/tools/bolt-python/](https://docs.slack.dev/tools/bolt-python/)
## 联系我们
如果你仍然遇到**技术问题**,我们的**专业支持团队**可以为你提供帮助。[**联系我们**](https://squarecloud.app/zh/support),我们很乐意协助你解决任何问题。
### 通过 CLI
要使用此方法,你需要在项目根目录中创建一个名为 `squarecloud.app` 的配置文件。该文件将包含项目所需的配置。
squarecloud.app 文件是一个配置文件,用于配置你的应用;它将用于定义你的环境。
首先,你的环境中需要已安装 CLI。如果尚未安装,请在终端中运行以下命令:
```
npm install -g @squarecloud/cli
```
如果你已经安装,我们建议对其进行更新。为此,请在终端中运行以下命令:
```bash theme={null}
squarecloud update
```
```bash theme={null}
curl -fsSL https://cli.squarecloud.app/install | bash
```
现在,要进行身份验证并使用其他 CLI 命令,你可以在[此处](https://squarecloud.app/zh/account/security)点击 "Request API Key" 找到你的授权密钥。获取授权密钥后,运行以下命令:
```bash theme={null}
squarecloud auth login
```
最后,要使用 CLI 将应用部署到 Square Cloud,你需要运行以下命令:
```bash theme={null}
squarecloud upload
```
或者,如果你手动创建了 zip 文件,可以使用:
```bash theme={null}
squarecloud upload --file
```
## 测试机器人
1. 在 Slack 应用面板的 "OAuth & Permissions" 下,将应用安装到 workspace。
2. 如果机器人暴露了 endpoint(用于事件或命令),请在 "Event Subscriptions" 和 "Slash Commands" 中配置 Request URL,指向你应用的公共 URL(Square Cloud 会在部署后提供域名)。
3. 在频道中测试提及功能或 `/hello` 命令,以验证响应是否正常。
安装链接示例(请替换 client\_id):
```txt theme={null}
https://slack.com/oauth/v2/authorize?client_id=000000000000.000000000000&scope=commands,chat:write,app_mentions:read
```
## 更多资源
如需进一步阅读,请查阅 Slack 官方文档:
* Bolt for JavaScript: [https://docs.slack.dev/tools/bolt-js/](https://docs.slack.dev/tools/bolt-js/)
* Bolt for Python: [https://docs.slack.dev/tools/bolt-python/](https://docs.slack.dev/tools/bolt-python/)
## 联系我们
如果你仍然遇到**技术问题**,我们的**专业支持团队**可以为你提供帮助。[**联系我们**](https://squarecloud.app/zh/support),我们很乐意协助你解决任何问题。