> ## Documentation Index
> Fetch the complete documentation index at: https://docs.squarecloud.app/llms.txt
> Use this file to discover all available pages before exploring further.
# 如何托管 NestJS 应用
> 了解如何在 Square Cloud 上创建并托管 NestJS 应用。
export const PortNote = ({lang}) => {
if (lang == 'pt-br') {
return
Qual porta devo usar para o meu servidor?
Você deve usar a porta 80 para o seu servidor. A porta 80 é a porta padrão para tráfego HTTP; a Square Cloud a encaminha para 443 (HTTPS) para estabelecer uma conexão segura.
Certifique-se de configurá-la antes de compactar e enviar seu projeto.
;
}
return
What port should I use for my server?
You should use port 80 for your server. Port 80 is the default port for HTTP traffic, which is handled by Square Cloud to route it to 443, HTTPS, for a secure connection.
Make sure to configure it before compressing and uploading your project.
;
};
export const RecommendedPlan = ({lang, plan, tier, cpu, appType}) => {
const url = `https://squarecloud.app/${lang}/pay?plan=${plan.toLowerCase()}&tier=${tier}`;
if (lang == 'en') {
return
Wondering how much RAM and CPU your plan needs to host {appType}?
Don't worry, we're here to help.
Our {plan} plan offers {tier}GB of RAM and {cpu}vCPU, which should be sufficient for most {appType}.
However, if you are working on a larger project and seeking extra stability, we recommend considering our Pro plan. With additional resources, you can maintain stability even during demand spikes.
To purchase, simply click here.
;
} else {
return
Está se perguntando quanta RAM e CPU seu plano precisa para hospedar {appType}?
Não se preocupe, estamos aqui para ajudar.
Nosso plano {plan} oferece {tier}GB de RAM e {cpu}vCPU, o que deve ser suficiente para a maioria dos {appType}.
No entanto, se você estiver trabalhando em um projeto maior e precisar de mais estabilidade, recomendamos considerar nosso plano Pro.
Com recursos adicionais, você pode manter a estabilidade mesmo durante picos de demanda.
Para comprar, basta clicar aqui.
;
}
};
export const appType_0 = "a NestJS application"
## 简介
要在 Square Cloud 上开发和托管 {appType_0},遵循一套结构化的配置和前置条件流程至关重要。本技术指南将涵盖整个过程,从初始设置到生产环境部署。
### 前置条件
* **Square Cloud 账户**:通过[注册页面](https://squarecloud.app/zh/signup)使用你的邮箱进行注册。
* **有效的付费套餐**:为你的应用提供专属资源和优化的性能。查看我们[可用的套餐](https://squarecloud.app/zh/pricing),选择最适合你需求的方案。
## 创建项目
要创建 NestJS 应用,在按照以下步骤操作之前,你的系统需要先安装 Node.js 和 npm。
### 安装 CLI
要使用 NestJS 命令行界面(CLI),你需要将其全局安装到系统中。运行以下命令:
```bash theme={null}
npm install -g @nestjs/cli
```
此命令会将 `@nestjs/cli` 包全局安装到你的系统中,使你可以在终端的任何位置使用 `nest` 命令。
### 开发项目
要创建一个新的 NestJS 项目,运行以下命令:
```bash theme={null}
nest new my-app
```
在此命令中,`nest new my-app` 用于创建一个新的 NestJS 项目。`nest new` 命令是随 `nest`(NestJS 命令行界面)一起提供的工具,用于初始化一个新的 NestJS 应用。
`my-app` 是新应用的名称。该命令会创建一个名为 `my-app` 的新目录,并为一个基础的 NestJS 应用设置好必要的文件和依赖。
使用 `nest new my-app` 命令生成 NestJS 项目后,要修改端口需要编辑的文件是 `main.ts`。该文件位于项目根目录下的 `src` 文件夹中。
```typescript theme={null}
import { NestFactory } from '@nestjs/core';
import { AppModule } from './app.module';
async function bootstrap() {
const app = await NestFactory.create(AppModule);
await app.listen(80); // Change the port number here to 80
}
bootstrap();
```
端口 80 是 HTTP 流量的默认端口。\
你可以使用以下命令启动开发服务器:
```bash theme={null}
npm run start:dev
```
## 构建项目
NestJS 使用 TypeScript,因此在运行应用之前,你必须将 TypeScript 代码编译为 JavaScript。
你可以运行以下命令来编译应用:
```bash theme={null}
npm run build
```
此命令会执行 `package.json` 文件中定义的 `build` 脚本,该脚本进而运行 `nest build` 命令。此命令会将你的 TypeScript 代码编译为 JavaScript。\
运行此命令后,编译生成的 JavaScript 文件将位于项目的 `dist` 目录中。这些文件正是你在生产环境中运行应用时所使用的。\
运行应用的主文件将是 `dist/main.js`。
## 部署
准备好项目文件后,你现在可以将它们上传到 Square Cloud 并托管你的项目。
为此,请创建一个包含所有项目文件的 ZIP 文件。
### 通过控制面板
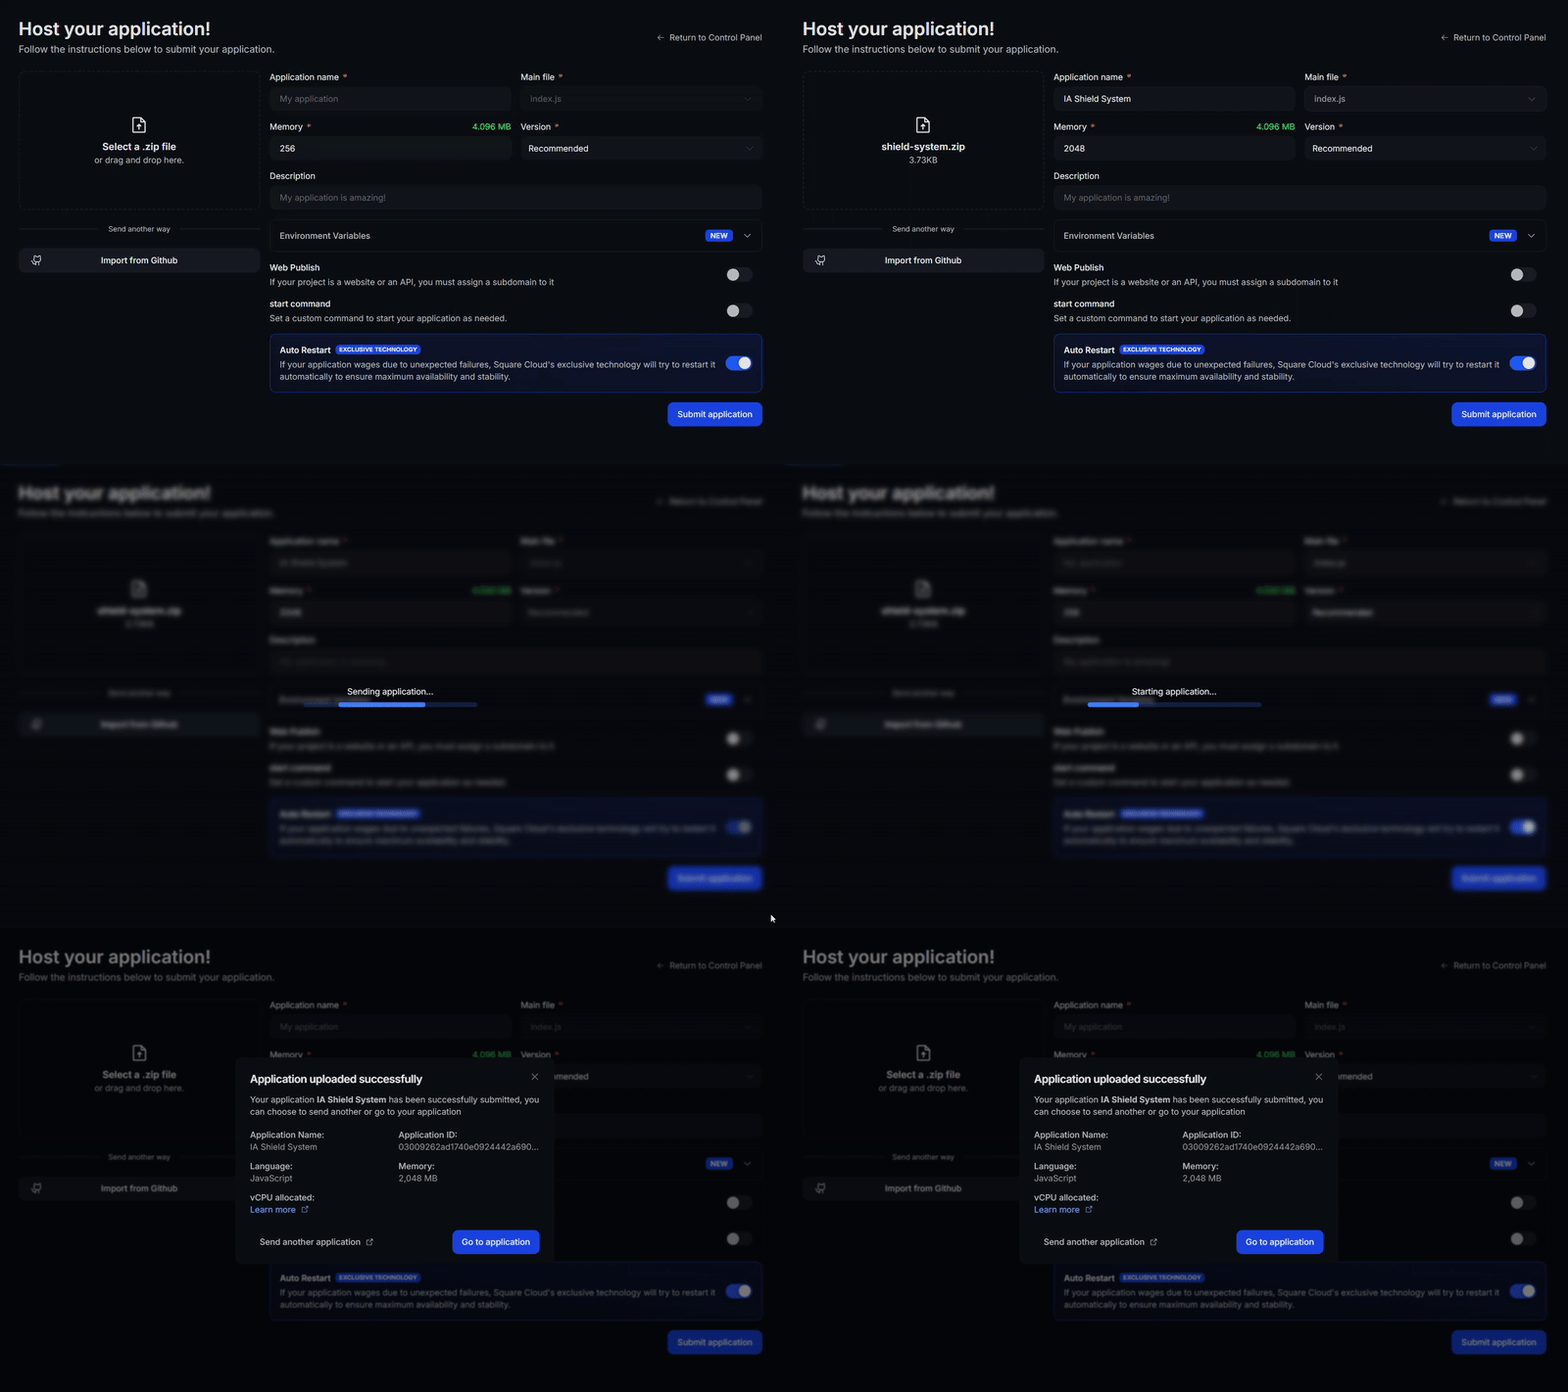
访问[上传页面](https://squarecloud.app/zh/dashboard/new)并上传你的项目 zip 文件。
上传 zip 后,你需要为项目配置名称、主文件或运行时环境以及其他设置。\
如果你上传的是 Web 项目,请务必选择 "Web Publication" 并为项目设置子域名。
最后,点击 "Deploy" 按钮,即可将项目托管到 Square Cloud。\
部署完成后,你可以在控制面板中监控项目的状态和日志。
 ### 通过 CLI
要使用此方法,你需要在项目根目录中创建一个名为 `squarecloud.app` 的配置文件。该文件将包含项目所需的配置。
squarecloud.app 文件是一个配置文件,用于配置你的应用;它将用于定义你的环境。
首先,你的环境中需要已安装 CLI。如果尚未安装,请在终端中运行以下命令:
```
npm install -g @squarecloud/cli
```
如果你已经安装,我们建议对其进行更新。为此,请在终端中运行以下命令:
```bash theme={null}
squarecloud update
```
```bash theme={null}
curl -fsSL https://cli.squarecloud.app/install | bash
```
现在,要进行身份验证并使用其他 CLI 命令,你可以在[此处](https://squarecloud.app/zh/account/security)点击 "Request API Key" 找到你的授权密钥。获取授权密钥后,运行以下命令:
```bash theme={null}
squarecloud auth login
```
最后,要使用 CLI 将应用部署到 Square Cloud,你需要运行以下命令:
```bash theme={null}
squarecloud upload
```
或者,如果你手动创建了 zip 文件,可以使用:
```bash theme={null}
squarecloud upload --file
```
## 更多资源
有关 NestJS 及其工具的更多信息,请访问 [NestJS 官方文档](https://docs.nestjs.com/)。在那里,你会找到详细的指南、教程和 API 文档,帮助你充分利用 NestJS。
## 故障排查
### 自定义域名
若要使用自定义域名(例如 `mysite.com`)来代替默认 URL `mysite.squareweb.app`,你需要 **Standard 计划或更高等级**。子域名由配置文件中的 **SUBDOMAIN** 字段定义。
### 最低内存要求
简单网站/API 的**最低要求为 512MB RAM**。对于使用框架的站点(Next.JS、React、Vue、Angular 等),我们始终建议**至少 1GB RAM**。对于更大型的应用,请分配更多 RAM,以防止应用内存耗尽而崩溃。
### 找不到此站点。
请检查**子域名/域名**是否与 **SUBDOMAIN** 字段或**自定义域名设置**中配置的内容一致。如果你刚上传站点,请等待最多 **60 秒**,让 Square 启用**首次访问**。
### 站点响应超时……
请检查你是否在应用中正确配置了**端口 80** 和**主机 0.0.0.0**。我们建议使用 Square 强制注入的环境变量:来自 `.env` 文件的 **PORT** 和 **HOST**。
## 联系我们
如果你仍然遇到**技术问题**,我们的**专业支持团队**可以为你提供帮助。[**联系我们**](https://squarecloud.app/zh/support),我们很乐意协助你解决任何问题。
### 通过 CLI
要使用此方法,你需要在项目根目录中创建一个名为 `squarecloud.app` 的配置文件。该文件将包含项目所需的配置。
squarecloud.app 文件是一个配置文件,用于配置你的应用;它将用于定义你的环境。
首先,你的环境中需要已安装 CLI。如果尚未安装,请在终端中运行以下命令:
```
npm install -g @squarecloud/cli
```
如果你已经安装,我们建议对其进行更新。为此,请在终端中运行以下命令:
```bash theme={null}
squarecloud update
```
```bash theme={null}
curl -fsSL https://cli.squarecloud.app/install | bash
```
现在,要进行身份验证并使用其他 CLI 命令,你可以在[此处](https://squarecloud.app/zh/account/security)点击 "Request API Key" 找到你的授权密钥。获取授权密钥后,运行以下命令:
```bash theme={null}
squarecloud auth login
```
最后,要使用 CLI 将应用部署到 Square Cloud,你需要运行以下命令:
```bash theme={null}
squarecloud upload
```
或者,如果你手动创建了 zip 文件,可以使用:
```bash theme={null}
squarecloud upload --file
```
## 更多资源
有关 NestJS 及其工具的更多信息,请访问 [NestJS 官方文档](https://docs.nestjs.com/)。在那里,你会找到详细的指南、教程和 API 文档,帮助你充分利用 NestJS。
## 故障排查
### 自定义域名
若要使用自定义域名(例如 `mysite.com`)来代替默认 URL `mysite.squareweb.app`,你需要 **Standard 计划或更高等级**。子域名由配置文件中的 **SUBDOMAIN** 字段定义。
### 最低内存要求
简单网站/API 的**最低要求为 512MB RAM**。对于使用框架的站点(Next.JS、React、Vue、Angular 等),我们始终建议**至少 1GB RAM**。对于更大型的应用,请分配更多 RAM,以防止应用内存耗尽而崩溃。
### 找不到此站点。
请检查**子域名/域名**是否与 **SUBDOMAIN** 字段或**自定义域名设置**中配置的内容一致。如果你刚上传站点,请等待最多 **60 秒**,让 Square 启用**首次访问**。
### 站点响应超时……
请检查你是否在应用中正确配置了**端口 80** 和**主机 0.0.0.0**。我们建议使用 Square 强制注入的环境变量:来自 `.env` 文件的 **PORT** 和 **HOST**。
## 联系我们
如果你仍然遇到**技术问题**,我们的**专业支持团队**可以为你提供帮助。[**联系我们**](https://squarecloud.app/zh/support),我们很乐意协助你解决任何问题。