> ## Documentation Index
> Fetch the complete documentation index at: https://docs.squarecloud.app/llms.txt
> Use this file to discover all available pages before exploring further.
# 在 Square Cloud 上使用 Go 快速入门
> 了解如何在 Square Cloud 上使用 Go 快速入门
## 🚀 简介
* 在开始之前,请确保你的系统上已安装 Go。如果尚未安装,你可以从 [Go 官方网站](https://go.dev/doc/install) 下载。
* 接下来,你需要在 Square Cloud 上创建一个账户,可以通过[登录页面](https://squarecloud.app/zh/signup)完成。你可以使用邮箱、GitHub 或两者结合来创建账户。
* 最后,你的账户需要有一个有效的付费计划。你可以在[这里](https://squarecloud.app/zh/pricing)查看我们的计划并根据需求购买。
## ⚙️ squarecloud.app 文件配置
如果你通过 Square Cloud 网站上传应用,可以忽略本节内容。网站会自动为你创建 `squarecloud.app` 配置文件。
squarecloud.app 文件是一个配置文件,用于配置你的应用;它用来定义名称、描述、
版本、主文件等内容。
## 📄 必需文件
* main.go(主文件示例)。
* go.mod(依赖文件)。
* 或 go.work(依赖文件)。
* go.sum(校验和文件,可选)。
* [squarecloud.app](https://docs.squarecloud.app/zh/getting-started/config-file)(包含 Square Cloud 配置的文件)。
## ▶️ 如何启动你的应用
* 如果配置文件中未定义 `START` 字段,Square Cloud 将执行 `go run MAIN` 来编译并运行 `MAIN` 中指定的 Go 文件。如果定义了 `START` 字段,则会直接执行其中的值。有关配置文件参数的更多信息,请访问[配置参数](https://docs.squarecloud.app/zh/getting-started/config-file#configuration-parameters)。
* Square Cloud 会运行 `go mod tidy` 命令来更新项目依赖。
## 🖥️ 准备项目
在将项目托管到 Square Cloud 之前,请先检查项目文件是否已正确配置以便托管。
配置文件(`squarecloud.app/.config`)必须位于 zip 文件的根目录中。否则,Square Cloud 在部署时将无法找到它。
## 📤 如何托管你的项目
现在你已经为 Go 项目准备好了所有文件,下一步就是将它们上传到 Square Cloud 并让你的应用上线。有多种上传方式,但我们将介绍两种:通过 Dashboard 或通过 CLI。
### 通过控制面板
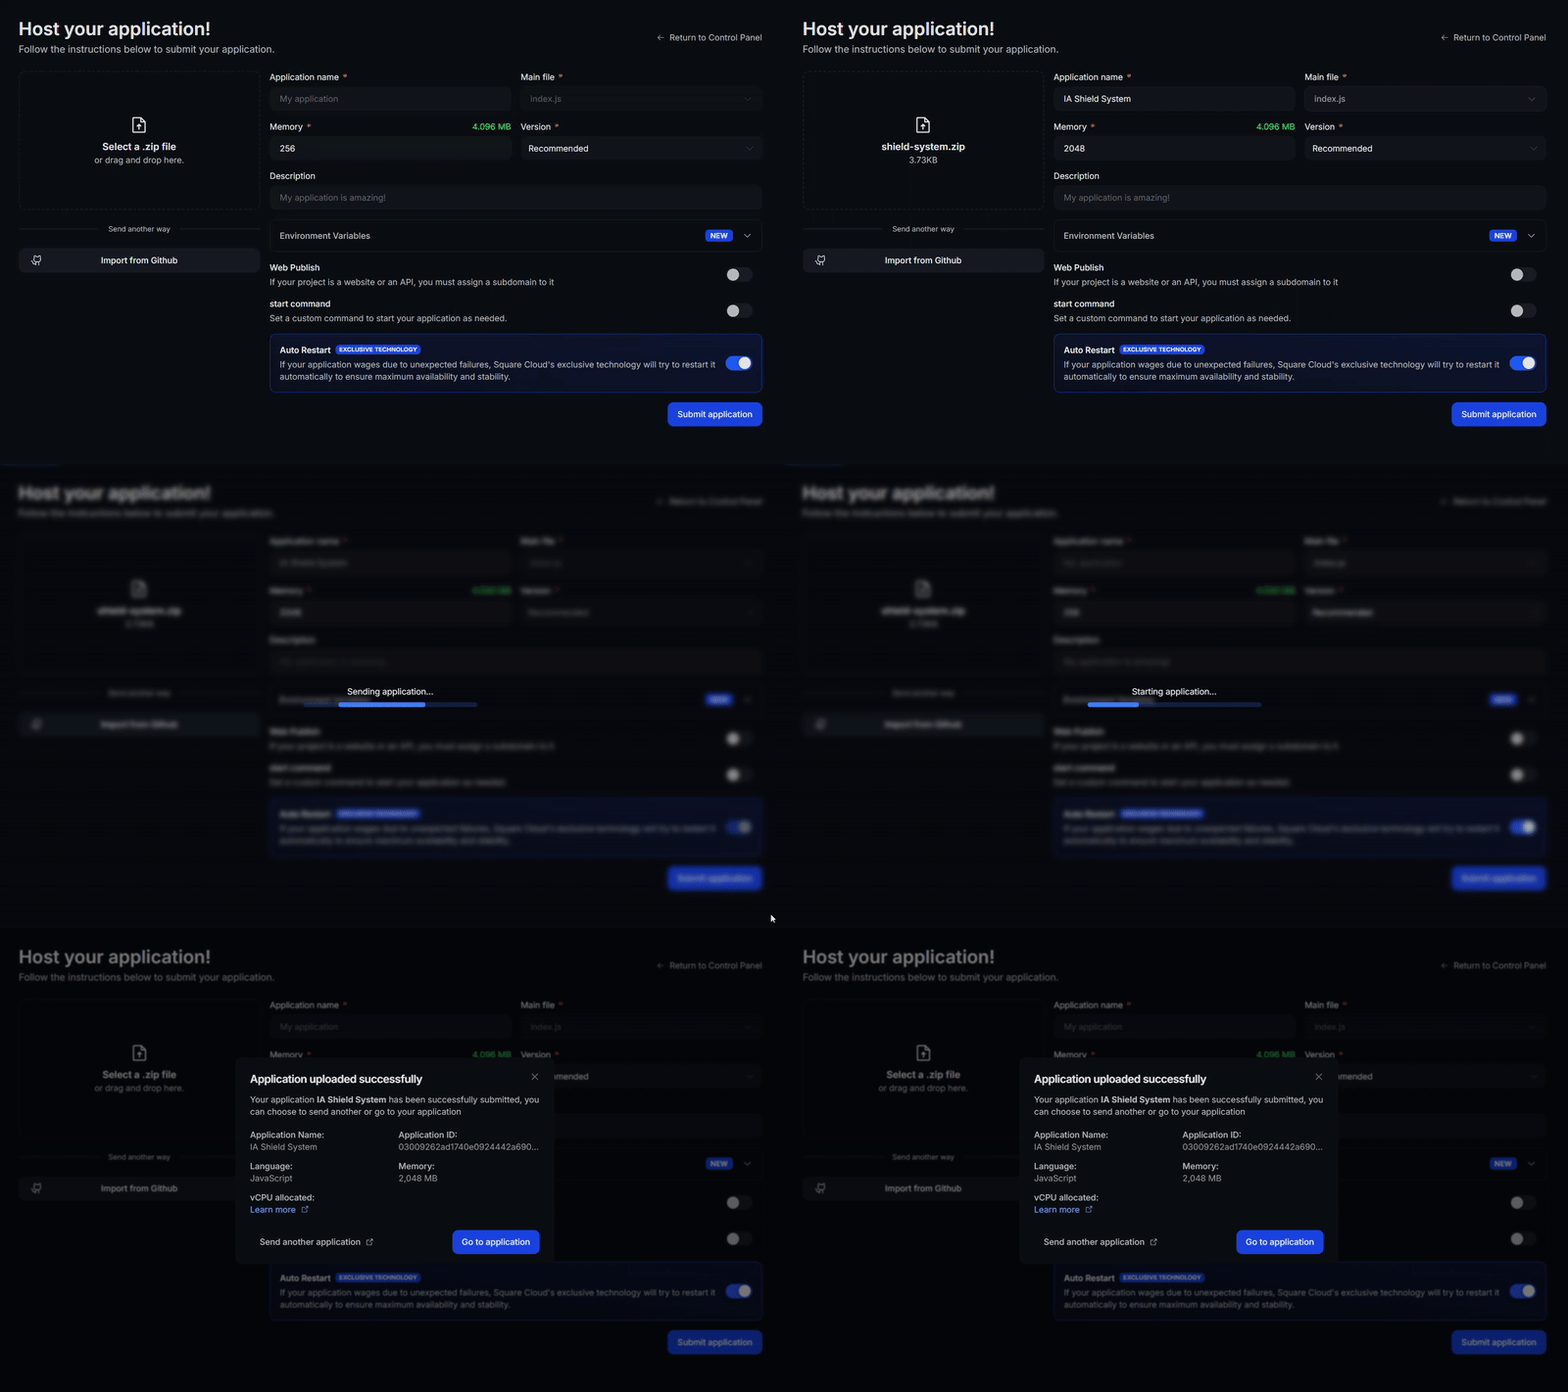
访问[上传页面](https://squarecloud.app/zh/dashboard/new)并上传你的项目 zip 文件。
上传 zip 后,你需要为项目配置名称、主文件或运行时环境以及其他设置。\
如果你上传的是 Web 项目,请务必选择 "Web Publication" 并为项目设置子域名。
最后,点击 "Deploy" 按钮,即可将项目托管到 Square Cloud。\
部署完成后,你可以在控制面板中监控项目的状态和日志。
 ### 通过 CLI
要使用此方法,你需要在项目根目录中创建一个名为 `squarecloud.app` 的配置文件。该文件将包含项目所需的配置。
squarecloud.app 文件是一个配置文件,用于配置你的应用;它将用于定义你的环境。
首先,你的环境中需要已安装 CLI。如果尚未安装,请在终端中运行以下命令:
```
npm install -g @squarecloud/cli
```
如果你已经安装,我们建议对其进行更新。为此,请在终端中运行以下命令:
```bash theme={null}
squarecloud update
```
```bash theme={null}
curl -fsSL https://cli.squarecloud.app/install | bash
```
现在,要进行身份验证并使用其他 CLI 命令,你可以在[此处](https://squarecloud.app/zh/account/security)点击 "Request API Key" 找到你的授权密钥。获取授权密钥后,运行以下命令:
```bash theme={null}
squarecloud auth login
```
最后,要使用 CLI 将应用部署到 Square Cloud,你需要运行以下命令:
```bash theme={null}
squarecloud upload
```
或者,如果你手动创建了 zip 文件,可以使用:
```bash theme={null}
squarecloud upload --file
```
## 联系我们
如果你仍然遇到**技术问题**,我们的**专业支持团队**可以为你提供帮助。[**联系我们**](https://squarecloud.app/zh/support),我们很乐意协助你解决任何问题。
### 通过 CLI
要使用此方法,你需要在项目根目录中创建一个名为 `squarecloud.app` 的配置文件。该文件将包含项目所需的配置。
squarecloud.app 文件是一个配置文件,用于配置你的应用;它将用于定义你的环境。
首先,你的环境中需要已安装 CLI。如果尚未安装,请在终端中运行以下命令:
```
npm install -g @squarecloud/cli
```
如果你已经安装,我们建议对其进行更新。为此,请在终端中运行以下命令:
```bash theme={null}
squarecloud update
```
```bash theme={null}
curl -fsSL https://cli.squarecloud.app/install | bash
```
现在,要进行身份验证并使用其他 CLI 命令,你可以在[此处](https://squarecloud.app/zh/account/security)点击 "Request API Key" 找到你的授权密钥。获取授权密钥后,运行以下命令:
```bash theme={null}
squarecloud auth login
```
最后,要使用 CLI 将应用部署到 Square Cloud,你需要运行以下命令:
```bash theme={null}
squarecloud upload
```
或者,如果你手动创建了 zip 文件,可以使用:
```bash theme={null}
squarecloud upload --file
```
## 联系我们
如果你仍然遇到**技术问题**,我们的**专业支持团队**可以为你提供帮助。[**联系我们**](https://squarecloud.app/zh/support),我们很乐意协助你解决任何问题。