> ## Documentation Index
> Fetch the complete documentation index at: https://docs.squarecloud.app/llms.txt
> Use this file to discover all available pages before exploring further.
# X (Twitter) ボットのホスティング方法
> Square Cloud で X (Twitter) ボットを作成してホスティングする方法を学びます。設定、デプロイ、Node.js と Python による実践的な例を含む完全なチュートリアルです。
export const RecommendedPlan = ({lang, plan, tier, cpu, appType}) => {
const url = `https://squarecloud.app/${lang}/pay?plan=${plan.toLowerCase()}&tier=${tier}`;
if (lang == 'en') {
return
Wondering how much RAM and CPU your plan needs to host {appType}?
Don't worry, we're here to help.
Our {plan} plan offers {tier}GB of RAM and {cpu}vCPU, which should be sufficient for most {appType}.
However, if you are working on a larger project and seeking extra stability, we recommend considering our Pro plan. With additional resources, you can maintain stability even during demand spikes.
To purchase, simply click here.
;
} else {
return
Está se perguntando quanta RAM e CPU seu plano precisa para hospedar {appType}?
Não se preocupe, estamos aqui para ajudar.
Nosso plano {plan} oferece {tier}GB de RAM e {cpu}vCPU, o que deve ser suficiente para a maioria dos {appType}.
No entanto, se você estiver trabalhando em um projeto maior e precisar de mais estabilidade, recomendamos considerar nosso plano Pro.
Com recursos adicionais, você pode manter a estabilidade mesmo durante picos de demanda.
Para comprar, basta clicar aqui.
;
}
};
export const appType_0 = "a X (Twitter) bot"
## はじめに
Square Cloud で {appType_0} を開発してホストするには、構成と前提条件の体系的な手順に従うことが不可欠です。この技術ガイドでは、初期セットアップから本番環境へのデプロイまで、プロセス全体を解説します。
### 前提条件
* **Square Cloud アカウント**: [登録ページ](https://squarecloud.app/ja/signup)からメールアドレスを使って登録します。
* **有効な有料プラン**: アプリケーションに専用リソースと最適化されたパフォーマンスを提供します。[利用可能なプラン](https://squarecloud.app/ja/pricing)を確認し、ニーズに最も適したものを選択してください。
### プロジェクトの作成
認証とボットの動作には、アクティブな X (Twitter) アカウントが必要です。アカウントをお持ちでない場合は、[X 公式サイト](https://x.com/)で登録してください。\
API にアクセスするには、X Developer アカウントも必要です。[X Developer Portal](https://developer.x.com/en) からアクセスをリクエストしてください。
### X 上でのボットアプリケーション
1. [X Developer Portal](https://developer.x.com/en/portal/dashboard) にアクセスします。
2. X (Twitter) アカウントでログインします。
3. 初めての場合は、開発者アクセスのリクエスト手続きを完了してください。
1. ダッシュボードで「Create Project」をクリックします。
2. プロジェクトの名前を選びます(例: 「Square Cloud Bot」)。
3. 最も適切なユースケースを選択します(例: 「Making a bot」)。
4. ボットの詳細な説明を入力します。
5. プロジェクトの作成を確定します。
1. 作成したプロジェクト内で「Create App」をクリックします。
2. アプリケーションに一意の名前を定義します。
3. アプリケーションの作成を確定します。
4. 生成された **App ID** を今後の参照用に記録しておきます。
1. アプリケーションの「Keys and tokens」セクションに移動します。
2. 「Consumer Keys」セクションで「Regenerate」をクリックして、以下を生成します:
* **API Key** (Consumer Key)
* **API Secret Key** (Consumer Secret)
3. **重要**: これらのキーは再表示できないため、すぐにコピーして保存してください。
1. 「App permissions」セクションに移動します。
2. 「Edit」をクリックして権限を変更します。
3. ボットがツイートを投稿できるように「Read and write」を選択します。
4. 必要に応じて、DM 機能のために「Read and write and Direct message」を選択します。
5. 変更を保存します。
1. 「Keys and tokens」セクションに戻ります。
2. 「Access Token and Secret」セクションで「Generate」をクリックします。
3. トークンの生成を確定します。
4. 以下をコピーして保存します:
* **Access Token**
* **Access Token Secret**
5. **警告**: これらのトークンはページを閉じた後は再表示できません。
1. 必要な 4 つの認証情報がすべて揃っていることを確認します:
* API Key (Consumer Key)
* API Secret Key (Consumer Secret)
* Access Token
* Access Token Secret
2. これらの認証情報を安全な場所に保管します
3. **重要**: これらの認証情報を公開したり共有したりしないでください
## プロジェクトの開発
1. **Node.js の確認**: Node.js がシステムにインストールされていることを確認してください。ない場合は、[Node.js 公式サイト](https://nodejs.org/)からダウンロードしてください。
2. **プロジェクトの初期化**: 次のコマンドを実行して、新しい Node.js プロジェクトを作成します:
```bash Terminal theme={null}
npm init -y
```
3. **依存関係のインストール**: ボットに必要なライブラリをインストールします:
```bash Terminal theme={null}
npm install twitter-api-v2
```
4. **環境変数のセットアップ**: 認証情報を安全に保存するために `.env` ファイルを作成します:
```env .env theme={null}
API_KEY=your_api_key_here
API_SECRET_KEY=your_api_secret_key_here
ACCESS_TOKEN=your_access_token_here
ACCESS_TOKEN_SECRET=your_access_token_secret_here
```
5. **メインファイルの作成**: ボットの基本構造を含む `index.js` ファイルを作成します:
```javascript index.js theme={null}
// Import necessary modules
const { TwitterApi } = require('twitter-api-v2');
// Configure Twitter client with authentication
const client = new TwitterApi({
appKey: process.env.API_KEY,
appSecret: process.env.API_SECRET_KEY,
accessToken: process.env.ACCESS_TOKEN,
accessSecret: process.env.ACCESS_TOKEN_SECRET,
});
// Client with read and write permissions
const rwClient = client.readWrite;
// Stores the authenticated bot user id (set in verifyBot)
let botUserId = null;
// Function to check if the bot is working
async function verifyBot() {
try {
// Get authenticated user information (X API v2)
const me = await rwClient.v2.me();
botUserId = me.data.id;
console.log(`Bot successfully initialized! User: @${me.data.username}`);
return true;
} catch (error) {
console.error('Error verifying bot:', error);
return false;
}
}
// Function to post a tweet
async function postTweet(text) {
try {
const tweet = await rwClient.v2.tweet(text);
console.log(`Tweet posted successfully! ID: ${tweet.data.id}`);
return tweet;
} catch (error) {
console.error('Error posting tweet:', error);
throw error;
}
}
// Function to respond to mentions
async function respondToMentions() {
if (!botUserId) return;
try {
// Fetch recent mentions (X API v2)
const mentions = await rwClient.v2.userMentionTimeline(botUserId, {
max_results: 10,
});
for (const tweet of mentions.data?.data ?? []) {
// Check if it's a new mention (implement control logic)
if (tweet.text.includes('!ping')) {
// Reply to the mention
await rwClient.v2.reply(
'Pong! 🤖 X Bot working correctly!',
tweet.id
);
console.log(`Replied to mention (tweet ID: ${tweet.id})`);
}
}
} catch (error) {
console.error('Error processing mentions:', error);
}
}
// Function to search and interact with specific tweets
async function searchAndInteract(query) {
if (!botUserId) return;
try {
// Search recent tweets (X API v2)
const tweets = await rwClient.v2.search(query, {
max_results: 10,
});
for (const tweet of tweets.data?.data ?? []) {
// Like the tweet
await rwClient.v2.like(botUserId, tweet.id);
console.log(`Liked tweet ID: ${tweet.id}`);
// Wait a bit between actions to avoid rate limiting
await new Promise(resolve => setTimeout(resolve, 2000));
}
} catch (error) {
console.error('Error searching and interacting:', error);
}
}
// Main bot function
async function runBot() {
console.log('Starting X bot...');
// Check if the bot is configured correctly
const botOk = await verifyBot();
if (!botOk) {
console.error('Bot initialization failed');
return;
}
// Example: Post an initialization tweet
try {
await postTweet('🤖 X Bot initialized and running on Square Cloud!');
} catch (error) {
console.log('Initialization tweet failed, but bot continues running');
}
// Main bot loop
setInterval(async () => {
try {
// Check and respond to mentions every 5 minutes
await respondToMentions();
// Example: Search and interact with tweets about a specific topic
// await searchAndInteract('#SquareCloud');
} catch (error) {
console.error('Error in main loop:', error);
}
}, 5 * 60 * 1000); // 5 minutes
console.log('Bot running. Press Ctrl+C to stop.');
}
// Signal handling for graceful shutdown
process.on('SIGINT', () => {
console.log('\nShutting down X bot...');
process.exit(0);
});
process.on('SIGTERM', () => {
console.log('\nShutting down X bot...');
process.exit(0);
});
// Initialize the bot
runBot();
```
## デプロイ
プロジェクトファイルの準備が完了したら、それらを Square Cloud にアップロードしてプロジェクトをホスティングできます。
そのためには、すべてのプロジェクトファイルを含む ZIP ファイルを作成してください。
**セキュリティ**: API 認証情報をコードに直接記述しないでください。Square Cloud では必ず環境変数を使用してください。
Square Cloud では、コントロールパネルから次の環境変数を設定します:
* `API_KEY`: あなたの X API キー
* `API_SECRET_KEY`: あなたの X API シークレットキー
* `ACCESS_TOKEN`: あなたのアクセストークン
* `ACCESS_TOKEN_SECRET`: あなたのアクセストークンシークレット
### ダッシュボード経由
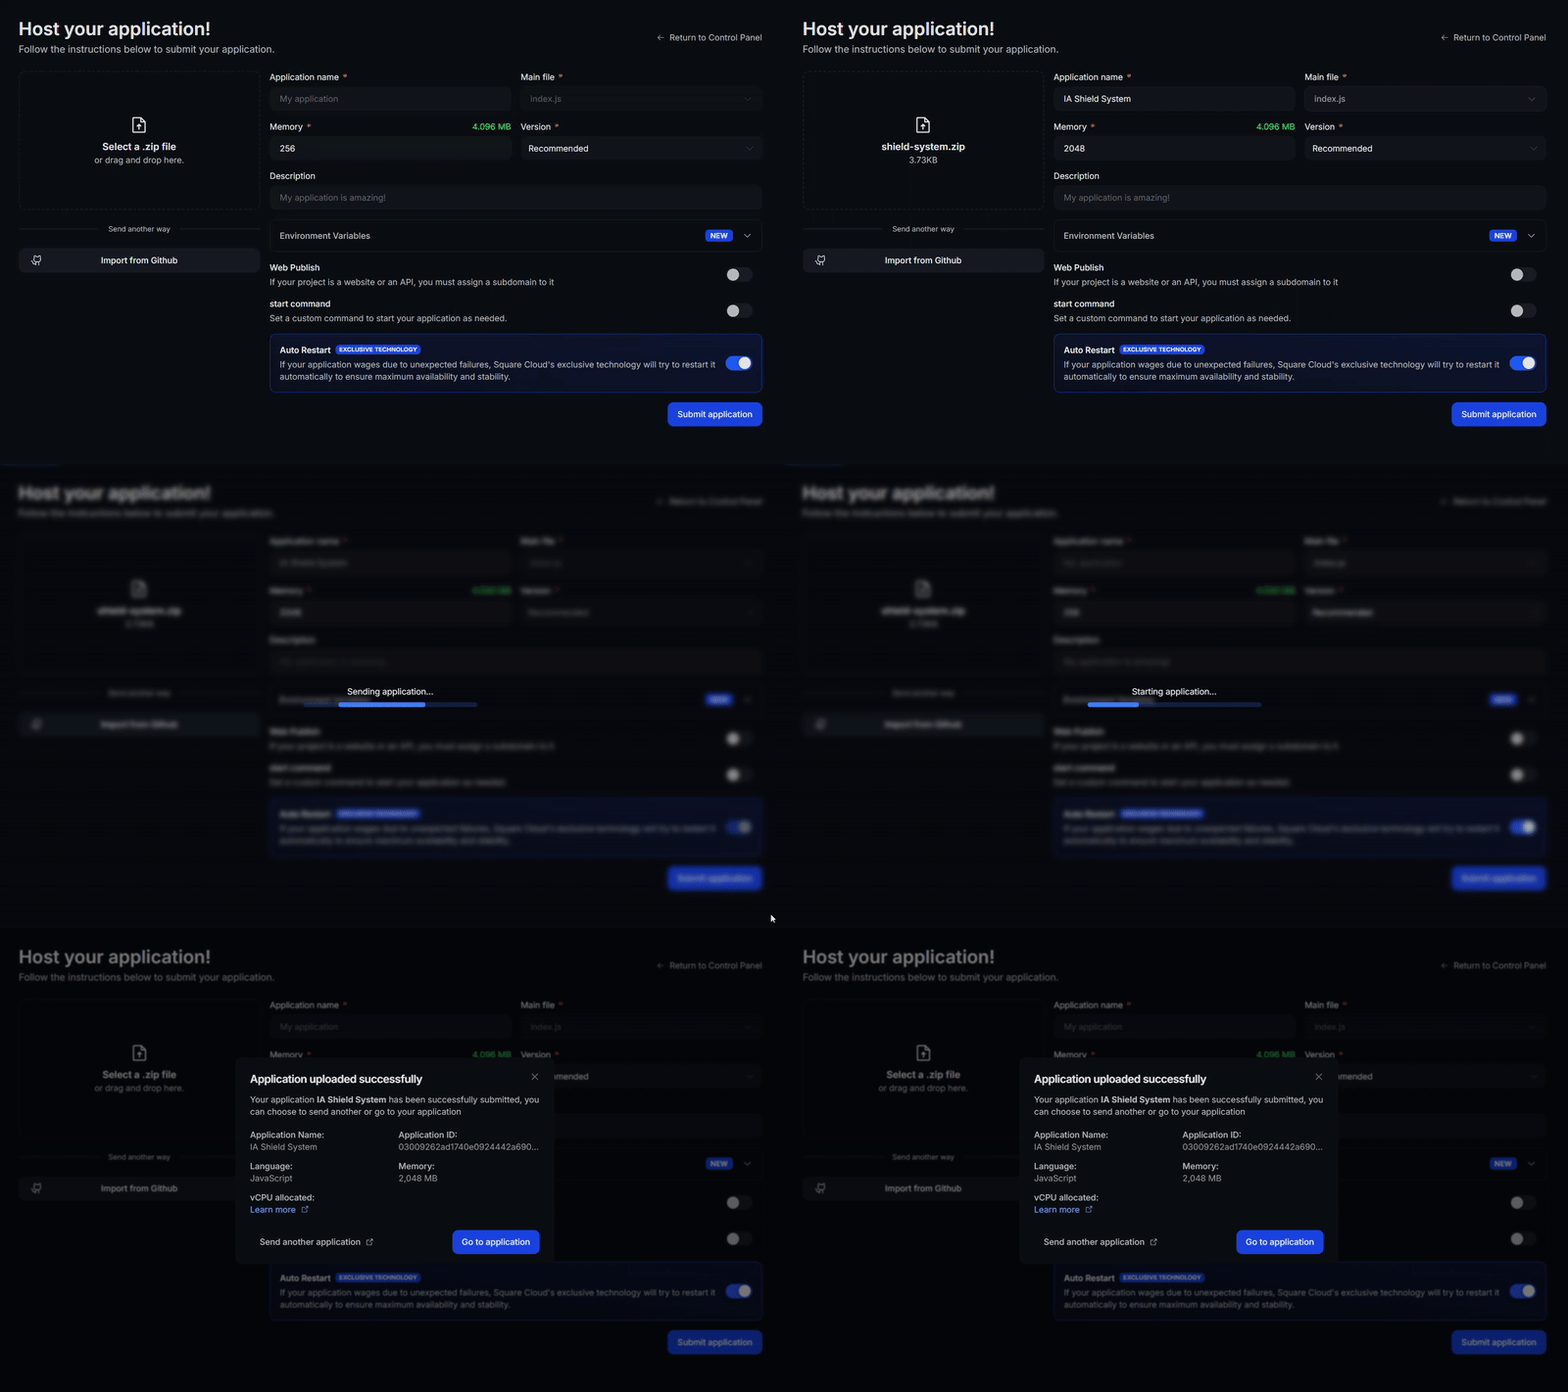
[アップロードページ](https://squarecloud.app/ja/dashboard/new)にアクセスし、プロジェクトの zip ファイルをアップロードします。
zip をアップロードした後、プロジェクトの名前、メインファイルまたはランタイム環境、その他の設定を構成する必要があります。\
ウェブプロジェクトをアップロードする場合は、必ず「Web Publication」を選択し、プロジェクトにサブドメインを設定してください。
最後に「Deploy」ボタンをクリックして、プロジェクトを Square Cloud にホストします。\
デプロイ後、ダッシュボードからプロジェクトのステータスとログを監視できます。
 ### CLI 経由
この方法を使用するには、プロジェクトのルートディレクトリに `squarecloud.app` という名前の設定ファイルを作成する必要があります。このファイルには、プロジェクトに必要な設定が含まれます。
squarecloud.app ファイルはアプリケーションを構成するために使用される設定ファイルであり、環境を定義するために使用されます。
まず、環境に CLI がインストールされている必要があります。まだの場合は、ターミナルで次のコマンドを実行してください:
```
npm install -g @squarecloud/cli
```
すでにお持ちの場合は、更新することを推奨します。更新するには、ターミナルで次のコマンドを実行してください:
```bash theme={null}
squarecloud update
```
```bash theme={null}
curl -fsSL https://cli.squarecloud.app/install | bash
```
次に、認証して他の CLI コマンドを使用するには、[こちら](https://squarecloud.app/ja/account/security)で「Request API Key」をクリックして認証キーを取得します。認証キーを取得したら、次のコマンドを実行してください:
```bash theme={null}
squarecloud auth login
```
最後に、CLI を使用してアプリケーションを Square Cloud にデプロイするには、次のコマンドを実行する必要があります:
```bash theme={null}
squarecloud upload
```
または、zip を手動で作成した場合は、次を使用できます:
```bash theme={null}
squarecloud upload --file
```
## その他のリソース
twitter-api-v2 を使用した X ボット開発についてさらに理解を深めるには、[twitter-api-v2 公式ライブラリのドキュメント](https://github.com/PLhery/node-twitter-api-v2)を確認してください。このドキュメントでは、詳細なガイド、高度なチュートリアル、そして実装を最大化するための完全な API リファレンスを提供しています。
以下も参照してください:
* [X API 公式ドキュメント](https://docs.x.com/overview)
* [X API 利用ポリシー](https://developer.x.com/en/developer-terms/policy)
* [ボットのベストプラクティスガイド](https://docs.x.com/x-api/getting-started/about-x-api)
### ハッシュタグの監視
```javascript theme={null}
// Function to monitor specific hashtags
async function monitorHashtags(hashtags) {
for (const hashtag of hashtags) {
try {
const tweets = await rwClient.v2.search(`#${hashtag}`, {
max_results: 10,
});
// Process found tweets
for (const tweet of tweets.data?.data ?? []) {
console.log(`Tweet found with #${hashtag}: ${tweet.text}`);
// Implement interaction logic
}
} catch (error) {
console.error(`Error monitoring #${hashtag}:`, error);
}
}
}
```
### 投稿のスケジュール設定
```javascript theme={null}
// Function to schedule posts
function schedulePost(text, delay) {
setTimeout(async () => {
try {
await postTweet(text);
console.log('Scheduled post published successfully!');
} catch (error) {
console.error('Error publishing scheduled post:', error);
}
}, delay);
}
// Example: Schedule a post for 1 hour
schedulePost('🤖 Scheduled post by the bot!', 60 * 60 * 1000);
```
### レート制限
X (Twitter) には厳格なレート制限があります。これらの制限を超えないように制御を実装してください:
```javascript theme={null}
// Rate limiting control
const rateLimiter = {
lastRequest: 0,
minInterval: 1000, // 1 second between requests
async wait() {
const now = Date.now();
const timeSinceLastRequest = now - this.lastRequest;
if (timeSinceLastRequest < this.minInterval) {
const waitTime = this.minInterval - timeSinceLastRequest;
await new Promise(resolve => setTimeout(resolve, waitTime));
}
this.lastRequest = Date.now();
}
};
```
### エラー処理
```javascript theme={null}
// Helper function to retry an operation on failure
async function retryOperation(operation, maxRetries = 3) {
for (let i = 0; i < maxRetries; i++) {
try {
return await operation();
} catch (error) {
console.error(`Attempt ${i + 1} failed:`, error.message);
if (i === maxRetries - 1) {
throw error;
}
// Wait before retrying
await new Promise(resolve => setTimeout(resolve, 2000 * (i + 1)));
}
}
}
```
## お問い合わせ
**技術的な問題**が解決しない場合は、**専門のサポートチーム**がお手伝いします。[**お問い合わせ**](https://squarecloud.app/ja/support)いただければ、どのような問題でも喜んで解決をサポートいたします。
### CLI 経由
この方法を使用するには、プロジェクトのルートディレクトリに `squarecloud.app` という名前の設定ファイルを作成する必要があります。このファイルには、プロジェクトに必要な設定が含まれます。
squarecloud.app ファイルはアプリケーションを構成するために使用される設定ファイルであり、環境を定義するために使用されます。
まず、環境に CLI がインストールされている必要があります。まだの場合は、ターミナルで次のコマンドを実行してください:
```
npm install -g @squarecloud/cli
```
すでにお持ちの場合は、更新することを推奨します。更新するには、ターミナルで次のコマンドを実行してください:
```bash theme={null}
squarecloud update
```
```bash theme={null}
curl -fsSL https://cli.squarecloud.app/install | bash
```
次に、認証して他の CLI コマンドを使用するには、[こちら](https://squarecloud.app/ja/account/security)で「Request API Key」をクリックして認証キーを取得します。認証キーを取得したら、次のコマンドを実行してください:
```bash theme={null}
squarecloud auth login
```
最後に、CLI を使用してアプリケーションを Square Cloud にデプロイするには、次のコマンドを実行する必要があります:
```bash theme={null}
squarecloud upload
```
または、zip を手動で作成した場合は、次を使用できます:
```bash theme={null}
squarecloud upload --file
```
## その他のリソース
twitter-api-v2 を使用した X ボット開発についてさらに理解を深めるには、[twitter-api-v2 公式ライブラリのドキュメント](https://github.com/PLhery/node-twitter-api-v2)を確認してください。このドキュメントでは、詳細なガイド、高度なチュートリアル、そして実装を最大化するための完全な API リファレンスを提供しています。
以下も参照してください:
* [X API 公式ドキュメント](https://docs.x.com/overview)
* [X API 利用ポリシー](https://developer.x.com/en/developer-terms/policy)
* [ボットのベストプラクティスガイド](https://docs.x.com/x-api/getting-started/about-x-api)
### ハッシュタグの監視
```javascript theme={null}
// Function to monitor specific hashtags
async function monitorHashtags(hashtags) {
for (const hashtag of hashtags) {
try {
const tweets = await rwClient.v2.search(`#${hashtag}`, {
max_results: 10,
});
// Process found tweets
for (const tweet of tweets.data?.data ?? []) {
console.log(`Tweet found with #${hashtag}: ${tweet.text}`);
// Implement interaction logic
}
} catch (error) {
console.error(`Error monitoring #${hashtag}:`, error);
}
}
}
```
### 投稿のスケジュール設定
```javascript theme={null}
// Function to schedule posts
function schedulePost(text, delay) {
setTimeout(async () => {
try {
await postTweet(text);
console.log('Scheduled post published successfully!');
} catch (error) {
console.error('Error publishing scheduled post:', error);
}
}, delay);
}
// Example: Schedule a post for 1 hour
schedulePost('🤖 Scheduled post by the bot!', 60 * 60 * 1000);
```
### レート制限
X (Twitter) には厳格なレート制限があります。これらの制限を超えないように制御を実装してください:
```javascript theme={null}
// Rate limiting control
const rateLimiter = {
lastRequest: 0,
minInterval: 1000, // 1 second between requests
async wait() {
const now = Date.now();
const timeSinceLastRequest = now - this.lastRequest;
if (timeSinceLastRequest < this.minInterval) {
const waitTime = this.minInterval - timeSinceLastRequest;
await new Promise(resolve => setTimeout(resolve, waitTime));
}
this.lastRequest = Date.now();
}
};
```
### エラー処理
```javascript theme={null}
// Helper function to retry an operation on failure
async function retryOperation(operation, maxRetries = 3) {
for (let i = 0; i < maxRetries; i++) {
try {
return await operation();
} catch (error) {
console.error(`Attempt ${i + 1} failed:`, error.message);
if (i === maxRetries - 1) {
throw error;
}
// Wait before retrying
await new Promise(resolve => setTimeout(resolve, 2000 * (i + 1)));
}
}
}
```
## お問い合わせ
**技術的な問題**が解決しない場合は、**専門のサポートチーム**がお手伝いします。[**お問い合わせ**](https://squarecloud.app/ja/support)いただければ、どのような問題でも喜んで解決をサポートいたします。