> ## Documentation Index
> Fetch the complete documentation index at: https://docs.squarecloud.app/llms.txt
> Use this file to discover all available pages before exploring further.
# Configure Top.gg Webhook on Square Cloud
> A detailed guide to setting up the Top.gg webhook on Square Cloud.
## Introduction
* This guide assumes you have an approved bot on [top.gg](https://top.gg/) and are using either Node.js or Python for your project.
* Next, you will need to create an account on Square Cloud, which can be done through the [sign up page](https://squarecloud.app/signup). You can use your email to create an account.
* Finally, you need to have an active paid plan on your account. You can view our plans and purchase one according to your needs [here](https://squarecloud.app/en/pricing).
## Setting Up the Environment
1. Before you begin, make sure you have Node.js and npm installed on your system. If you don't have them yet, you can download them from the [official Node.js website](https://nodejs.org/).
2. Start a new Node.js project with the following command:
```bash Terminal theme={null}
npm init -y
```
This command creates a package.json file in the current directory.
2. Install the necessary libraries:
```bash Terminal theme={null}
npm install @top-gg/sdk express
```
1. Ensure you have Python and Pip (a package manager for Python) installed on your system. If not, you can download them from the [official Python website](https://www.python.org/) and the [official Pip website](https://pypi.org/).
2. Install the `flask` and `waitress` libraries using pip:
```bash theme={null}
pip install flask
pip install waitress
```
## Setting Up the Project
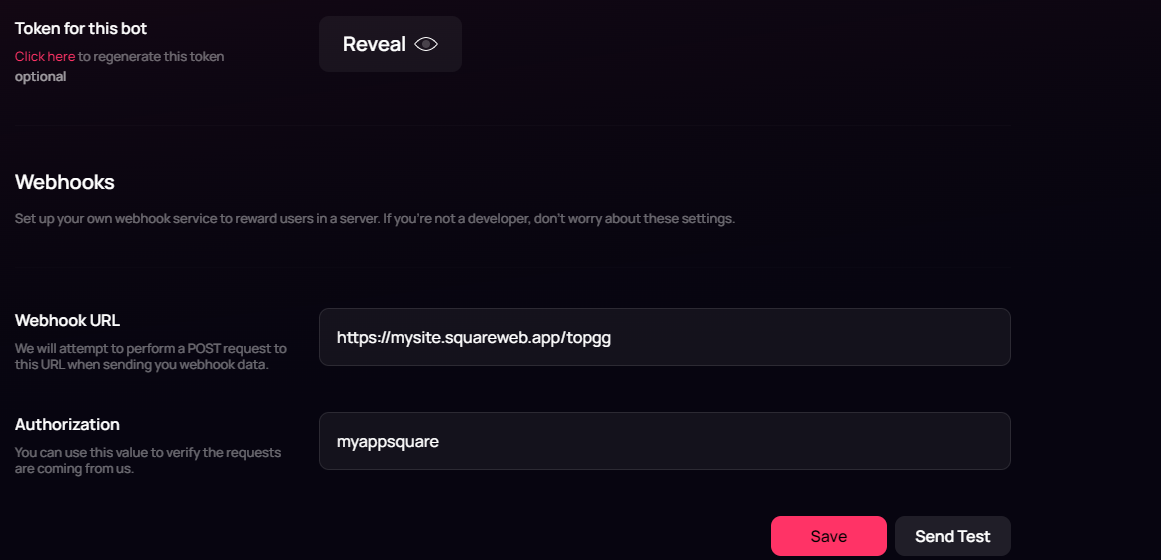
**1. Get your webhook authentication:**
* Go to your Top.gg profile [here](https://top.gg/user/me).
* Click "edit" on the bot you want to receive notifications for votes.
* Under "GENERAL", choose the "webhook" option.
* Set the webhook authentication in "Authorization". In this example, we used "myappsquare".
**2. Implement the webhook listener:**
The following sections provide code examples for both Javascript and Python:
We will use the example provided by the top.gg documentation [here](https://docs.top.gg/docs/Libraries/javascript), with some modifications.
```javascript index.js theme={null}
// Import libraries
const Topgg = require("@top-gg/sdk");
const express = require("express");
// Create Express app and Top.gg webhook instances
const app = express();
const webhook = new Topgg.Webhook("YOUR_AUTHORIZATION_TOKEN");
// Define route for '/topgg' endpoint (POST requests)
app.post("/topgg", webhook.listener((vote) => {
// Log vote received message with user ID
console.log(`Vote received successfully! User ID: ${vote.user}`);
}));
// Start server on port 80 (default HTTP)
app.listen(80);
```
For Python, you can use the following code:
```python app.py theme={null}
# Import the necessary libraries
import logging
import json
from waitress import serve
from flask import Flask, request, abort
# Create an instance of the Flask app
app = Flask(__name__)
# Define your authorization token
AUTH_TOKEN = 'YOUR_AUTHORIZATION'
# Define a route for the '/topgg' endpoint that accepts POST requests
@app.route("/topgg", methods=["POST"])
def hook():
# Check the authorization header
auth = request.headers.get('Authorization')
if auth != AUTH_TOKEN:
logging.error('Access denied')
abort(401) # Unauthorized
# Convert the request data from bytes to a JSON dictionary
data = json.loads(request.data)
# Print the ID of the user who voted
print(f'Vote received successfully! User ID: {data["user"]}')
# Return a response with the string "Data received" and status 200 to indicate that the request was processed successfully
return "Data received"
# Check if this script is being run directly and not imported as a module
if __name__ == "__main__":
# Set the log message format to exclude the log level
logging.basicConfig(format='%(message)s', level=logging.INFO)
# Serve our Flask app on port 80 and listen on all network interfaces
serve(app, host="0.0.0.0", port=80)
```
## Creating the squarecloud config file
The squarecloud.app file is a configuration file that will be used to configure your application; it will be used to define the name, description, version, main file, among other things.
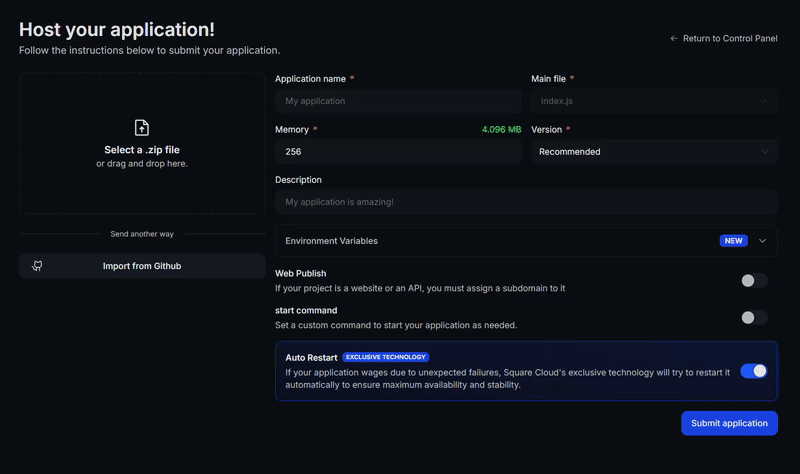
## Uploading Your Application to Square Cloud
After following all the steps, put your application files into a `.zip` file, including the configuration file.
If your application is a Node.js project, take a look at our article on [Node.js](/en/articles/getting-started-with-nodejs).
If your application is a Python project, take a look at our article on [Python](/en/articles/getting-started-with-python).
Access the [Square Cloud
Dashboard](https://squarecloud.app/en/dashboard/new) and upload your project
files.
 First, you need to have the CLI installed in your environment. If you
don't have it yet, run the following command in your terminal:
```
npm install -g @squarecloud/cli
```
If you already have it, we recommend updating it. To do this, run the following command in your terminal:
```bash theme={null}
squarecloud update
```
```bash theme={null}
curl -fsSL https://cli.squarecloud.app/install | bash
```
Now, to authenticate and use other CLI commands, you will find your
authorization key [here](https://squarecloud.app/en/account) by clicking on
"Request API Key". After obtaining your authorization key, run the
following command:
```bash theme={null}
squarecloud auth login
```
Finally, to deploy your application to Square Cloud using the CLI, you need to execute the following command, passing the path of your zip file:
```bash theme={null}
squarecloud upload zip
```
## Starting Tests
If you have done everything correctly, try accessing your site using the subdomain defined in the configuration file. If you defined it as "mysite", to access it will be `mysite.squareweb.app`. After you access and only "Cannot GET /" or "Method Not Allowed" appears, everything is okay.
Now, you need to go back to the previous page where the authorization was defined. In the Webhook URL field, you should put the URL of your site with the route that will receive the votes.
* For the JavaScript code we created with `app.post("/topgg", webhook.listener((vote) => {...})`, the route that will receive the votes is "/topgg". So, if your website is "mysite.squareweb.app", you should put "mysite.squareweb.app/topgg" as the Webhook URL.
* For the Python code we created with `@app.route("/topgg", methods=["POST"])`, the route that will receive the votes is also "/topgg". So, the Webhook URL would be the same "mysite.squareweb.app/topgg".
First, you need to have the CLI installed in your environment. If you
don't have it yet, run the following command in your terminal:
```
npm install -g @squarecloud/cli
```
If you already have it, we recommend updating it. To do this, run the following command in your terminal:
```bash theme={null}
squarecloud update
```
```bash theme={null}
curl -fsSL https://cli.squarecloud.app/install | bash
```
Now, to authenticate and use other CLI commands, you will find your
authorization key [here](https://squarecloud.app/en/account) by clicking on
"Request API Key". After obtaining your authorization key, run the
following command:
```bash theme={null}
squarecloud auth login
```
Finally, to deploy your application to Square Cloud using the CLI, you need to execute the following command, passing the path of your zip file:
```bash theme={null}
squarecloud upload zip
```
## Starting Tests
If you have done everything correctly, try accessing your site using the subdomain defined in the configuration file. If you defined it as "mysite", to access it will be `mysite.squareweb.app`. After you access and only "Cannot GET /" or "Method Not Allowed" appears, everything is okay.
Now, you need to go back to the previous page where the authorization was defined. In the Webhook URL field, you should put the URL of your site with the route that will receive the votes.
* For the JavaScript code we created with `app.post("/topgg", webhook.listener((vote) => {...})`, the route that will receive the votes is "/topgg". So, if your website is "mysite.squareweb.app", you should put "mysite.squareweb.app/topgg" as the Webhook URL.
* For the Python code we created with `@app.route("/topgg", methods=["POST"])`, the route that will receive the votes is also "/topgg". So, the Webhook URL would be the same "mysite.squareweb.app/topgg".
 Finally, click on the "Send Test" button. After that, check the terminal. If everything went well, the message you defined in `console.log` or `print` should appear in the terminal.
 And with that, if everything has been configured correctly, your webhook will be ready to send notifications when your bot receives a vote on top.gg.
## Troubleshooting
### Custom Domain
To use a custom domain (e.g., `mysite.com`) instead of the default URL `mysite.squareweb.app`, you need the **Standard plan or higher**. The subdomain is defined by the **SUBDOMAIN** field in the configuration file. See: [How to set up your custom domain](https://docs.squarecloud.app/en/tutorials/platform/custom-domain).
### Minimum RAM Requirements
**Minimum: 512MB RAM** for simple websites/APIs. For sites with frameworks (Next.JS, React, Vue, Angular, etc.), we always recommend **at least 1GB RAM**. For larger applications, allocate more RAM to prevent the application from running out of memory and crashing.
### Could not find this site.
Check if the **subdomain/domain** matches what's configured in the **SUBDOMAIN** field or in the **custom domain settings**. If you just uploaded the site, wait up to **60 seconds** for Square to enable **first access**.
And with that, if everything has been configured correctly, your webhook will be ready to send notifications when your bot receives a vote on top.gg.
## Troubleshooting
### Custom Domain
To use a custom domain (e.g., `mysite.com`) instead of the default URL `mysite.squareweb.app`, you need the **Standard plan or higher**. The subdomain is defined by the **SUBDOMAIN** field in the configuration file. See: [How to set up your custom domain](https://docs.squarecloud.app/en/tutorials/platform/custom-domain).
### Minimum RAM Requirements
**Minimum: 512MB RAM** for simple websites/APIs. For sites with frameworks (Next.JS, React, Vue, Angular, etc.), we always recommend **at least 1GB RAM**. For larger applications, allocate more RAM to prevent the application from running out of memory and crashing.
### Could not find this site.
Check if the **subdomain/domain** matches what's configured in the **SUBDOMAIN** field or in the **custom domain settings**. If you just uploaded the site, wait up to **60 seconds** for Square to enable **first access**.
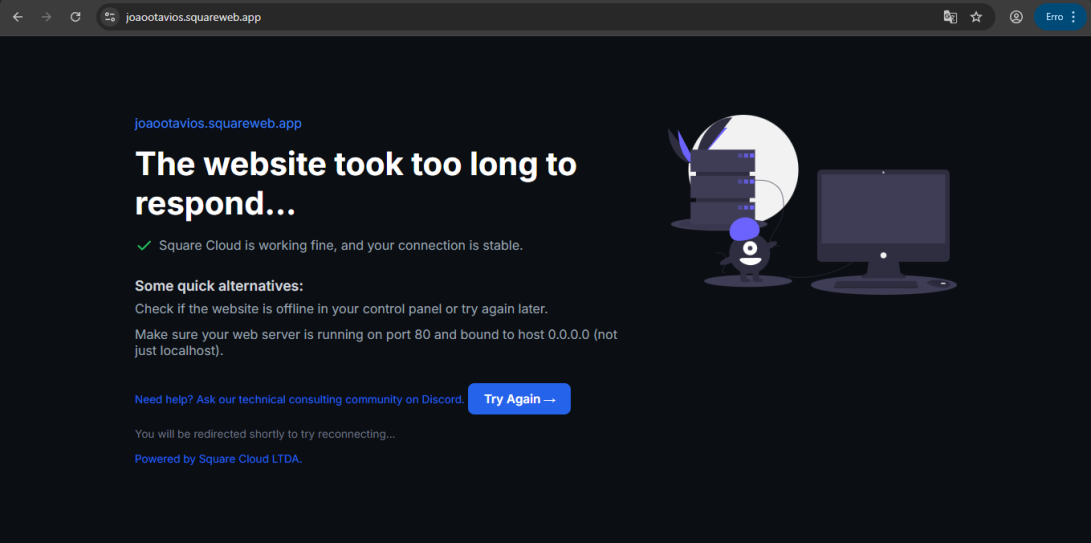
 ### Site took too long to respond...
Check if you correctly configured **port 80** and **host 0.0.0.0** in the application. We recommend using Square's forced environment variables: **PORT** and **HOST** from the `.env` file.
### Site took too long to respond...
Check if you correctly configured **port 80** and **host 0.0.0.0** in the application. We recommend using Square's forced environment variables: **PORT** and **HOST** from the `.env` file.
 ## Contact us
If you continue facing **technical difficulties**, our **specialized support team** is available to assist you. [**Contact us**](https://squarecloud.app/en/support) and we'll be happy to help you resolve any issue.
## Contact us
If you continue facing **technical difficulties**, our **specialized support team** is available to assist you. [**Contact us**](https://squarecloud.app/en/support) and we'll be happy to help you resolve any issue.