> ## Documentation Index
> Fetch the complete documentation index at: https://docs.squarecloud.app/llms.txt
> Use this file to discover all available pages before exploring further.
# How to deploy Evolution API on Square Cloud
> This tutorial will guide you to create and deploy your Evolution API application on Square Cloud.
export const PortNote = ({lang}) => {
if (lang == 'pt-br') {
return
Qual porta devo usar para o meu servidor?
Você deve usar a porta 80 para o seu servidor. A porta 80 é a porta padrão para tráfego HTTP; a Square Cloud a encaminha para 443 (HTTPS) para estabelecer uma conexão segura.
Certifique-se de configurá-la antes de compactar e enviar seu projeto.
;
}
return
What port should I use for my server?
You should use port 80 for your server. Port 80 is the default port for HTTP traffic, which is handled by Square Cloud to route it to 443, HTTPS, for a secure connection.
Make sure to configure it before compressing and uploading your project.
;
};
export const RecommendedPlan = ({lang, plan, tier, cpu, appType}) => {
const url = `https://squarecloud.app/${lang}/pay?plan=${plan.toLowerCase()}&tier=${tier}`;
if (lang == 'en') {
return
Wondering how much RAM and CPU your plan needs to host {appType}?
Don't worry, we're here to help.
Our {plan} plan offers {tier}GB of RAM and {cpu}vCPU, which should be sufficient for most {appType}.
However, if you are working on a larger project and seeking extra stability, we recommend considering our Pro plan. With additional resources, you can maintain stability even during demand spikes.
To purchase, simply click here.
;
} else {
return
Está se perguntando quanta RAM e CPU seu plano precisa para hospedar {appType}?
Não se preocupe, estamos aqui para ajudar.
Nosso plano {plan} oferece {tier}GB de RAM e {cpu}vCPU, o que deve ser suficiente para a maioria dos {appType}.
No entanto, se você estiver trabalhando em um projeto maior e precisar de mais estabilidade, recomendamos considerar nosso plano Pro.
Com recursos adicionais, você pode manter a estabilidade mesmo durante picos de demanda.
Para comprar, basta clicar aqui.
;
}
};
export const appType_0 = "Evolution API"
## Introduction
To develop and host {appType_0} on Square Cloud, it's essential to follow a structured sequence of configurations and prerequisites. This technical guide will cover the entire process, from initial setup to production deployment.
### Prerequisites
* **Square Cloud Account**: Register through the [signup page](https://squarecloud.app/en/signup) using your email.
* **Active Paid Plan**: Ensures dedicated resources and optimized performance for your application. Check our [available plans](https://squarecloud.app/en/pricing) and choose the most suitable for your needs.
## Why use Evolution API?
Evolution API creates an easier way to use many tools in one place, integrating n8n, chatwoot and other tools.
This project allows you to fastly create and connect with an instance through it or through it API, managing multiple bot instances in one place.
## Setting up the project
First, you need to get the project from some source. You can get it from the [official repository](https://github.com/EvolutionAPI/evolution-api) or from [our repository](https://github.com/squarecloud-education/evolutionapi-web) which already have the files needed to deploy on the releases.
### Database configuration
To start setting up, we need a database for it. You can host one in Square Cloud if you have Standard plan or higher.
After creating, we need to set in our `.env` the URL as `DATABASE_CONNECTION_URI` and create the client certificate for the PostgreSQL connection. Here's an example of the configuration needed:
```systemd .env theme={null}
DATABASE_PROVIDER=postgresql
DATABASE_CONNECTION_URI='postgresql://squarecloud:password@host:port/database?sslmode=require&sslidentity=path/to/client-identity.p12&sslpassword=p12password'
DATABASE_CONNECTION_CLIENT_NAME='evolution_exchange'
DATABASE_SAVE_DATA_INSTANCE=true
DATABASE_SAVE_DATA_NEW_MESSAGE=true
DATABASE_SAVE_MESSAGE_UPDATE=true
DATABASE_SAVE_DATA_CONTACTS=true
DATABASE_SAVE_DATA_CHATS=true
DATABASE_SAVE_DATA_LABELS=true
DATABASE_SAVE_DATA_HISTORIC=true
DATABASE_SAVE_IS_ON_WHATSAPP=true
DATABASE_SAVE_IS_ON_WHATSAPP_DAYS=7
DATABASE_DELETE_MESSAGE=true
```
With the environment variable and certificate set, you need to apply the migrations on your database. To do so, you need to have the `runWithProvider.js` file within the project folder and run the following command:
```bash theme={null}
npm run db:deploy:win
```
```bash theme={null}
npm run db:deploy
```
### Server configuration
As shown in the repository `.env.example` file, you need to set some environment variables, server\_type, server\_port, server\_url and the language.
```systemd .env theme={null}
SERVER_NAME=evolution
SERVER_TYPE=http
SERVER_PORT=80
# Change the SERVER_URL to your actual server URL.
# you change it to your app url, selected when creating the app
# or when set a domain
SERVER_URL="https://my-evolution-api.squareweb.app"
LANGUAGE=en
# Other variables below...
```
It is important to configure a secure global API key to avoid non-authorized access.
```systemd .env theme={null}
# Other variables...
AUTHENTICATION_API_KEY=MySuperSecureAPIKEY
```
## Deploying
To deploy it in Square Cloud, you only will need to set the startup command and publish on web. To install and build, we recommend to use 3096MB of RAM.
```bash startup command theme={null}
npx prisma generate --schema prisma/postgresql-schema.prisma && npm run build && npm run start:prod
```
### Via dashboard
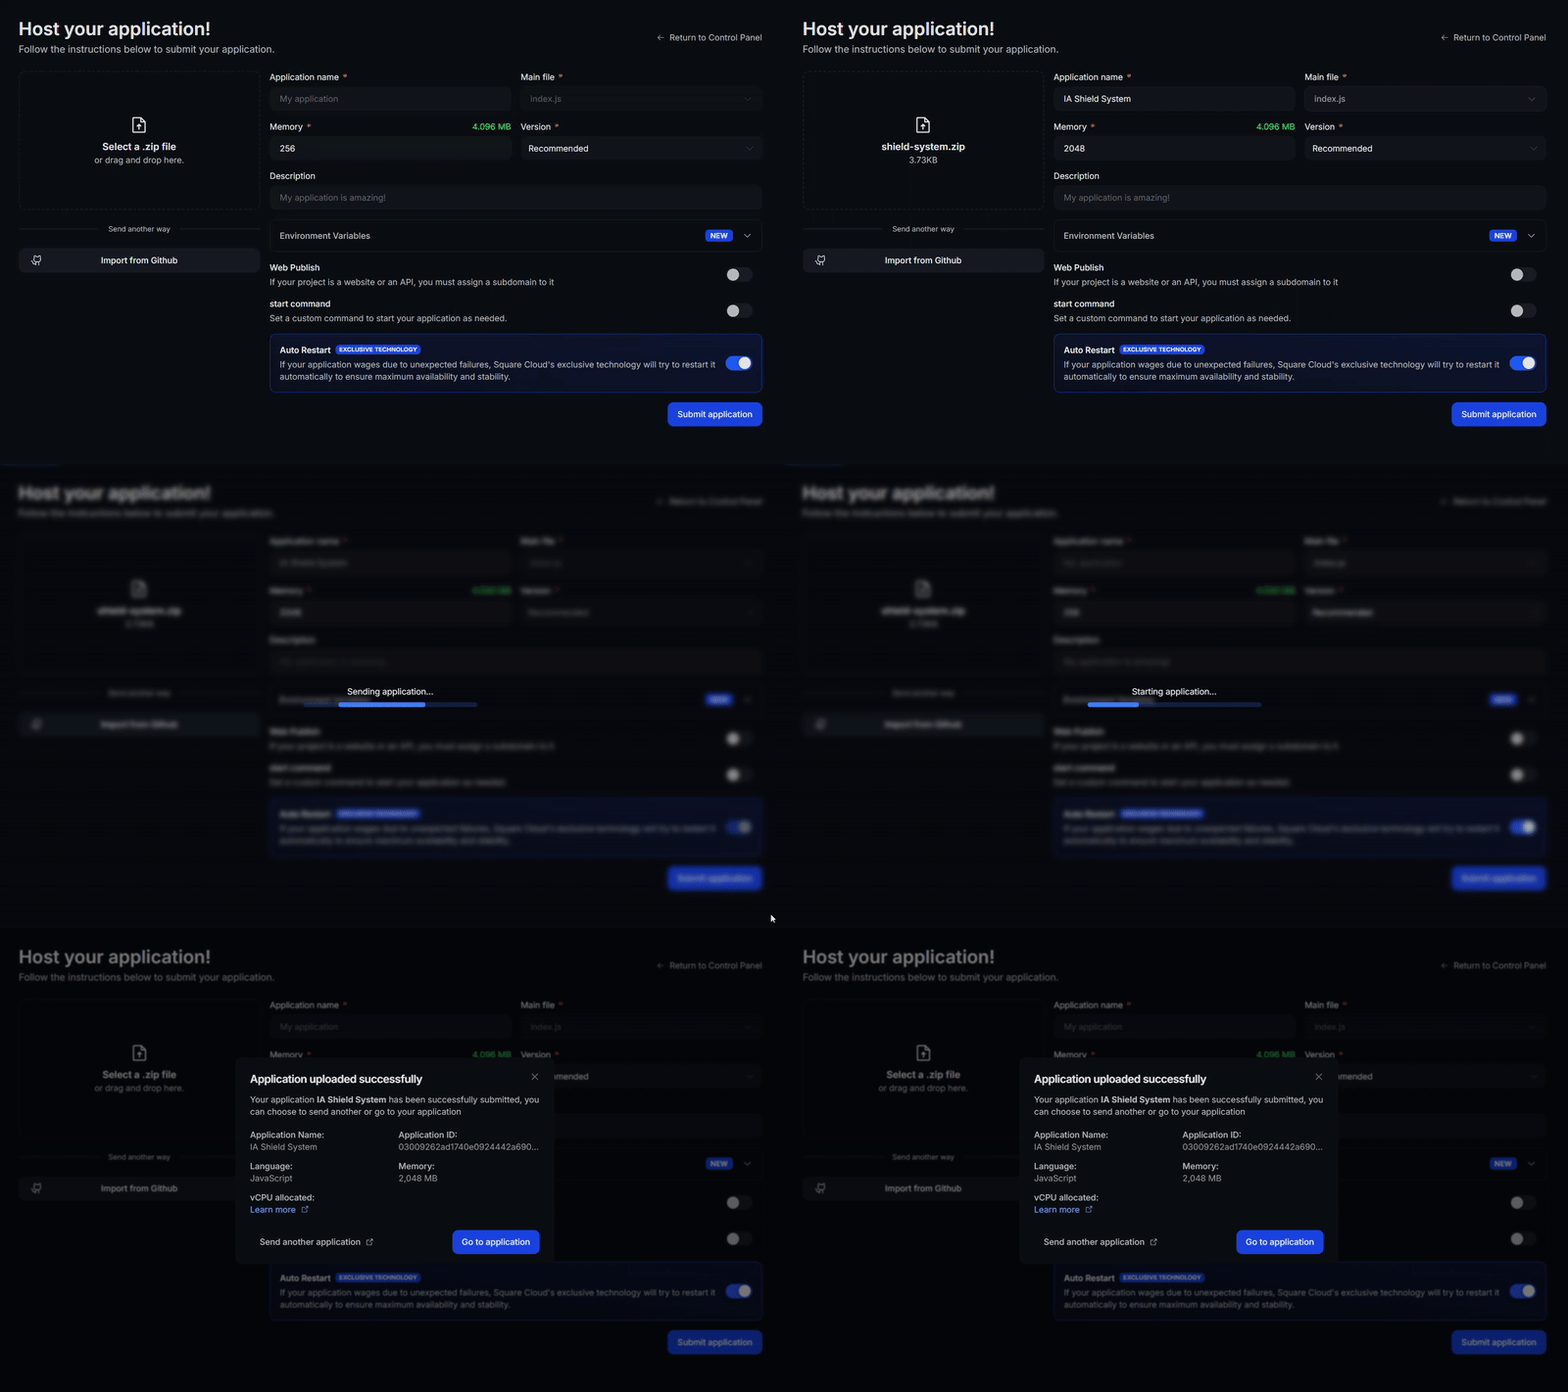
Access the [upload page](https://squarecloud.app/en/dashboard/new) and upload your project zip file.
After uploading your zip, you will need to configure the name, main file or runtime environment and other settings for your project.\
If you are uploading a web project, make sure to select "Web Publication" and set a subdomain to your project.
Finally, click on the "Deploy" button to host your project on Square Cloud.\
After deployment, you can monitor your project's status and logs from the dashboard.
 ### Via CLI
To use this method, you need to create a config file named `squarecloud.app` in the root directory of your project. This file will contain the necessary configuration for your project.
The squarecloud.app file is a configuration file that will be used to configure your application; it will be used to define your environment.
First, you need to have the CLI installed in your environment. If you don't have it yet, run the following command in your terminal:
```
npm install -g @squarecloud/cli
```
If you already have it, we recommend updating it. To do this, run the following command in your terminal:
```bash theme={null}
squarecloud update
```
```bash theme={null}
curl -fsSL https://cli.squarecloud.app/install | bash
```
Now, to authenticate and use other CLI commands, you will find your authorization key [here](https://squarecloud.app/en/account/security) by clicking on "Request API Key". After obtaining your authorization key, run the following command:
```bash theme={null}
squarecloud auth login
```
Finally, to deploy your application to Square Cloud using the CLI, you need to run the following command:
```bash theme={null}
squarecloud upload
```
Or if you created the zip manually, you can use:
```bash theme={null}
squarecloud upload --file
```
## Additional info
After the first run, you can reduce the RAM to 1536MB or 2048MB and set the startup command to only:
```bash theme={null}
npm run start:prod
```
### Cache system
You can configure a cache system in Evolution API. To do so, you will need a Redis Database that you can also host in Square Cloud.\
To configure it, you will also need to download the certificate and set the URL to connect.
```systemd .env theme={null}
CACHE_REDIS_ENABLED=true
CACHE_REDIS_URI="redis://default:MySecurePassword@square-cloud-db-ID.squareweb.app:7170"
CACHE_REDIS_TTL=604800
# Prefix serves to differentiate data from one installation to another that are using the same redis
CACHE_REDIS_PREFIX_KEY=evolution
# Enabling this variable will save the connection information in Redis and not in the database.
CACHE_REDIS_SAVE_INSTANCES=false
```
## Troubleshooting
### Custom Domain
To use a custom domain (e.g., `mysite.com`) instead of the default URL `mysite.squareweb.app`, you need the **Standard plan or higher**. The subdomain is defined by the **SUBDOMAIN** field in the configuration file.
### Minimum RAM Requirements
**Minimum: 512MB RAM** for simple websites/APIs. For sites with frameworks (Next.JS, React, Vue, Angular, etc.), we always recommend **at least 1GB RAM**. For larger applications, allocate more RAM to prevent the application from running out of memory and crashing.
### Could not find this site.
Check if the **subdomain/domain** matches what's configured in the **SUBDOMAIN** field or in the **custom domain settings**. If you just uploaded the site, wait up to **60 seconds** for Square to enable **first access**.
### Site took too long to respond...
Check if you correctly configured **port 80** and **host 0.0.0.0** in the application. We recommend using Square's forced environment variables: **PORT** and **HOST** from the `.env` file.
## Contact us
If you continue facing **technical difficulties**, our **specialized support team** is available to assist you. [**Contact us**](https://squarecloud.app/en/support) and we'll be happy to help you resolve any issue.
### Via CLI
To use this method, you need to create a config file named `squarecloud.app` in the root directory of your project. This file will contain the necessary configuration for your project.
The squarecloud.app file is a configuration file that will be used to configure your application; it will be used to define your environment.
First, you need to have the CLI installed in your environment. If you don't have it yet, run the following command in your terminal:
```
npm install -g @squarecloud/cli
```
If you already have it, we recommend updating it. To do this, run the following command in your terminal:
```bash theme={null}
squarecloud update
```
```bash theme={null}
curl -fsSL https://cli.squarecloud.app/install | bash
```
Now, to authenticate and use other CLI commands, you will find your authorization key [here](https://squarecloud.app/en/account/security) by clicking on "Request API Key". After obtaining your authorization key, run the following command:
```bash theme={null}
squarecloud auth login
```
Finally, to deploy your application to Square Cloud using the CLI, you need to run the following command:
```bash theme={null}
squarecloud upload
```
Or if you created the zip manually, you can use:
```bash theme={null}
squarecloud upload --file
```
## Additional info
After the first run, you can reduce the RAM to 1536MB or 2048MB and set the startup command to only:
```bash theme={null}
npm run start:prod
```
### Cache system
You can configure a cache system in Evolution API. To do so, you will need a Redis Database that you can also host in Square Cloud.\
To configure it, you will also need to download the certificate and set the URL to connect.
```systemd .env theme={null}
CACHE_REDIS_ENABLED=true
CACHE_REDIS_URI="redis://default:MySecurePassword@square-cloud-db-ID.squareweb.app:7170"
CACHE_REDIS_TTL=604800
# Prefix serves to differentiate data from one installation to another that are using the same redis
CACHE_REDIS_PREFIX_KEY=evolution
# Enabling this variable will save the connection information in Redis and not in the database.
CACHE_REDIS_SAVE_INSTANCES=false
```
## Troubleshooting
### Custom Domain
To use a custom domain (e.g., `mysite.com`) instead of the default URL `mysite.squareweb.app`, you need the **Standard plan or higher**. The subdomain is defined by the **SUBDOMAIN** field in the configuration file.
### Minimum RAM Requirements
**Minimum: 512MB RAM** for simple websites/APIs. For sites with frameworks (Next.JS, React, Vue, Angular, etc.), we always recommend **at least 1GB RAM**. For larger applications, allocate more RAM to prevent the application from running out of memory and crashing.
### Could not find this site.
Check if the **subdomain/domain** matches what's configured in the **SUBDOMAIN** field or in the **custom domain settings**. If you just uploaded the site, wait up to **60 seconds** for Square to enable **first access**.
### Site took too long to respond...
Check if you correctly configured **port 80** and **host 0.0.0.0** in the application. We recommend using Square's forced environment variables: **PORT** and **HOST** from the `.env` file.
## Contact us
If you continue facing **technical difficulties**, our **specialized support team** is available to assist you. [**Contact us**](https://squarecloud.app/en/support) and we'll be happy to help you resolve any issue.