> ## Documentation Index
> Fetch the complete documentation index at: https://docs.squarecloud.app/llms.txt
> Use this file to discover all available pages before exploring further.
# So hostest du X (Twitter)-Bots
> Lerne, wie du einen X (Twitter)-Bot auf Square Cloud erstellst und hostest. Vollständiges Tutorial mit Konfiguration, Deployment und praktischen Beispielen in Node.js und Python.
export const RecommendedPlan = ({lang, plan, tier, cpu, appType}) => {
const url = `https://squarecloud.app/${lang}/pay?plan=${plan.toLowerCase()}&tier=${tier}`;
if (lang == 'en') {
return
Wondering how much RAM and CPU your plan needs to host {appType}?
Don't worry, we're here to help.
Our {plan} plan offers {tier}GB of RAM and {cpu}vCPU, which should be sufficient for most {appType}.
However, if you are working on a larger project and seeking extra stability, we recommend considering our Pro plan. With additional resources, you can maintain stability even during demand spikes.
To purchase, simply click here.
;
} else {
return
Está se perguntando quanta RAM e CPU seu plano precisa para hospedar {appType}?
Não se preocupe, estamos aqui para ajudar.
Nosso plano {plan} oferece {tier}GB de RAM e {cpu}vCPU, o que deve ser suficiente para a maioria dos {appType}.
No entanto, se você estiver trabalhando em um projeto maior e precisar de mais estabilidade, recomendamos considerar nosso plano Pro.
Com recursos adicionais, você pode manter a estabilidade mesmo durante picos de demanda.
Para comprar, basta clicar aqui.
;
}
};
export const appType_0 = "a X (Twitter) bot"
## Einführung
Um {appType_0} auf Square Cloud zu entwickeln und zu hosten, ist es wichtig, einer strukturierten Abfolge von Konfigurationen und Voraussetzungen zu folgen. Dieser technische Leitfaden deckt den gesamten Prozess ab, von der anfänglichen Einrichtung bis zum Produktions-Deployment.
### Voraussetzungen
* **Square Cloud Konto**: Registriere dich über die [Registrierungsseite](https://squarecloud.app/de/signup) mit deiner E-Mail-Adresse.
* **Aktiver kostenpflichtiger Plan**: Stellt dedizierte Ressourcen und optimierte Leistung für deine Anwendung sicher. Sieh dir unsere [verfügbaren Pläne](https://squarecloud.app/de/pricing) an und wähle den passendsten für deine Bedürfnisse.
### Projekt erstellen
Ein aktives X (Twitter)-Konto ist für die Authentifizierung und den Betrieb des Bots erforderlich. Wenn du kein Konto hast, registriere dich auf der [offiziellen X-Website](https://x.com/).\
Ein X-Developer-Konto ist ebenfalls erforderlich, um auf die APIs zuzugreifen. Beantrage den Zugriff über das [X Developer Portal](https://developer.x.com/en).
### Bot-Anwendung auf X
1. Gehe zum [X Developer Portal](https://developer.x.com/en/portal/dashboard).
2. Melde dich mit deinem X (Twitter)-Konto an.
3. Wenn dies dein erstes Mal ist, schließe den Antragsprozess für den Developer-Zugriff ab.
1. Klicke im Dashboard auf "Create Project".
2. Wähle einen Namen für dein Projekt (z. B. "Square Cloud Bot").
3. Wähle den am besten geeigneten Anwendungsfall (z. B. "Making a bot").
4. Gib eine detaillierte Beschreibung deines Bots an.
5. Bestätige die Projekterstellung.
1. Klicke innerhalb des erstellten Projekts auf "Create App".
2. Lege einen eindeutigen Namen für deine Anwendung fest.
3. Bestätige die Erstellung der Anwendung.
4. Notiere dir die generierte **App ID** für die spätere Verwendung.
1. Navigiere zum Abschnitt "Keys and tokens" deiner Anwendung.
2. Klicke im Abschnitt "Consumer Keys" auf "Regenerate", um Folgendes zu generieren:
* **API Key** (Consumer Key)
* **API Secret Key** (Consumer Secret)
3. **Wichtig**: Kopiere und speichere diese Schlüssel sofort, da du sie nicht erneut ansehen kannst.
1. Gehe zum Abschnitt "App permissions".
2. Klicke auf "Edit", um die Berechtigungen zu ändern.
3. Wähle "Read and write", damit dein Bot Tweets posten kann.
4. Wähle bei Bedarf "Read and write and Direct message" für DM-Funktionalität.
5. Speichere die Änderungen.
1. Kehre zum Abschnitt "Keys and tokens" zurück.
2. Klicke im Abschnitt "Access Token and Secret" auf "Generate".
3. Bestätige die Token-Generierung.
4. Kopiere und speichere:
* **Access Token**
* **Access Token Secret**
5. **Warnung**: Diese Tokens können nach dem Schließen der Seite nicht erneut angezeigt werden.
1. Stelle sicher, dass du alle 4 erforderlichen Anmeldedaten hast:
* API Key (Consumer Key)
* API Secret Key (Consumer Secret)
* Access Token
* Access Token Secret
2. Bewahre diese Anmeldedaten an einem sicheren Ort auf
3. **Wichtig**: Teile oder veröffentliche diese Anmeldedaten niemals öffentlich
## Projekt entwickeln
1. **Node.js-Prüfung**: Stelle sicher, dass Node.js auf deinem System installiert ist. Andernfalls lade es von der [offiziellen Node.js-Website](https://nodejs.org/) herunter.
2. **Projektinitialisierung**: Erstelle ein neues Node.js-Projekt, indem du Folgendes ausführst:
```bash Terminal theme={null}
npm init -y
```
3. **Abhängigkeiten installieren**: Installiere die für den Bot erforderlichen Bibliotheken:
```bash Terminal theme={null}
npm install twitter-api-v2
```
4. **Umgebungsvariablen einrichten**: Erstelle eine `.env`-Datei, um deine Anmeldedaten sicher zu speichern:
```env .env theme={null}
API_KEY=your_api_key_here
API_SECRET_KEY=your_api_secret_key_here
ACCESS_TOKEN=your_access_token_here
ACCESS_TOKEN_SECRET=your_access_token_secret_here
```
5. **Hauptdatei erstellen**: Entwickle die Datei `index.js` mit der Grundstruktur des Bots:
```javascript index.js theme={null}
// Import necessary modules
const { TwitterApi } = require('twitter-api-v2');
// Configure Twitter client with authentication
const client = new TwitterApi({
appKey: process.env.API_KEY,
appSecret: process.env.API_SECRET_KEY,
accessToken: process.env.ACCESS_TOKEN,
accessSecret: process.env.ACCESS_TOKEN_SECRET,
});
// Client with read and write permissions
const rwClient = client.readWrite;
// Stores the authenticated bot user id (set in verifyBot)
let botUserId = null;
// Function to check if the bot is working
async function verifyBot() {
try {
// Get authenticated user information (X API v2)
const me = await rwClient.v2.me();
botUserId = me.data.id;
console.log(`Bot successfully initialized! User: @${me.data.username}`);
return true;
} catch (error) {
console.error('Error verifying bot:', error);
return false;
}
}
// Function to post a tweet
async function postTweet(text) {
try {
const tweet = await rwClient.v2.tweet(text);
console.log(`Tweet posted successfully! ID: ${tweet.data.id}`);
return tweet;
} catch (error) {
console.error('Error posting tweet:', error);
throw error;
}
}
// Function to respond to mentions
async function respondToMentions() {
if (!botUserId) return;
try {
// Fetch recent mentions (X API v2)
const mentions = await rwClient.v2.userMentionTimeline(botUserId, {
max_results: 10,
});
for (const tweet of mentions.data?.data ?? []) {
// Check if it's a new mention (implement control logic)
if (tweet.text.includes('!ping')) {
// Reply to the mention
await rwClient.v2.reply(
'Pong! 🤖 X Bot working correctly!',
tweet.id
);
console.log(`Replied to mention (tweet ID: ${tweet.id})`);
}
}
} catch (error) {
console.error('Error processing mentions:', error);
}
}
// Function to search and interact with specific tweets
async function searchAndInteract(query) {
if (!botUserId) return;
try {
// Search recent tweets (X API v2)
const tweets = await rwClient.v2.search(query, {
max_results: 10,
});
for (const tweet of tweets.data?.data ?? []) {
// Like the tweet
await rwClient.v2.like(botUserId, tweet.id);
console.log(`Liked tweet ID: ${tweet.id}`);
// Wait a bit between actions to avoid rate limiting
await new Promise(resolve => setTimeout(resolve, 2000));
}
} catch (error) {
console.error('Error searching and interacting:', error);
}
}
// Main bot function
async function runBot() {
console.log('Starting X bot...');
// Check if the bot is configured correctly
const botOk = await verifyBot();
if (!botOk) {
console.error('Bot initialization failed');
return;
}
// Example: Post an initialization tweet
try {
await postTweet('🤖 X Bot initialized and running on Square Cloud!');
} catch (error) {
console.log('Initialization tweet failed, but bot continues running');
}
// Main bot loop
setInterval(async () => {
try {
// Check and respond to mentions every 5 minutes
await respondToMentions();
// Example: Search and interact with tweets about a specific topic
// await searchAndInteract('#SquareCloud');
} catch (error) {
console.error('Error in main loop:', error);
}
}, 5 * 60 * 1000); // 5 minutes
console.log('Bot running. Press Ctrl+C to stop.');
}
// Signal handling for graceful shutdown
process.on('SIGINT', () => {
console.log('\nShutting down X bot...');
process.exit(0);
});
process.on('SIGTERM', () => {
console.log('\nShutting down X bot...');
process.exit(0);
});
// Initialize the bot
runBot();
```
## Deployment
Nachdem du deine Projektdateien vorbereitet hast, kannst du sie nun auf Square Cloud hochladen und dein Projekt hosten.
Erstelle dazu eine ZIP-Datei, die alle deine Projektdateien enthält.
**Sicherheit**: Füge deine API-Anmeldedaten niemals direkt in den Code ein. Verwende auf Square Cloud immer Umgebungsvariablen.
Konfiguriere auf Square Cloud die folgenden Umgebungsvariablen über das Control Panel:
* `API_KEY`: Dein X-API-Schlüssel
* `API_SECRET_KEY`: Dein geheimer X-API-Schlüssel
* `ACCESS_TOKEN`: Dein Access Token
* `ACCESS_TOKEN_SECRET`: Dein Access Token Secret
### Über das Dashboard
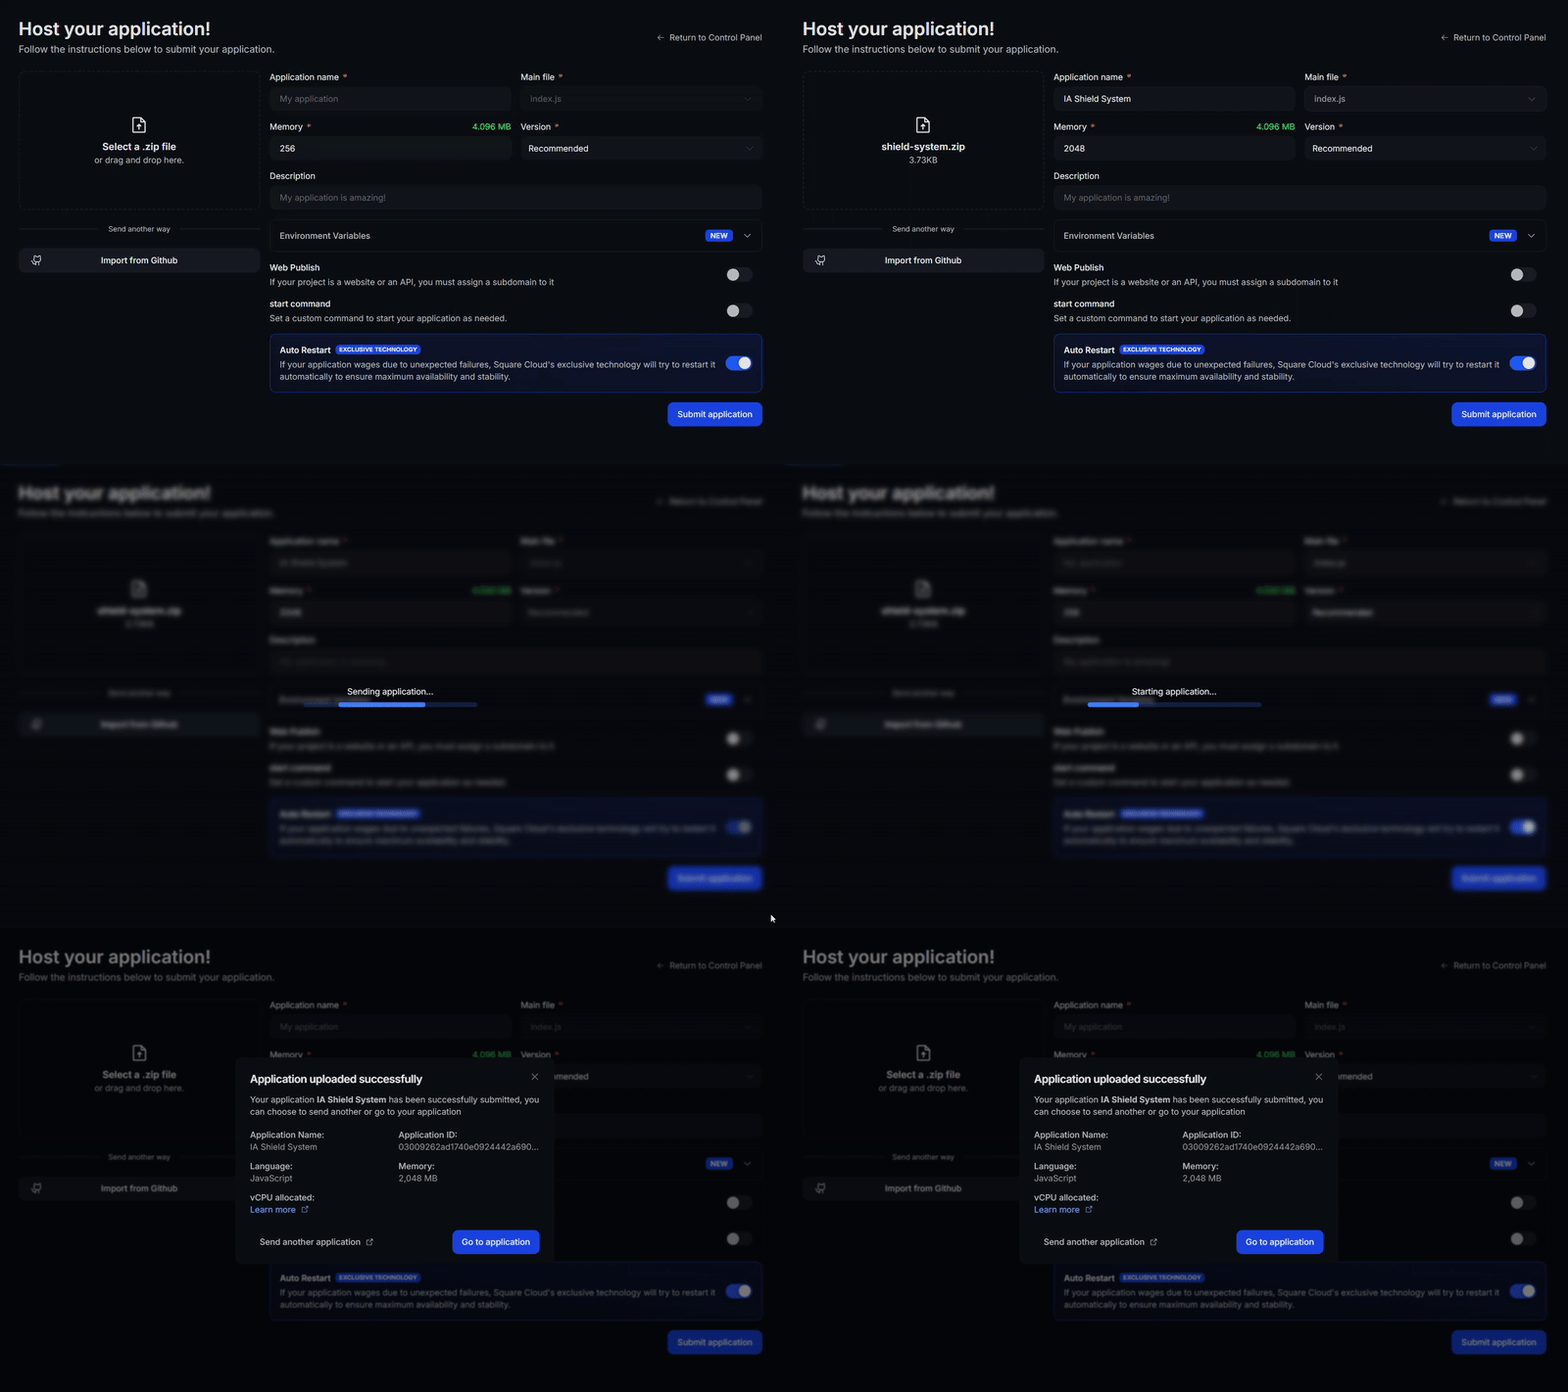
Rufe die [Upload-Seite](https://squarecloud.app/de/dashboard/new) auf und lade die ZIP-Datei deines Projekts hoch.
Nachdem du deine ZIP-Datei hochgeladen hast, musst du den Namen, die Hauptdatei oder Runtime-Umgebung und weitere Einstellungen für dein Projekt konfigurieren.\
Wenn du ein Web-Projekt hochlädst, achte darauf, "Web Publication" auszuwählen und deinem Projekt eine Subdomain zuzuweisen.
Klicke abschließend auf die Schaltfläche "Deploy", um dein Projekt auf Square Cloud zu hosten.\
Nach dem Deploy kannst du den Status und die Logs deines Projekts über das Dashboard überwachen.
 ### Über die CLI
Um diese Methode zu nutzen, musst du eine Konfigurationsdatei mit dem Namen `squarecloud.app` im Stammverzeichnis deines Projekts erstellen. Diese Datei enthält die notwendige Konfiguration für dein Projekt.
Die Datei squarecloud.app ist eine Konfigurationsdatei, mit der deine Anwendung konfiguriert wird; sie dient dazu, deine Umgebung zu definieren.
Zuerst musst du die CLI in deiner Umgebung installiert haben. Falls du sie noch nicht hast, führe den folgenden Befehl in deinem Terminal aus:
```
npm install -g @squarecloud/cli
```
Falls du sie bereits hast, empfehlen wir, sie zu aktualisieren. Führe dazu den folgenden Befehl in deinem Terminal aus:
```bash theme={null}
squarecloud update
```
```bash theme={null}
curl -fsSL https://cli.squarecloud.app/install | bash
```
Um dich zu authentifizieren und weitere CLI-Befehle zu nutzen, findest du deinen Autorisierungsschlüssel [hier](https://squarecloud.app/de/account/security), indem du auf "Request API Key" klickst. Nachdem du deinen Autorisierungsschlüssel erhalten hast, führe den folgenden Befehl aus:
```bash theme={null}
squarecloud auth login
```
Um deine Anwendung schließlich über die CLI auf Square Cloud bereitzustellen, musst du den folgenden Befehl ausführen:
```bash theme={null}
squarecloud upload
```
Oder falls du die ZIP-Datei manuell erstellt hast, kannst du Folgendes verwenden:
```bash theme={null}
squarecloud upload --file
```
## Weitere Ressourcen
Um dein Wissen über die Entwicklung von X-Bots mit twitter-api-v2 zu vertiefen, konsultiere die [offizielle Dokumentation der twitter-api-v2-Bibliothek](https://github.com/PLhery/node-twitter-api-v2). Die Dokumentation bietet detaillierte Anleitungen, fortgeschrittene Tutorials und vollständige API-Referenzen, um deine Implementierung optimal zu gestalten.
Siehe auch:
* [Offizielle X-API-Dokumentation](https://docs.x.com/overview)
* [Nutzungsrichtlinien der X-API](https://developer.x.com/en/developer-terms/policy)
* [Leitfaden für Bot-Best-Practices](https://docs.x.com/x-api/getting-started/about-x-api)
### Hashtag-Überwachung
```javascript theme={null}
// Function to monitor specific hashtags
async function monitorHashtags(hashtags) {
for (const hashtag of hashtags) {
try {
const tweets = await rwClient.v2.search(`#${hashtag}`, {
max_results: 10,
});
// Process found tweets
for (const tweet of tweets.data?.data ?? []) {
console.log(`Tweet found with #${hashtag}: ${tweet.text}`);
// Implement interaction logic
}
} catch (error) {
console.error(`Error monitoring #${hashtag}:`, error);
}
}
}
```
### Geplante Posts
```javascript theme={null}
// Function to schedule posts
function schedulePost(text, delay) {
setTimeout(async () => {
try {
await postTweet(text);
console.log('Scheduled post published successfully!');
} catch (error) {
console.error('Error publishing scheduled post:', error);
}
}, delay);
}
// Example: Schedule a post for 1 hour
schedulePost('🤖 Scheduled post by the bot!', 60 * 60 * 1000);
```
### Rate Limiting
X (Twitter) hat strikte Rate Limits. Implementiere Kontrollen, um das Überschreiten dieser Limits zu vermeiden:
```javascript theme={null}
// Rate limiting control
const rateLimiter = {
lastRequest: 0,
minInterval: 1000, // 1 second between requests
async wait() {
const now = Date.now();
const timeSinceLastRequest = now - this.lastRequest;
if (timeSinceLastRequest < this.minInterval) {
const waitTime = this.minInterval - timeSinceLastRequest;
await new Promise(resolve => setTimeout(resolve, waitTime));
}
this.lastRequest = Date.now();
}
};
```
### Fehlerbehandlung
```javascript theme={null}
// Helper function to retry an operation on failure
async function retryOperation(operation, maxRetries = 3) {
for (let i = 0; i < maxRetries; i++) {
try {
return await operation();
} catch (error) {
console.error(`Attempt ${i + 1} failed:`, error.message);
if (i === maxRetries - 1) {
throw error;
}
// Wait before retrying
await new Promise(resolve => setTimeout(resolve, 2000 * (i + 1)));
}
}
}
```
## Kontaktiere uns
Falls du weiterhin **technische Schwierigkeiten** hast, steht dir unser **spezialisiertes Support-Team** zur Verfügung. [**Kontaktiere uns**](https://squarecloud.app/de/support) und wir helfen dir gerne, jedes Problem zu lösen.
### Über die CLI
Um diese Methode zu nutzen, musst du eine Konfigurationsdatei mit dem Namen `squarecloud.app` im Stammverzeichnis deines Projekts erstellen. Diese Datei enthält die notwendige Konfiguration für dein Projekt.
Die Datei squarecloud.app ist eine Konfigurationsdatei, mit der deine Anwendung konfiguriert wird; sie dient dazu, deine Umgebung zu definieren.
Zuerst musst du die CLI in deiner Umgebung installiert haben. Falls du sie noch nicht hast, führe den folgenden Befehl in deinem Terminal aus:
```
npm install -g @squarecloud/cli
```
Falls du sie bereits hast, empfehlen wir, sie zu aktualisieren. Führe dazu den folgenden Befehl in deinem Terminal aus:
```bash theme={null}
squarecloud update
```
```bash theme={null}
curl -fsSL https://cli.squarecloud.app/install | bash
```
Um dich zu authentifizieren und weitere CLI-Befehle zu nutzen, findest du deinen Autorisierungsschlüssel [hier](https://squarecloud.app/de/account/security), indem du auf "Request API Key" klickst. Nachdem du deinen Autorisierungsschlüssel erhalten hast, führe den folgenden Befehl aus:
```bash theme={null}
squarecloud auth login
```
Um deine Anwendung schließlich über die CLI auf Square Cloud bereitzustellen, musst du den folgenden Befehl ausführen:
```bash theme={null}
squarecloud upload
```
Oder falls du die ZIP-Datei manuell erstellt hast, kannst du Folgendes verwenden:
```bash theme={null}
squarecloud upload --file
```
## Weitere Ressourcen
Um dein Wissen über die Entwicklung von X-Bots mit twitter-api-v2 zu vertiefen, konsultiere die [offizielle Dokumentation der twitter-api-v2-Bibliothek](https://github.com/PLhery/node-twitter-api-v2). Die Dokumentation bietet detaillierte Anleitungen, fortgeschrittene Tutorials und vollständige API-Referenzen, um deine Implementierung optimal zu gestalten.
Siehe auch:
* [Offizielle X-API-Dokumentation](https://docs.x.com/overview)
* [Nutzungsrichtlinien der X-API](https://developer.x.com/en/developer-terms/policy)
* [Leitfaden für Bot-Best-Practices](https://docs.x.com/x-api/getting-started/about-x-api)
### Hashtag-Überwachung
```javascript theme={null}
// Function to monitor specific hashtags
async function monitorHashtags(hashtags) {
for (const hashtag of hashtags) {
try {
const tweets = await rwClient.v2.search(`#${hashtag}`, {
max_results: 10,
});
// Process found tweets
for (const tweet of tweets.data?.data ?? []) {
console.log(`Tweet found with #${hashtag}: ${tweet.text}`);
// Implement interaction logic
}
} catch (error) {
console.error(`Error monitoring #${hashtag}:`, error);
}
}
}
```
### Geplante Posts
```javascript theme={null}
// Function to schedule posts
function schedulePost(text, delay) {
setTimeout(async () => {
try {
await postTweet(text);
console.log('Scheduled post published successfully!');
} catch (error) {
console.error('Error publishing scheduled post:', error);
}
}, delay);
}
// Example: Schedule a post for 1 hour
schedulePost('🤖 Scheduled post by the bot!', 60 * 60 * 1000);
```
### Rate Limiting
X (Twitter) hat strikte Rate Limits. Implementiere Kontrollen, um das Überschreiten dieser Limits zu vermeiden:
```javascript theme={null}
// Rate limiting control
const rateLimiter = {
lastRequest: 0,
minInterval: 1000, // 1 second between requests
async wait() {
const now = Date.now();
const timeSinceLastRequest = now - this.lastRequest;
if (timeSinceLastRequest < this.minInterval) {
const waitTime = this.minInterval - timeSinceLastRequest;
await new Promise(resolve => setTimeout(resolve, waitTime));
}
this.lastRequest = Date.now();
}
};
```
### Fehlerbehandlung
```javascript theme={null}
// Helper function to retry an operation on failure
async function retryOperation(operation, maxRetries = 3) {
for (let i = 0; i < maxRetries; i++) {
try {
return await operation();
} catch (error) {
console.error(`Attempt ${i + 1} failed:`, error.message);
if (i === maxRetries - 1) {
throw error;
}
// Wait before retrying
await new Promise(resolve => setTimeout(resolve, 2000 * (i + 1)));
}
}
}
```
## Kontaktiere uns
Falls du weiterhin **technische Schwierigkeiten** hast, steht dir unser **spezialisiertes Support-Team** zur Verfügung. [**Kontaktiere uns**](https://squarecloud.app/de/support) und wir helfen dir gerne, jedes Problem zu lösen.